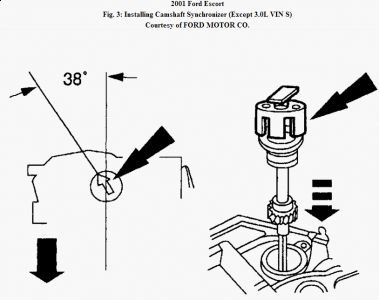
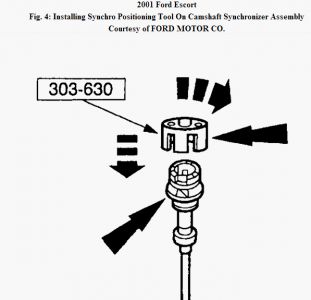
CAMSHAFT POSITION SENSOR Removal & Installation (2.0L SOHC VIN P) Disconnect negative battery cable. Release fuel pressure. See FUEL SYSTEM PRESSURE RELEASE under FUEL SYSTEM. Remove fuel injection supply manifold. See appropriate article in ENGINES. Disconnect wiring from CMP sensor. Remove sensor retaining bolt and remove sensor. Inspect CMP sensor "O" ring and replace if necessary. Tighten bolts to specification. See TORQUE SPECIFICATIONS . Removal & Installation (2.0L DOHC VIN 3) CMP sensor is located on rear of cylinder head above exhaust manifold. Disconnect negative battery cable. Remove air cleaner outlet tube and breather pipe. Disconnect wiring from CMP sensor. Remove sensor retaining bolt and remove sensor. To install, reverse removal procedure. Tighten bolts to specification. See TORQUE SPECIFICATIONS . Removal & Installation (2.5L) CMP sensor is located on front of left cylinder head. Disconnect negative battery cable. Disconnect CMP sensor harness connector. Remove CMP sensor retaining bolt and CMP sensor. See Fig. 1 . Ensure "O" ring is properly located and in good condition. To install, reverse removal procedure. Tighten bolts to specification. See TORQUE SPECIFICATIONS . Fig. 1: Removing Camshaft Position Sensor (2.5L, 3.0L VIN S & 4.6L) Courtesy of FORD MOTOR CO. Removal & Installation (3.0L DOHC VIN S) CMP sensor is located on left side of timing cover. Disconnect negative battery cable. Disconnect CMP sensor harness connector. Remove CMP sensor retaining bolt and CMP sensor. See Fig. 1 . Ensure "O" ring is properly located and in good condition. To install, reverse removal procedure. Tighten CMP sensor bolts to specification. See TORQUE SPECIFICATIONS . Removal & Installation (3.0L VIN U & 2) 1. CMP sensor is located on top of camshaft synchronizer assembly. Disconnect negative battery cable. Remove the accelerator cable shield. Disconnect accelerator cable, speed control actuator cable and throttle return spring from throttle body lever. Remove 2 bolts retaining accelerator cable bracket and position aside. Loosen the clamp and disconnect the hose. Detach the spark plug wire retainer. Detach the wiring harness from the intake manifold support. Release the fuel charging wiring harness from the valve cover studs. Position the wiring harness away from the camshaft position sensor. 2. Disconnect CMP sensor harness connector. Remove CMP sensor mounting bolts and CMP sensor. To install, reverse removal procedure. Tighten CMP sensor bolts to specification. See TORQUE SPECIFICATIONS . If camshaft synchronizer removal and installation is necessary,see CAMSHAFT SYNCHRONIZER . Removal & Installation (3.8L) 1. CMP sensor is located on top of camshaft synchronizer assembly. Disconnect negative battery cable. Disconnect CMP sensor harness connector. Remove CMP sensor mounting bolts and CMP sensor. 2. To install, reverse removal procedure. Tighten CMP sensor bolts to specification. See TORQUE SPECIFICATIONS . If camshaft synchronizer removal and installation is necessary, see CAMSHAFT SYNCHRONIZER . Removal & Installation (3.9L) CMP sensor is located on top rear of left cylinder head. Disconnect negative battery cable. Remove wiper motor. Remove harness bracket nut and stud from rear of left cylinder head and position aside. Disconnect CMP sensor harness connector. Remove CMP sensor mounting bolts. Remove CMP sensor. To install, reverse removal procedure. Tighten CMP sensor bolts to specification. See TORQUE SPECIFICATIONS . Removal & Installation (4.6L) CMP sensor is located on left side of timing cover. Disconnect negative battery cable. Remove bolts retaining power steering pump reservoir and position aside (if necessary). Disconnect CMP sensor harness connector. Remove CMP sensor retaining bolt and CMP sensor. See Fig. 1 . Ensure "O" ring is properly located and in good condition. To install, reverse removal procedure. Tighten CMP sensor bolts to specification. See TORQUE SPECIFICATIONS .
Mar 28, 2009 at 5:40 AM