3.0 or 4.0?
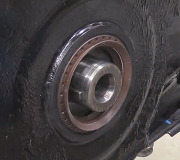
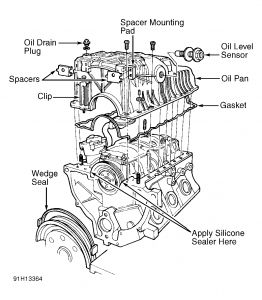
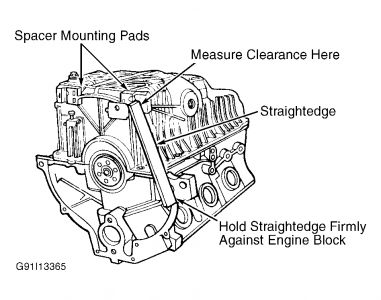
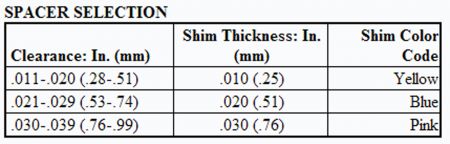
OIL PAN Removal 1. Disconnect negative battery cable. Raise and support vehicle. Remove starter. Remove transmission. For M/T models, see appropriate article in CLUTCHES. For A/T models, see TRANSMISSION REMOVAL & INSTALLATION article in TRANSMISSION SERVICING. 2. On 4WD models, remove front wheels. Remove pivot bolts/nuts from lower control arms, and allow control arms to hang free. Position jacks under control arms and then remove pivot bolts. Remove lower control arm rear pivot bracket from crossmember. Remove front drive axle assembly mounting bolts, and wire aside. See appropriate article in SUSPENSION. 3. On all models, drain engine oil and remove oil filter. Disconnect low oil level sensor connector from engine oil pan. Remove 2 engine-to-transmission bolts and spacers. Remove oil pan retaining bolts/nuts. On 4WD models, raise engine approximately one inch (25 mm). On all models, remove oil pan. Remove oil pan gasket and crankshaft rear main bearing cap and wedge seal. See Fig. 9 . Fig. 9: Exploded View Of Oil Pan Assembly Courtesy of FORD MOTOR CO. Installation 1. Clean gasket mating surfaces. Apply small amount of silicone sealer to engine block, where oil pan, rear seal and block mate. See Fig. 9 . 2. Install NEW crankshaft rear main bearing cap wedge seal. Wedge seal should fit snugly into sides of rear main bearing cap. See Fig. 9 . Position NEW oil pan gasket into groove in oil pan. If installi ng original oil pan, go to step 5). If installing NEW oil pan, go to next step. 3. If transmission is still in vehicle, position oil pan on engine without spacers. Install oil pan retaining nuts on 4 locating studs. Using a feeler gauge, measure gap between locating pads on oil pan and transmission bellhousing. 4. If transmission is removed from vehicle, position oil pan on engine without spacers. Install oil pan retaining nuts on 4 locating studs. Place a straightedge across mounting surface on back of engine, and measure difference between mounting surface on engine and mounting surface on oil pan. See Fig. 10 . Determine spacer thicknes s from measured clearance. See SPACER SELECTION table. Remove oil pan, and go to next step.
CAUTION: If installing original oil pan, existing oil pan spacers may be used. If installing NEW oil pan, measure oil pan-to- transmission clearance and install correct spacers to prevent oil pan damage and/or oil leaks. 5. Position oil pan spacers on oil pan locating pads. Install oil pan. Tighten retaining bolts/nuts tight enough to compress oil pan gasket so transmission bolts align with holes in oil pan, but loose enough to allow oil pan to move when transmission bolts are installed. 6. Install oil pan-to-transmission bolts and tighten to specification. Install and tighten all oil pan bolts to specification. See TORQUE SPECIFICATIONS . To complete installation, reverse removal procedure. Fill or top off fluids. Start engine and check for leaks.
This is 4.0 instructions!
Page 1 of 2 4.0L V6 - VIN [X] -1995 Ford Aerostar
Sunday, August 24th, 2008 AT 7:46 AM