1992 Ford Aerostar Losing Water

Tiny
GEEKSATLARGE
  • MEMBER
  • 1992 FORD AEROSTAR
  • 6 CYL
  • 2WD
  • AUTOMATIC
  • 166,000 MILES
I need help tracking down a problem where I'm losing water that's coming out of the top of the water overflow reservoir. When parked, I can see a trickle coming from where the hose goes down into the reservoir through the reservoir cap. However, the trickle becomes much greater when I drive. I'm losing about a half gallon within 10 minutes or so. This problem was much worse (pool of water under he engine and engine compartment wet all over), then I changed out the thermostat and radiator cap. Now, I don't get the pool of water, but I'm still losing a significant amount through the top of the water overflow reservoir cap. I don't see any pinched hoses either. Do you have any ideas on what could be the cause of water loss; obstruction, maybe?
Thursday, September 9th, 2010 AT 4:53 PM

11 Replies

Tiny
BMRFIXIT
  • MECHANIC
  • 19,053 POSTS
Pressure coolant system when engine cool is a must
Do a headgasket test headgasket failure was a very common on ford v6
part store sells a headgasket test kit that is very easy to use
good luck
Was this
answer
helpful?
Yes
No
+1
Thursday, September 9th, 2010 AT 6:14 PM
Tiny
GEEKSATLARGE
  • MEMBER
  • 11 POSTS
When you say "Pressure coolant system when engine cool", does that mean this is a separate procedure whereby I apply actual pressure to the cooling system; and how is that done?
Was this
answer
helpful?
Yes
No
Thursday, September 9th, 2010 AT 6:31 PM
Tiny
BMRFIXIT
  • MECHANIC
  • 19,053 POSTS
A cooling system pressure tester can be installed in place of the radiator cap
You can pump it up to about 14 psi and check for leaks


https://www.2carpros.com/forum/automotive_pictures/99387_PressureTester_1.jpg

Was this
answer
helpful?
Yes
No
Thursday, September 9th, 2010 AT 7:12 PM
Tiny
GEEKSATLARGE
  • MEMBER
  • 11 POSTS
Here's an update on my situation. I checked the inside of the oil cap and it is dry; looks normal. I also pressure tested the radiator at 14 psi and the pressure held nicely - there was a slight drop off over time, but nothing like you would expect from a leak. I also drained the overflow reservoir and am not getting a loss of water out of the top of its cap anymore. However, I'm still having to add about a half gallon of water after letting the car sit all day or overnight. I'm at wits end. Do you think it could be the radiator itself?
Was this
answer
helpful?
Yes
No
Tuesday, September 14th, 2010 AT 7:28 PM
Tiny
BMRFIXIT
  • MECHANIC
  • 19,053 POSTS
If pressure test held at 14 PSI for some time and viewable leaks
and after driving for few you needed to add coolant I have to assume its a headgasket
Was this
answer
helpful?
Yes
No
Tuesday, September 14th, 2010 AT 7:34 PM
Tiny
GEEKSATLARGE
  • MEMBER
  • 11 POSTS
Is replacing a head gasket something I can do; any special tools required? If it's not recommended I do it, what would be the approximate cost of having a shop do it? And, should I take it to someone who specializes in doing head gaskets?
Was this
answer
helpful?
Yes
No
Wednesday, September 15th, 2010 AT 11:33 AM
Tiny
BMRFIXIT
  • MECHANIC
  • 19,053 POSTS
What do you have for an engine size?
Was this
answer
helpful?
Yes
No
Wednesday, September 15th, 2010 AT 7:47 PM
Tiny
GEEKSATLARGE
  • MEMBER
  • 11 POSTS
My engine size is a 3.0 L 2WD 6 CYL. The head gasket check will take a few days to get it done. I'll keep you posted on that. But, I'd still like to get some info on whether or not this is something I can/should do myself; and the approximate cost in parts and labor.
Was this
answer
helpful?
Yes
No
+1
Thursday, September 16th, 2010 AT 12:07 PM
Tiny
BMRFIXIT
  • MECHANIC
  • 19,053 POSTS
CYLINDER HEAD
Removal
Remove upper and lower intake manifolds. See, in this article, INTAKE MANIFOLDS under REMOVAL & INSTALLATION. Remove accessory drive belts and idler. When removing left cylinder head, remove power steering pump bracket retaining bolts. Remove power steering pump and bracket as an assembly (with hoses attached).
On Aerostar, remove ignition coil bracket and coil. On all models, remove dipstick tube retaining nut from exhaust manifold. Rotate or remove dipstick tube. When removing right cylinder head, remove alternator bracket and adjusting arm.
Remove spark plugs. Remove exhaust manifolds. See, in this article, EXHAUST MANIFOLDS. Remove PCV valve and valve covers. See VALVE COVERS.
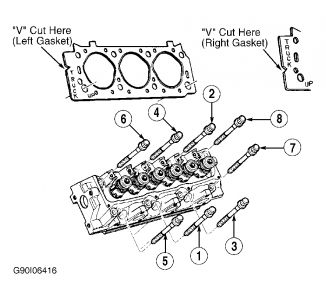
Loosen rocker arm bolts and move rocker arm off push rod. Keep push rods in order for installation reference, and remove push rods. Remove and discard cylinder head retaining bolts. Remove cylinder head and gasket.

INTAKE MANIFOLDS
NOTE:Upper and lower intake manifold service procedures are covered separately.

Removal (Upper)
Disconnect negative battery cable. Remove air cleaner duct hose. Remove throttle linkage shield and disconnect linkage. Mark and disconnect vacuum hoses from throttle body. Mark and disconnect electrical connectors.
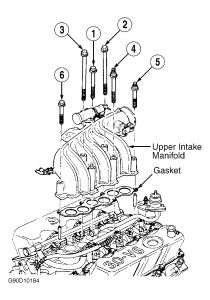
Disconnect PCV hose. Remove alternator support brace. Remove 6 upper intake manifold assembly bolts. Remove upper intake manifold assembly and gasket.

Removal (Lower)
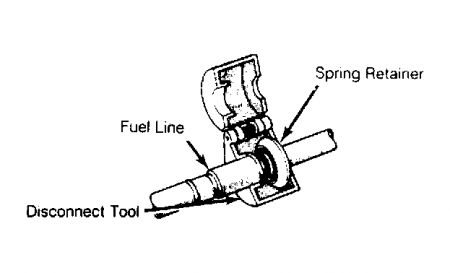
Disconnect negative battery cable. Drain cooling system. Remove air cleaner duct hose. Relieve fuel pressure. See, in this article, FUEL PRESSURE RELEASE under REMOVAL & INSTALLATION. Using Disconnect Tool (D87L-9280-A) for 3/8" line or (D87L-9280-B) for 1/2" line, disconnect fuel supply and return lines. See Fig.
Remove throttle linkage shield and disconnect linkage. Mark and disconnect vacuum hoses from throttle body. Mark and disconnect electrical connectors. Disconnect upper radiator hose from thermostat housing. Remove ignition coil from throttle body.
Remove throttle body. Remove alternator support brace. Disconnect fuel injector harness connectors. Disconnect heater hoses. Mark distributor housing location and note rotor position. Remove distributor. Remove valve covers. See VALVE COVERS.
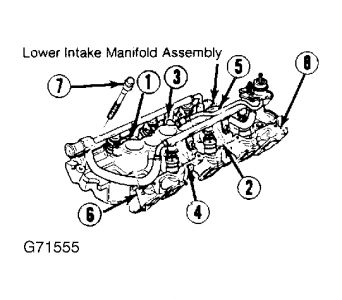
Loosen cylinder No. 3 intake valve rocker arm. Rotate rocker arm off push rod. Remove push rod. Remove intake manifold retaining bolts. Remove alternator if necessary. Remove intake manifold.

EXHAUST MANIFOLDS
Removal
Disconnect negative battery cable. Remove spark plugs. Remove oil dipstick tube retaining nut from left cylinder head, and rotate tube off of stud. Separate exhaust pipe from exhaust manifold. Remove exhaust manifold bolts. Remove exhaust manifold.

VALVE COVERS
NOTE:Valve covers have integral (built-in) gaskets which are made to last the life of the vehicle. If necessary, replacement gaskets are available.

Removal
Disconnect negative battery cable. On Aerostar, remove fresh air hose from air cleaner. On all models, mark and remove spark plug wires from spark plugs. Remove spark plug wire separators from valve cover studs. For left valve cover, remove upper intake manifold.
Remove PCV valve. Disconnect injector wiring harness bracket from left valve cover studs. For right valve cover on Aerostar, remove oil filler tube. On Ranger, disconnect engine wiring harness connectors from right valve cover.
On all models, disconnect injector wiring harness bracket from right valve cover studs. Disconnect breather hose. On all applications, remove valve cover retaining bolts and studs.
Carefully slide a thin knife between cylinder head and valve cover. Cut silicone sealer; DO NOT cut integral gasket. Remove valve cover(s).


https://www.2carpros.com/forum/automotive_pictures/99387_aer_1.jpg


https://www.2carpros.com/forum/automotive_pictures/99387_aerr_1.jpg


https://www.2carpros.com/forum/automotive_pictures/99387_aero_1.jpg


https://www.2carpros.com/forum/automotive_pictures/99387_are_1.jpg

Was this
answer
helpful?
Yes
No
+1
Thursday, September 16th, 2010 AT 4:49 PM
Tiny
RASMATAZ
  • MECHANIC
  • 75,992 POSTS
Estimates/Quotes:

NOTE: Total costs varies with locations labor could range from $70.00-$130.00 per hr


https://www.2carpros.com/forum/automotive_pictures/12900_aerostar_1.jpg

Was this
answer
helpful?
Yes
No
Thursday, September 16th, 2010 AT 5:22 PM
Tiny
CLASSY
  • MEMBER
  • 1 POST
I had the same problem with my 1992 ford Aerostar 3.0. It turned out to be the heater core. I no longer have a problem with overheating.
Was this
answer
helpful?
Yes
No
Sunday, July 28th, 2013 AT 8:37 PM

Please login or register to post a reply.

Sponsored links