Hi and thanks for using 2CarPros.
Honestly, either there is an over boost issue or the charge air pressure sensor is bad. I attached a diagnostic flow chart, but it will require specialized tooling. See picture 1.
Here are the diagnostic directions for the sensor. All remaining pics but the last one correlate with these directions.
CHARGE AIR PRESSURE SENSOR G31, CHECKING
Charge Air Pressure Sensor G31, Checking
Special tools, testers and auxiliary items required
- Multimeter V.A.G 1526 or equivalent.
- Test Box 105 Pin VAG1598/42.
- Adapter Lead Vag1598/39 VAG1598/39.
- Adapter cable V.A.G 1598/39-1.
NOTE: Use only gold-plated terminals when servicing terminals in harness connector of Charge Air Pressure Sensor G31.
Test requirements
- Fuses for the Engine Control Module (ECM) J623 OK.
- Battery voltage at least 12.5 volts.
- All electrical consumers such as, lights and rear window defroster, switched off.
- On vehicles with automatic transmission, selector lever in position "P" or "N".
- A/C switched off.
- Ground (GND) connections between engine/transmission/chassis OK.
- Ignition switched off.
Test sequence
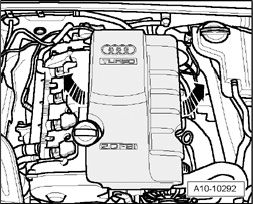
- Remove engine cover - arrows -.
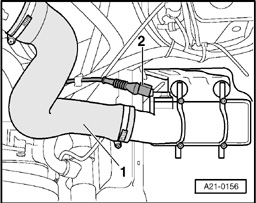
- Disconnect the electrical harness connector - 2 - from the Charge Air Pressure Sensor G31.
- Start engine and let it run at idle.
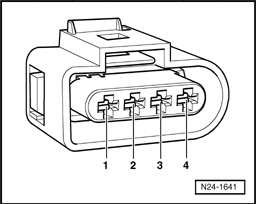
- Using the Multimeter V.A.G 1526 A or equivalent, check the Charge Air Pressure Sensor G31 electrical connector terminals 1+3 for voltage.
Specified value: min. 4.5 V
- Switch ignition off.
If the specification is not obtained:
- Connect the test box 1598/42 to the wiring harness of the Engine Control Module (ECM) J623.
- Using the Test Box 105 Pin VAG1598/42 and Multimeter V.A.G 1526 A or equivalent, check the following wiring connection for an open circuit.
Terminal Test box socket
1 53
3 19
4 38
Specified resistance 1.5 Ohms max.
If the specification is not obtained:
- Check the wiring for a short circuit to Battery positive (+) or an open circuit.
- If necessary, repair the wiring connection.
If no malfunctions are found in the wiring:
- Replace Charge Air Pressure Sensor G31.
Final procedures
After the repair work, the following work steps must be performed in the following sequence:
1. Check the DTC memory.
2. If necessary, erase the DTC memory.
3. If the DTC memory was erased, generate readiness code.
- End diagnosis and switch the ignition off.
_________________________________
Here are the directions for removal of the sensor. The last pic correlates with these directions.
REMOVAL AND REPLACEMENT
Charge Air Pressure Sensor G31, Removing And Installing
Removing
- Disconnect electrical harness connector - 2 - at Charge Air Pressure Sensor G31.
- Remove bolts and pull out Charge Air Pressure Sensor G31 from charge air cooler.
NOTE: Ignore - 1 -.
Installing
Installation is in reverse order of removal, note the following:
NOTE: Replace O-ring.
Torque specifications
Charge Air Pressure Sensor G31 to charge air cooler5 Nm
___________________________
Let me know if this helps. And honestly, if it is over boosting, it can cause engine damage. When you remove the sensor for cleaning, do the checks listed above to confirm it is good.
Take care,
Joe
Images (Click to enlarge)
Dec 10, 2018 at 5:26 PM