I just finished replacing my blower motor yesterday and I can say that even though it takes some time. You don't have to completely remove everything to change it out.
1. Apply parking break and turn the key to acc and put car into either neutral or the very last gear.
2. Remove dash face and undercover below steering wheel.
3. Loosen support holding steering wheel.
Remove trim cover panels from both front doors along floor line, sideway and beside windshield.
4. Loosen but don't remove the bolt on both sides under dash. They will be a 1/2 inch socket and have a groove they can slide in.
5. Remove the five screws along the windshield at top of dashboard.
6. Below radio behind the carpet are 2 bolts remove them.
7. Now for the fun parts. Open your hood and remove the bolt holding the transmission dipstick check tube. 9/16
8. Behind this and along the fire wall are 3 nuts to remove. 2 are behind the tube and one is near the distributor
9. On the passenger side remove glove box by opening it and then pulling the tension each side to release the box.
10. Pull dash forward until the 1/2 inch bolt is almost out of the grove and then tighten it to stay in place.
11. Remove the 7 small screws hold the face cover of the blower box.
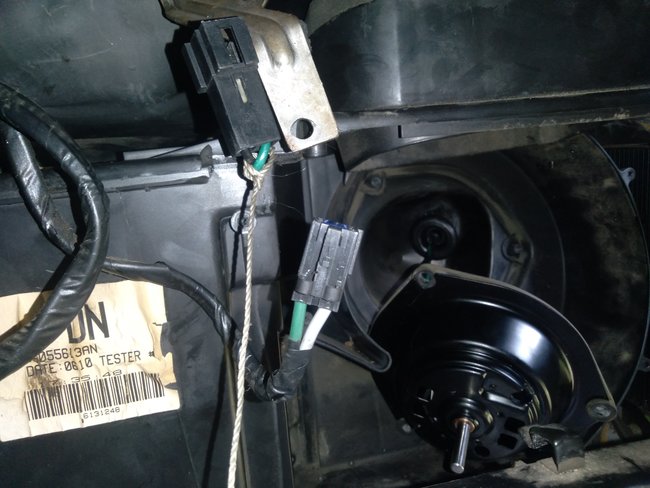
12. Remove airlines from flap door opener (don't know exact name).
13. With the cover out of the way you can pull the spring clip off the fan wheel( be careful with removing this because it's called a spring clip for a reason and mine sprang into oblivion so I had to replace it.) Remove fan wheel without using too much force so it doesn't break.
14. Remove the 3 screws holding the motor in place and disconnect the power.
15. This is the shortcut step that allows you to do all this without removing the dash and heater coil, A/C lines, have a professional drain your coolant and the replace it after you've finished replacing the motor.
Tie a string to the end of the pigtail you just disconnected. Pull the motor out and when you are finding it seems stuck. Pull the right side of the box the motor is mounted in towards you as you pull the pigtail out.
16. Tie the same string to the new pigtail and pull it back through.
17. Replace each nut, bolt and screw on the cover, reconnect air plugs to door opener, replace nuts on firewall, slide dash back into place and tighten 1/2 inch bolts, replace the 2 bolts below radio, replace dash cover and lift steering wheel back into place, replace the 5 screws along top of dashboard by windshield, replace side cover along door frame.
18. Put car back into park and release parking brake.
19. Test everything to see if it is working and enjoy.
Images (Click to enlarge)
Jun 6, 2021 at 7:16 AM