Alternator Removal & Replacement

Tiny
JSTARZ
  • MEMBER
  • 1997 DODGE CARAVAN
I have released the serpentine belt's tension, tensioner pulley, and disconnected the alternator and electrical connections. Removed the "accessible" alternator bracket bolts, however, the bracket it still to stiff to move.

I cannot remove the alternator from the under the hood. There is just not enough available clearance / room to extract it and complete this work.
Do you
have the same problem?
Yes
No
Sunday, April 11th, 2010 AT 3:22 AM

15 Replies

Tiny
MATHIASO
  • MECHANIC
  • 1,209 POSTS
Hello JStarz

I suppose this is a 3.0L Engine.

Remove the windshield wiper/motor module assembly

Rotate the accessory drive belt tensioner clockwise, and slip the belt off of the pulley .

then remove the bolt securing the top of the alternator to the bracket ...


https://www.2carpros.com/forum/automotive_pictures/46384_a1_1.jpg


as well as the bottom bolt securing the alternator to the lower pivot bracket


https://www.2carpros.com/forum/automotive_pictures/46384_a2_1.jpg


With both mounting bolts removed, lift and rotate the alternator to access the wiring harness


https://www.2carpros.com/forum/automotive_pictures/46384_3_3.jpg

Was this
answer
helpful?
Yes
No
Sunday, April 11th, 2010 AT 10:57 AM
Tiny
JSTARZ
  • MEMBER
  • 7 POSTS
* * * Response Message * * *

While I appreciate your response, the information provided is not for my 1997 Dodge Caravan. It has a 3.3 liter engine and a very different alternator bracket which is not reflected in your answer's pictures. Mine has a large black bracket approx 12" high x 6" wide that faces left towards the pulleys in addition to a top stablizing bracket that covers the alternator completely.

The wiper model referred to does not appear anywhere in the pictures. I have tried to remove the grille assemble under the wipers, however, there is a large tray or panel that still in blocking the removal of the alternator.

There is just no room to affect this repair without being able to loosen the belt tensioner assembly which is virtually impossible to access the mounting bolt / nut.

Would you please review this situation and advise accordinlgly.

Regards,

JStarz
Was this
answer
helpful?
Yes
No
Monday, April 12th, 2010 AT 11:31 AM
Tiny
MATHIASO
  • MECHANIC
  • 1,209 POSTS
Hello JStarz
3.3 and 3.8 represent 46% and 3.0 represent 56% and 2.4 the rest. I guessed 56% because of lack of more information and I chose the highest % trying to save time.

Thank you for giving more information.

3.3 L

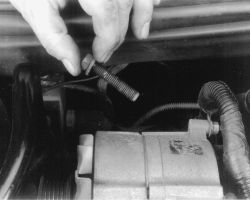
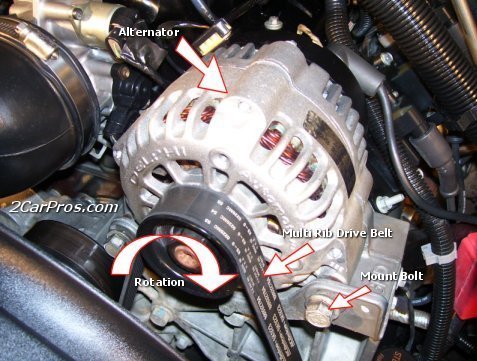
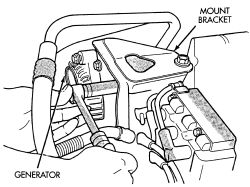
Remove the bolt securing the top of the alternator mounting bracket to the engine air intake plenum.


https://www.2carpros.com/forum/automotive_pictures/46384_new1_1.jpg


# Remove the bolts securing the outside of the alternator mounting bracket to the alternator mounting plate.

# Remove the bolt securing the top of the alternator to the mounting bracket.

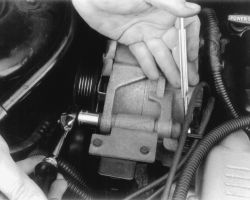
# Remove the alternator mounting bracket from the vehicle.

# Rotate the alternator toward the dash panel.

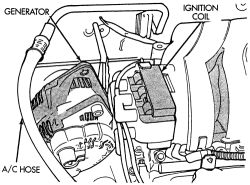
# Unplug the push-in field wire connector from behind the alternator.

# Remove the B+ nut and wire from behind the alternator.


https://www.2carpros.com/forum/automotive_pictures/46384_new2_2.jpg


https://www.2carpros.com/forum/automotive_pictures/46384_new3_1.jpg


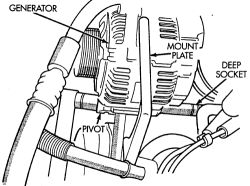
# Remove the bolt securing the bottom of the alternator to the lower pivot bracket.

# Remove the alternator from the vehicle.

To install:

13. Install the alternator into position on the vehicle's engine.

14. Install the bolt securing the bottom of the alternator to the lower pivot bracket.

15. Connect the B+ wire and tighten the retaining nut to 75 inch lbs. (9 Nm).

16. Plug in the push-in field wire connector onto the back of the alternator.

17. Rotate the alternator forward away from the dash panel.

18. Install the alternator mounting bracket in position on the vehicle.

19. Install the bolt to secure the top of the alternator to the mounting bracket.

20. Install the bolts to secure the outside of the alternator mounting bracket to the alternator mounting plate.

21. Install the bolt to secure the top of the alternator mounting bracket to the engine air intake plenum.

22. Tighten all of the alternator mounting bolts to 40 ft. lbs. (54 Nm).

23. Install the accessory drive belt. Be sure the drive belt is correctly routed on the engine and correctly seated on all of the pulleys.

24. Install the windshield wiper/motor module assembly.

25. Reconnect the negative battery cable.

26. Verify the charging rate of the alternator.
Was this
answer
helpful?
Yes
No
+1
Monday, April 12th, 2010 AT 12:01 PM
Tiny
JSTARZ
  • MEMBER
  • 7 POSTS
* * * My Clearance Problem Persists * * *

While the descriptions are right on, I am still not sure of how to create enought room - specifically, how to I remove that mounting bracket.

I have removed virtually all of the facing bolt, however, I cannot seems to see or get to the Tensioner Bracket that is holding the bracket firmly in place and I cannot move or remove it, which I believe I need to do to create enough working room to extract the alternator.

As of now, the clearance between the inside front fender and the engine is not enough to free it up.

I am open to suggestions.

Thanks again,

JStarz

Is HowStill
Was this
answer
helpful?
Yes
No
Monday, April 12th, 2010 AT 12:59 PM
Tiny
JSTARZ
  • MEMBER
  • 7 POSTS
* * * My Clearance Problem Persists * * *

While the descriptions are right on, I am still not sure of how to create enought room - specifically, how to I remove that mounting bracket.

I have removed virtually all of the facing bolt, however, I cannot seems to see or get to the Tensioner Bracket that is holding the bracket firmly in place and I cannot move or remove it, which I believe I need to do to create enough working room to extract the alternator.

As of now, the clearance between the inside front fender and the engine is not enough to free it up.

I am open to suggestions.

Thanks again,

JStarz
Was this
answer
helpful?
Yes
No
Tuesday, April 13th, 2010 AT 2:45 AM
Tiny
MATHIASO
  • MECHANIC
  • 1,209 POSTS
Hello JStarz

Sorry for the delay
Have you tried to turn the bracket in different position?
What is in your way to remove the mounting bracket?
Remove what ever is holding the bracket.
I did not omit any removal instruction or maybe you forget one step. Do you have anybody around to discuss the removal instruction? Because if you do not read the instruction carefully nobody will tell you the right way.
Let me know how you're doing.
Was this
answer
helpful?
Yes
No
Tuesday, April 13th, 2010 AT 5:58 AM
Tiny
JSTARZ
  • MEMBER
  • 7 POSTS
I just cannot remove or loosen the Alternator Bracket even though I the Alternator is completely disconnected from the car.


https://www.2carpros.com/forum/automotive_pictures/515411_1997_Dodge_Caravan_46384_new2_2x1_1.jpg

[img]

The Tensioner Support Bracket Appears To Be "Sandwiching" The Alternator Bracket. I Have Removed Virtually All The Bolts From The Bracket But It Will Not Move And Any Direction.

There Appears To Be A 15mm Nut Behind The Alternator Bracket Which Is Impossible To Access. I can feel it, but not see it..
Was this
answer
helpful?
Yes
No
-1
Tuesday, April 13th, 2010 AT 12:54 PM
Tiny
MATHIASO
  • MECHANIC
  • 1,209 POSTS
Hello,

It is written there"deep socket"?
You need deep socket to get to it.
It is also written"pivot"
you need to pivot what is in your way to get the deep socket inn there.
Am I right or wrong?
Was this
answer
helpful?
Yes
No
Wednesday, April 14th, 2010 AT 5:53 AM
Tiny
JSTARZ
  • MEMBER
  • 7 POSTS
Hi,

In reviewing your response, Yes, It does say Deep Socket", however, I believe in the illustration it is referring to the Alternator's Bottom Bolt.

The illustration, that I updated, highlighting in Red the - Serpentine Belt Tensioner Assembly - which is, I believe holding the Alternator Bracket against the motor making it impossible to move. That is the problem I am experiencing. There is virtually no access to the rear area of this assembly that I can just barely touch and feel a 15mm nut holding it on. I cannot see it from under the car and can just feel of it from the top. There is no way to apply a Deep Socket to it. If any thing, a shallow swivel flexible socket would be needed to affect it removal. That's why I am seeking assistance, technique and advise from someone who has done this repair before and knows just what I am up against.

Additionally, I have removed the Tensioner-Pulley to provide more room. But the clearance between the engine and the inside fender well is just not large enough to extract the alternator. There is just no vertical clearance to remove it from the top. The windshield wiper panel is blocking that area along with the AC lines running over the alternator.

I need to resolve this issue as soon as possible and cannot proceed as it stands now.

I would like this issue be referred-on if possible.

Regards,

JStarz
Was this
answer
helpful?
Yes
No
Wednesday, April 14th, 2010 AT 3:54 PM
Tiny
RASMATAZ
  • MECHANIC
  • 75,992 POSTS
On the 3.3 and 3.8 Mit1 . Com says you have to remove the windshield wiper housing, accessory belt, and generator mount bracket
Was this
answer
helpful?
Yes
No
-1
Thursday, April 15th, 2010 AT 1:21 AM
Tiny
MATHIASO
  • MECHANIC
  • 1,209 POSTS
There is a pivot bolt and it has spacer. It must be removed. Do not drop spacer when removing it.
Try a swivel flexible socket to get behind.
Was this
answer
helpful?
Yes
No
-1
Thursday, April 15th, 2010 AT 6:14 AM
Tiny
JALOPYPAPA
  • MEMBER
  • 467 POSTS
I did mine not too long ago. Twice, in fact, after the alternator tested good then conked out again after I put it back. The second time was pretty easy. I'll look later tonight to refresh my memory. As I recall, I removed the tensioner but later found I didn't have to, that the bracket goes around it but not under it, as it appears. The tensioner has a 15mm bolt through the center of it that, best I remember, unbolts from the back of the lower, cast aluminum portion of the bracket. The trickiest part was getting the 8mm nuts off for the power steering reservoir and line and, after getting I think three 15mm bolts out of the front of the bracket, finding I had to jimmy it back and forth and pull pretty vigorously to slide it out from between the lower bracket and the front cover. It was kinda wedged in there. B**ch, ain't it? I had to work both underneath the car and sitting up in the engine compartment.
Was this
answer
helpful?
Yes
No
Thursday, April 15th, 2010 AT 11:30 AM
Tiny
REBEL SPIRIT
  • MEMBER
  • 2 POSTS
I just did this the other day with my 2000 dodge grand caravan 3.3l. You have to remove the belt tensioner. That is what is holding the bottom of the alternator bracket in place. In order to get to the belt tensioner nut on the back, you have to move alternator out of the way as much as you can. Some say you can get to the nut from underneath. I did it from the top, and was not easy. I used a 15mm wrench.
Was this
answer
helpful?
Yes
No
Wednesday, January 9th, 2019 AT 7:23 PM
Tiny
REBEL SPIRIT
  • MEMBER
  • 2 POSTS
Thank you Ken. I also would like to add, that if after changing your alternator, because of having to disconnect your battery, that if you find your vehicle keeps cutting off upon start up, you have to reset you IAC valve, which all you have to do is. Start your vehicle with gas pedal slightly pressed, let it idle with foot still on gas for 5 seconds, then turn car off for 10 seconds, then start the car normally.
Was this
answer
helpful?
Yes
No
Saturday, January 12th, 2019 AT 12:27 PM
Tiny
KEN L
  • MASTER CERTIFIED MECHANIC
  • 42,468 POSTS
Excellent addition to this thread! :)
Was this
answer
helpful?
Yes
No
Sunday, January 13th, 2019 AT 10:37 AM

Please login or register to post a reply.

Sponsored links