Driver's side heater and defrost not blowing air

Tiny
FRANZISKA
  • MEMBER
  • 2009 DODGE CARAVAN
  • 3.3L
  • 6 CYL
  • 2WD
  • AUTOMATIC
  • 230,000 MILES
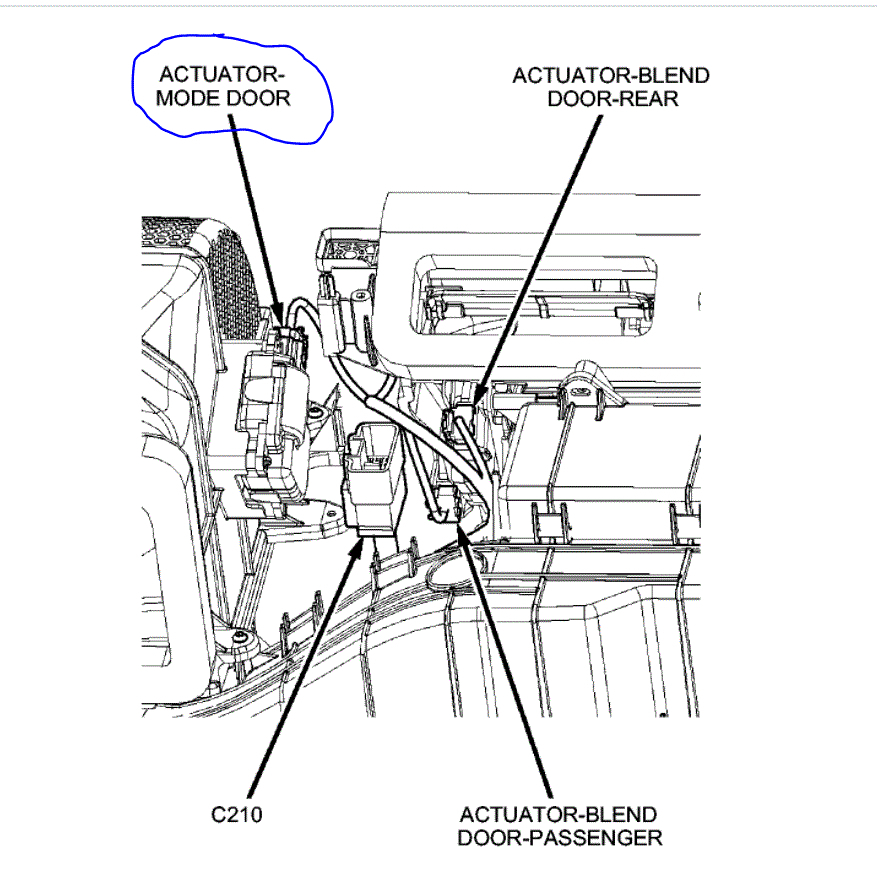
There is just a tiny little bit of warm air coming out in the driver's side in the area for feet while there's super much hot air coming through at the passenger's side. The three smaller defrost heaters directly at the windshield don't work at all, there's no air coming through. The two larger heaters just a little further away from the wind shield work perfectly fine. As it is very cold right now, my windshield would freeze while driving. I tried to find hoses that have leaks but I couldn't. Is this a well known problem with the van listed above is the SE model and can I fix it by myself? What parts would I need and how expensive is it going to be? Unfortunately, I had to replace lots of things already and I just have the car for three months. Would be so grateful for your help! Thank you very much!
Monday, November 23rd, 2020 AT 4:08 PM

5 Replies

Tiny
JACOBANDNICKOLAS
  • MECHANIC
  • 108,179 POSTS
Hi,

Whenever there is an airflow direction issue, it is usually related to a mode door actuator. That actuator moves a door in the HVAC system that changes the directions the air moves.

Now, I attached a pic below showing the actuator I am referring to, but I need to know two things before I suggest replacing it. First, does this vehicle have automatic or manual climate control? Next, when you change the airflow directions, for example, defroster to the floor, does it work?

Let me know.

Joe
Was this
answer
helpful?
Yes
No
Monday, November 23rd, 2020 AT 6:26 PM
Tiny
FRANZISKA
  • MEMBER
  • 3 POSTS
Hi Joe,

Thanks for answering so quickly.
When I choose defroster, 2 out of the 5 air slots provide warm air. When I change to floor, the passenger side works very well, just the driver's site not really. There's just a hint of air coming through.

I've got a manual climate control.

Franzi
Was this
answer
helpful?
Yes
No
Monday, November 23rd, 2020 AT 7:59 PM
Tiny
JACOBANDNICKOLAS
  • MECHANIC
  • 108,179 POSTS
Hi,

At this point, it sounds like it is related to the mode door or the mode door actuator. What I would suggest is to remove the mode door actuator and inspect it. There is a plastic gear on it that can fail. It may not be fully moving the door.

Here are the directions for removal. The attached pic correlates with the directions. Install will be the opposite.

______________________
2009 Dodge or Ram Truck Grand Caravan V6-3.3L Flex Fuel
Front
Vehicle Heating and Air Conditioning Air Door Actuator / Motor Service and Repair Removal and Replacement Mode Door Actuator - Removal Front
FRONT
REMOVAL

WARNING: Disable the airbag system before attempting any steering wheel, steering column, or instrument panel component diagnosis or service. Disconnect and isolate the negative battery (ground) cable, then wait two minutes for the airbag system capacitor to discharge before performing further diagnosis or service. This is the only sure way to disable the airbag system. Failure to take the proper precautions may result in accidental airbag deployment and possible serious or fatal injury. See: Air Bag(s) Arming and Disarming > Service and Repair

pic 1

NOTE: LHD model shown. RHD model similar.

1. Disconnect and isolate the negative battery cable. See: Battery > Service and Repair
2. If equipped, remove the silencer from underneath the passenger side of the instrument panel. See: Dashboard / Instrument Panel > Service and Repair
3. Remove the lower glove box bin from the instrument panel. See: Glove Compartment > Service and Repair
4. Remove the lower trim panel (3) from the passenger side of the instrument panel to gain access to the mode door actuator (1).
5. Remove the two screws (3) that secure the mode door actuator to the bracket (2) located on the passenger side of the HVAC air distribution housing and remove the actuator from the bracket.
6. Disengage the red locking tab and disconnect the wire harness connector (4) from the mode door actuator and remove the actuator from the vehicle.

________________

Let me know what you find.

Joe
Was this
answer
helpful?
Yes
No
Monday, November 23rd, 2020 AT 9:17 PM
Tiny
FRANZISKA
  • MEMBER
  • 3 POSTS
Hi Joe,

Do I have to remove the large grey plastic cover of the lower glove box first? I can't really access the actuator properly or see the screws that are shown on the picture. But if I wanted to remove the lower glove box, I think I would first need to remove the upper glove box. How is it?
Thanks!
Was this
answer
helpful?
Yes
No
Tuesday, November 24th, 2020 AT 7:47 AM
Tiny
JACOBANDNICKOLAS
  • MECHANIC
  • 108,179 POSTS
Hi,

Here are the directions for the removal of both upper and lower glove boxes:

________________________

2009 Dodge or Ram Truck Grand Caravan V6-3.3L Flex Fuel
Instrument Panel Glove Box - Removal
Vehicle Body and Frame Interior Moulding / Trim Glove Compartment Service and Repair Removal and Replacement Instrument Panel Glove Box - Removal
INSTRUMENT PANEL GLOVE BOX - REMOVAL
REMOVAL

UPPER GLOVE BOX

1. Remove the instrument panel center bezel. See: Dashboard / Instrument Panel > Removal and Replacement > Center Bezel.
2. Remove the instrument panel end cap.
3. Remove fasteners from the upper glove box.
4. Carefully pry out the upper glove box disengaging the spring clips.

LOWER GLOVE BOX

1. Open the lower glove box door.
2. While pressing on both sides of the door pull the door down until stops are disengaged from the lower IP panel.
3. Carefully disengage the bottom hinges and remove the door.

________________________

Here are the directions for the bezel removal.

2009 Dodge or Ram Truck Grand Caravan V6-3.3L Flex Fuel
Center Bezel
Vehicle Body and Frame Interior Moulding / Trim Dashboard / Instrument Panel Service and Repair Removal and Replacement Instrument Panel Bezel - Removal Center Bezel
CENTER BEZEL
REMOVAL

1. Remove the instrument panel hood. See: Dashboard / Instrument Panel > Removal and Replacement > Instrument Panel Cover - Removal.
2. Remove the storage bin. See: Dashboard / Instrument Panel > Removal and Replacement > Instrument Panel Bin - Removal.
3. Remove the top two and lower two fasteners from the center bezel.
4. Disconnect the electrical connectors.
5. Remove the center bezel from the vehicle.

____________________________________-

Let me know if this helps or if you have other questions.

Take care,
Joe
Was this
answer
helpful?
Yes
No
Tuesday, November 24th, 2020 AT 7:03 PM

Please login or register to post a reply.

Sponsored links