1999 Chrysler Sebring Vent control does not work

Tiny
RBAURHYTE
  • MEMBER
  • 1999 CHRYSLER SEBRING
  • 6 CYL
  • 2WD
  • AUTOMATIC
  • 80,000 MILES
Regardless of the position of the the vent control selector all air exhausts onto the front window and floor
Friday, August 13th, 2010 AT 7:38 AM

7 Replies

Tiny
KHLOW2008
  • MECHANIC
  • 41,815 POSTS
Hi rbaurhyte,

Thank you for the donation.

There is a vacumn from the engine side that goes to the A/C control panel for controlling the modes. Check if the vacumn hose is leaking, broken or disconnected.
Was this
answer
helpful?
Yes
No
-1
Friday, August 13th, 2010 AT 3:25 PM
Tiny
RBAURHYTE
  • MEMBER
  • 4 POSTS
Obviously. Any idea where in the engine compartment and how to get at the control panel?
Was this
answer
helpful?
Yes
No
+1
Saturday, August 14th, 2010 AT 9:25 AM
Tiny
KHLOW2008
  • MECHANIC
  • 41,815 POSTS
VACUUM CONTROL SYSTEM DIAGNOSIS
VACUUM CONTROL ONE-WAY CHECK VALVE
1.In engine compartment, locate Black vacuum hose that runs from brake booster check valve or intake manifold, through firewall near heater hoses or expansion valve. This supply vacuum hose goes to A/C-heater control panel vacuum switch.

2.Within Black vacuum hose, disconnect and remove check valve near intake manifold or brake booster. Connect vacuum gauge to an external vacuum pump. Start vacuum pump. Plug end of hose probe on vacuum gauge. Adjust bleed valve on vacuum gauge to obtain an exact vacuum reading of 8 in. Hg.

3.Unplug and plug end of hose probe on vacuum gauge several times to ensure exact vacuum reading. Connect vacuum gauge hose probe to control panel side of check valve. Vacuum gauge reading should be 8 in. Hg. Replace check valve if vacuum leak exists.

4.Connect vacuum gauge hose probe to engine side of check valve. Vacuum should flow through check valve. Replace check valve if operation is not as described.

VACUUM CONTROLS
1.This test checks for proper function of control panel vacuum circuits. Perform steps 1) through 4) under VACUUM CONTROL ONE-WAY CHECK VALVE.

2.Connect vacuum gauge hose probe to Black vacuum hose end that leads to A/C-heater control panel switch. Position vacuum gauge so gauge reading can be observed from inside vehicle.

3.Operate A/C-heater controls (sliding lever or push buttons) in all mode positions (floor, defrost, panel, etc.). Pause after each selection to allow vacuum actuators or motors to energize and stabilize. Record vacuum gauge reading at each selection.

4.After each selection, vacuum reading should be 7.5-8 in. Hg. Maximum vacuum reading drop is .75 in. Hg. If proper vacuum reading cannot be obtained, vacuum leak exists in selected circuit.

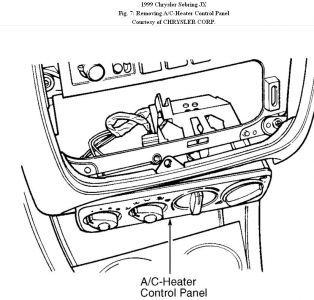
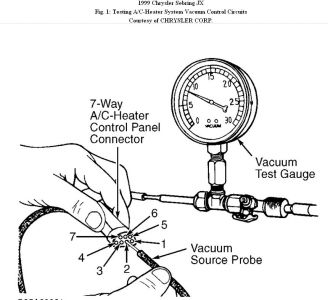
5.To check for vacuum leak(s), disconnect 7-way A/C-heater control panel vacuum harness connector. See Fig. 1 . If necessary, remove control panel from instrument panel to access A/C-heater control panel vacuum harness connector, or remove lower instrument panel assembly.

6.Connect vacuum source probe to each port of connector. See Fig. 1 . Record each vacuum gauge reading. Vacuum reading should be 8 in. Hg at each port.

7.If correct vacuum readings are obtained, replace faulty A/C-heater control panel vacuum switch assembly. If proper vacuum readings are not obtained, check appropriate vacuum circuit.

8.Start vacuum check by plugging vacuum hose at vacuum actuator in suspect circuit. Recheck vacuum circuit by connecting vacuum source probe to proper port.

9.If proper vacuum reading is now obtained, replace vacuum actuator. If proper reading is not obtained, check vacuum hoses and connections for leak. Repair or replace as required.

NOTE:
Some models use brake booster check valve for vacuum source. These models do not use another in-line vacuum check valve.
NOTE:
Brown (bi-level) vacuum circuit contains a restriction in line. It takes longer to obtain correct vacuum reading on this line.


https://www.2carpros.com/forum/automotive_pictures/192750_HVACVacumn99SebringFig01_1.jpg

Was this
answer
helpful?
Yes
No
Saturday, August 14th, 2010 AT 10:05 AM
Tiny
RBAURHYTE
  • MEMBER
  • 4 POSTS
Thanks. Just one last question. Is it possible to remove the control panel from the front after removing the trim plate which surrounds the radio and the control panel. Looks like it was installed from behind the dash. Bob
Was this
answer
helpful?
Yes
No
+1
Saturday, August 14th, 2010 AT 10:15 AM
Tiny
KHLOW2008
  • MECHANIC
  • 41,815 POSTS
Hi Bob,

Here are the removal procedures.

A/C-HEATER CONTROL PANEL
Removal & Installation
1.Ensure ignition switch is in OFF position. Remove screws from trim panel around radio and A/C-heater control panel.

2.Carefully pry up on trim panel to reveal cigarette lighter bezel screws. Remove cigarette lighter bezel and wiring. Remove A/C-heater control panel screws.

3.Lower A/C-heater control panel into cigarette lighter opening. See Fig. 7 . Disconnect A/C-heater control panel wiring harness and control cables. To install, reverse removal procedure.

Ensure control cables are properly adjusted. Attach cable(s) to A/C-heater control panel lever arm. Turn knob fully counterclockwise. Pull cable jacket away from cable end until taut. Clip cable jacket onto A/C-heater control panel. Knob should travel a full 180 degrees if cable is properly adjusted.


https://www.2carpros.com/forum/automotive_pictures/192750_HeaterControlPanel99SebringFig07_1.jpg


Was this
answer
helpful?
Yes
No
Saturday, August 14th, 2010 AT 3:55 PM
Tiny
RBAURHYTE
  • MEMBER
  • 4 POSTS
I looked into this last weekend and after removing the control knob assemble found that it is not vacuum controlled, but is electric.

I found 12 volts on one pin and about 2 volts on another. I jumped the 12 volts to the other wired pins, but got no response.
Is there a test procedure from this connector or any info on how to get to the actuators?
Was this
answer
helpful?
Yes
No
Wednesday, August 25th, 2010 AT 2:17 PM
Tiny
KHLOW2008
  • MECHANIC
  • 41,815 POSTS
You should not attempt to jump terminals as it can damage the internal circuits.

For the system, a scan tool with body computer diagnostic capabilities would be required to retrieve trouble codes.

If the mode switch works without any changes in the vent direction, it could be a fault with the mode door actuator motor.
L
Was this
answer
helpful?
Yes
No
Thursday, August 26th, 2010 AT 7:17 AM

Please login or register to post a reply.

Sponsored links