Page 1 of 1
NOTE: Before replacing major components, be sure connector pins or cavities are not damaged, preventing proper voltage and resistance readings.
1.Disconnect any spark plug wire. Insert an insulated screwdriver or a spark tester into spark plug terminal. If using screwdriver, hold screwdriver shaft about 1/4" from a good ground. Have an assistant crank engine.
CAUTION:Fault/Trouble Codes may erase and SMEC damage may occur if spark plug wire is held more than 1/4" from ground while cranking.
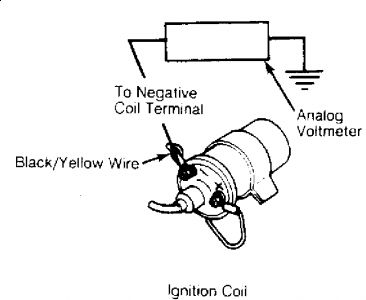
2.If there is good spark between screwdriver and ground as long as engine is cranking, go to NS2 . Treat 1-2 sparks as no spark. If there is no spark, go to step 3). If there is good spark, but engine is hard to start or starts and stalls, go to NS9 . 3.Disconnect coil wire from distributor cap. Hold wire 1/4" away from ground. Crank engine. If there is good spark from coil wire, repair secondary ignition system. Check or replace distributor cap, rotor and spark plug wires. Treat 1-2 sparks as no spark. 4.If there is no spark from coil wire, connect voltmeter between Dark Green/Black wire at positive terminal of coil and ground. Crank engine for at least 7 seconds. If voltmeter reading is within one volt of battery voltage as long as engine is cranking, go to NS6 . If voltmeter reads zero volts or cranking voltage for about one second, go to NS12 .
Fig. 4: Ignition System Check
NS6 - IGNITION CONTROL SYSTEM FAULT CODE CHECK
Connect DRB II to engine harness connector. Put system in Diagnostic Test Mode. Record all codes. If 88-12-55 is displayed (no fault codes), go to NS7 below. If 88-12-43-55 is displayed (spark control circuit), go to NS8 .
NS7 - IGNITION CONTROL CIRCUIT CHECK
1.Connect DRB II to engine harness connector. Connect analog voltmeter to ignition coil negative terminal and ground. Put system in ATM Test "01". If voltmeter reading is pulsating between 10-14 volts, replace ignition coil.
Fig. 7: Ignition Control Circuit Check (Turbo) "A"
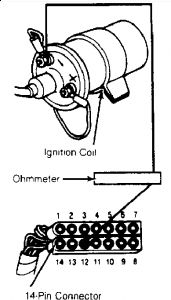
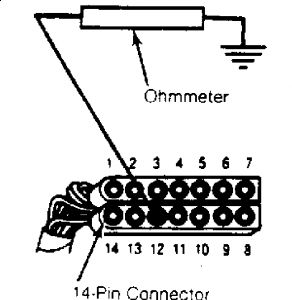
2.If voltmeter reading is not pulsating, but reads battery voltage, go to step 3). If voltmeter reading is pulsating between 5-10 volts, replace ignition coil. If voltmeter reading is pulsating between 0-2 volts, go to step 4). 3.Turn ignition off. Disconnect 14-pin connector from SMEC. Connect ohmmeter to ignition coil negative terminal and 14-pin connector cavity No. 12. If there is not continuity, repair Black/Yellow wire in cavity No. 12 for an open circuit. If there is continuity, replace SMEC for a defective power board. Before replacing SMEC, ensure terminal in connector cavity No. 12 is not damaged causing a poor connection.
Fig. 8: Ignition Control Circuit Check (Turbo) "B"
4.With DRB II connected to engine harness connector, turn ignition off. Disconnect wire from negative side of ignition coil. Connect voltmeter to ignition coil negative terminal and ground. Put system in ATM Test "01". If voltmeter reading is between 0-2 volts, replace ignition coil. 5.If voltmeter reading is greater than 10 volts, turn ignition off. Disconnect 14-pin connector from SMEC. Connect ohmmeter to 14-pin connector cavity No. 12 and ground. If there is not continuity, replace SMEC for a defective power board. If there is continuity, repair Black/Yellow wire to cavity No. 12 for a short circuit to ground.
Fig. 9: Ignition Control Circuit Check (Turbo) "C"
NS8 ,CODE 43 - IGNITION CONTROL CIRCUIT CHECK
1.Connect DRB II to engine harness connector. Put system in Diagnostic Test Mode. Turn ignition off. Disconnect coil wire from distributor cap and hold wire 1/4" away from good ground. Disconnect 60-pin connector from SMEC. Connect one end of a jumper wire to cavity No. 34 of 60-pin connector. Turn ignition on.
Fig. 10: Ignition Control Circuit Check (All Engines) "A"
2.Press and hold ATM key on DRB II. Touch other end of jumper wire to good ground. Make and break this connection several times. If there is spark as you make and break this connection, replace SMEC for a defective logic board. Before replacing SMEC, ensure
6/9/2009
Page 2 of 2
terminal in cavity No. 34 is not damaged causing a poor connection. 3.If there is no spark as you make and break the connection, turn ignition off. Remove jumper wire from 60-pin connector. Disconnect 14-pin connector from SMEC. Connect ohmmeter leads to 60 pin connector cavity No. 34 and 14-pin connector cavity No. 13.
Fig. 11: Ignition Control Circuit Check (All Engines) "B"
4.If there is continuity, replace SMEC for a defective power board. Before replacing SMEC, ensure terminal in cavity No. 13 is not damaged causing a poor connection. If there is no continuity, repair Yellow wire to cavity No. 13 for an open circuit.
SMEC is at left front corner of the engine bay.
Is your check engine light on? If yes turn the key from off to on three times, on the fourth one leave it in the on position, count the flasshes...22 would flash as 2 blinks, then a short puase, then 2 more blinks...if several codes are stored, the pause is longer between codes, code 55 will be the last code...do this and post all codes found...
Tuesday, June 9th, 2009 AT 4:32 PM