2002 Chevy Venture Coolant leak.

Tiny
REBELWOLF
  • MEMBER
  • 2002 CHEVROLET VENTURE
Engine Cooling problem
2002 Chevy Venture 6 cyl Front Wheel Drive Automatic

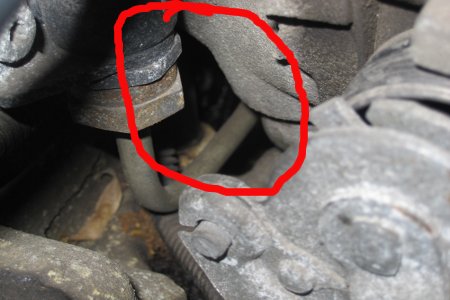
I have a coolant leak and after feeling around and a couple heat warnings on the arm and hand from the exhaust while feeling and checking hoses, I think I have spotted the location of the leak.

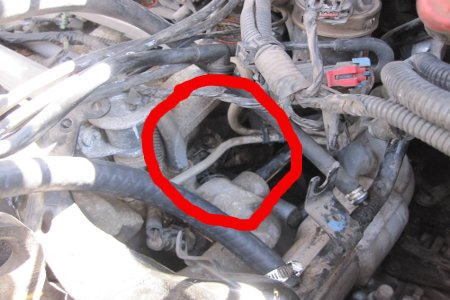
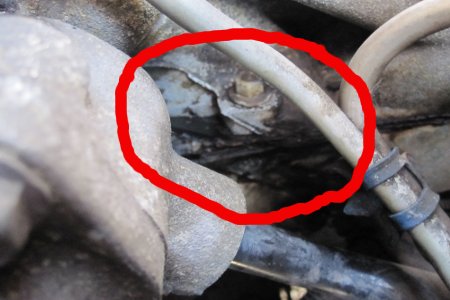
Looking in from the front of the van, looking under the throttle body, under the aluminum thing on the top of the engine (upper plenum?) I can see the head of a bolt and it looks like the coolant is coming from that area. (hard to tell in that small space there is to look in)

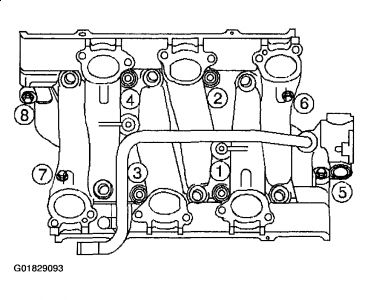
If that is where the leak is what is there that would be leaking?

red arrow pointing the direction I am looking to see water bubbling.


http://www.2carpros.com/forum/automotive_pictures/510644_image001_1.jpg

Thursday, April 1st, 2010 AT 8:42 PM

8 Replies

Tiny
OBXAUTOMEDIC
  • MECHANIC
  • 3,711 POSTS
Hello,

It could be the Thermostat Housing Gasket. Does it look like it somewhere at the end of the Radiator Hose that connects to the Housing?

Can you get a close up pic in that area?

.
Was this
answer
helpful?
Yes
No
+1
Thursday, April 1st, 2010 AT 8:57 PM
Tiny
REBELWOLF
  • MEMBER
  • 4 POSTS
It was a challenge...lol but here is the best I could get(dark out). Looking right in there. There is a bolt head, cant really see it in the picture. The bolt head is below and back a wee bit of the throttle body (towards firewall)


https://www.2carpros.com/forum/automotive_pictures/510644_closeup_1.jpg


Thanks a ton for any help.
Was this
answer
helpful?
Yes
No
Thursday, April 1st, 2010 AT 9:49 PM
Tiny
OBXAUTOMEDIC
  • MECHANIC
  • 3,711 POSTS
Ok, from what I can see and of course it's not much there are 2 possibilities.

One is the Intake Gasket - I say this cause you said about the bubbling at the bolt head.

The other could be just a leaking Throttle Body cooling hose that is dripping in that area.

My wife drives an 03, so if I get a chance tomorrow I will look at hers and see if I can come up with any other possibilities, and post them.

.
Was this
answer
helpful?
Yes
No
+2
Friday, April 2nd, 2010 AT 4:18 PM
Tiny
REBELWOLF
  • MEMBER
  • 4 POSTS
Thanks for taking the time to help me out!
I think we are going to be pulling the top off tomorrow morning (aluminum part on top) to get a better look in there. If we do I will be able to get a better pic at that time.
Was this
answer
helpful?
Yes
No
+1
Friday, April 2nd, 2010 AT 11:45 PM
Tiny
OBXAUTOMEDIC
  • MECHANIC
  • 3,711 POSTS
Well was a little busy today and didn't get a chance to look at my wifes van before she went to work. So should be able to take a look at it tomorrow, we are both off for my baby girls 2nd b-day.

.
Was this
answer
helpful?
Yes
No
+1
Saturday, April 3rd, 2010 AT 7:41 PM
Tiny
REBELWOLF
  • MEMBER
  • 4 POSTS
Ok we removed the throttle body and the aluminum part that was attached to get a better look.

The first image is not as close as the second to give an idea of what you are looking at in the close picture. In the close up, just a bit to the right of the bolt is where we found the leak to be. We sealed all the lines and hooked a bicycle pump to the line and pumped some air in and that is where water/coolant came out.

Is this a big job to fix? Is it costly? Would there be a chance that stop leak stuff might seal it?


https://www.2carpros.com/forum/automotive_pictures/510644_leak001_1.jpg


https://www.2carpros.com/forum/automotive_pictures/510644_leak002_1.jpg


Thanks for the help, and I will be recommending this site to others.
Was this
answer
helpful?
Yes
No
+2
Sunday, April 4th, 2010 AT 12:55 PM
Tiny
OBXAUTOMEDIC
  • MECHANIC
  • 3,711 POSTS
Ok, it can be a big job depending on how mechanically inclined you are. Cause it looks like it is the Intake Gasket.

I did look at my wifes van and that bolt is the only thing I could see that would be leaking.

Anyway, yes you can try some stop leak and see what happens. But that is usually just a temp fix, especially with the Intake Gasket. And since you have it apart somewhat already I would continue on.

If you do go on with the repair here are a few suggestions.

Take plenty of pics of each step of disassembly

Label all vacuum lines

Get a piece of cardbaord draw a diagram of the bolt pattern and cut out the holes and as you remove each bolt place it in corresponding holes.

As soon as I can find the Torq specs and tightening sequence I will post them.

.
Was this
answer
helpful?
Yes
No
Sunday, April 4th, 2010 AT 8:18 PM
Tiny
OBXAUTOMEDIC
  • MECHANIC
  • 3,711 POSTS
Sorry took so long I'm sure if you were going to attempt the repair it is probably already done.

But, if not here are the Torq Specs

Lower Intake

1st - Verticle Bolts = 62 inch pounds
1st - Diagnal Bolts = 62 inch pounds

2nd - Verticle Bolts = 115 inch pounds
2nd - Diagnal Bolts = 18 Foot Pound

Upper Intake

18 foot pounds

Here is the tightening sequence for the lower intake...


https://www.2carpros.com/forum/automotive_pictures/188069_02venture_lowerintakeseq_1.jpg


And I guess it doesn't matter with the upper cause I cannot find the tightening sequence. However, I would start with the center bolts and work out in an X type pattern...

5__________________1__________________3

4__________________2__________________6

.
Was this
answer
helpful?
Yes
No
Wednesday, April 7th, 2010 AT 9:12 PM

Please login or register to post a reply.

Sponsored links