2004 Chevy Impala coolant leaks inside

Tiny
HIDME
  • MEMBER
  • 2004 CHEVROLET IMPALA
Interior problem
2004 Chevy Impala 6 cyl Two Wheel Drive Automatic

I just got this 2004 impala police car. I found coolant inside on floor. I can tell it flow from the center of underneath control console.
Can any one give me idea how to fix it?
Thanks
Hanping
Tuesday, November 3rd, 2009 AT 1:54 PM

5 Replies

Tiny
MATHIASO
  • MECHANIC
  • 1,209 POSTS


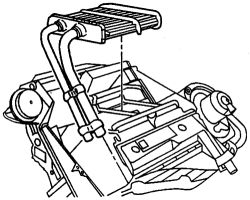
https://www.2carpros.com/forum/automotive_pictures/46384_heater_core_1.jpg


i suspect a leaking heater core or the 2 connections to it.

Disconnect the negative battery cable.
If equipped with a 3.1L engine, remove the air cleaner and duct assembly.
If equipped with a 3.8L engine, remove the fuel injector sight shield by performing the following procedures:
Clean the area around the oil filler cap/tube assembly location.
Rotate the oil filler cap/tube assembly counterclockwise from the valve cover.
Lift the fuel injector sight shield up at the front and slide it from the rear engine bracket.
Reinstall the oil filler cap/tube assembly in the valve cover.

CAUTION
Before draining the cooling system, allow the engine to cool to relieve the systems internal pressure and to avoid scalding coolant.

Drain the cooling system by performing the following procedure:
Raise and safely support the front of the vehicle.
Remove and clean the coolant recovery tank.
Place a 2 gallon pan under the radiator to catch the coolant.
At the bottom of the radiator, open the drain valve and drain the coolant to a level lower than the heater core.
Remove the radiator cap and open the air bleed screw (2-3 turns) located on top of the thermostat housing.
After sufficient coolant has been drained from the system, close the drain valve.

CAUTION
Engine coolant is a hazardous waste; it should be stored for reuse or submitted for recycling. NEVER dispose of it by dumping it into the environment.

Disconnect and plug the heater hoses at the heater core.
If equipped, remove the lower center console by removing or disconnecting the following:

Cigarette lighter Automatic transaxle shift handle Upper console trim plate from the front floor console by unsnapping it Electrical connectors from the upper console trim plate and remove the trim plate CD storage compartment from the front floor console by unsnapping it Raise the front floor console armrest and remove the compartment mat Console-to-chassis bolts and screws Electrical connectors from the console and remove the console from the vehicle

Remove the lower instrument panel lower compartment by removing or disconnecting the following:

Lower right instrument panel insulator Compartment-to-panel bolts and screws, from under the instrument panel compartment Instrument panel compartment door screws and the door Instrument panel compartment screws and plastic clips; then slide the compartment from the instrument panel Electrical connector from the compartment Ashtray and bracket, if necessary Lower heater duct Heater core cover and discard the cover seals Heater core mounting clip and bracket
Heater core
Was this
answer
helpful?
Yes
No
Tuesday, November 3rd, 2009 AT 7:05 PM
Tiny
HIDME
  • MEMBER
  • 27 POSTS
Thank you for your instruction. I removed almost everything on dash board, exept plastic frame behind dashboard, because the passenger side front airbag connection wire, which looks like not able to disconnect. I removed air outlet connected to rear air duct, by untie screw and plastic heat stack by chisel. I'm not sure I can open the core cover by breaking more plastic heat stack or I should try to take the whole black box off. To remove the whole black box which contain the heater core seem requires to remove the passenger airbag and remove the plastic frame.
Any suggestion?
Was this
answer
helpful?
Yes
No
Monday, November 9th, 2009 AT 3:04 PM
Tiny
MATHIASO
  • MECHANIC
  • 1,209 POSTS
Hello my friend
you are two step away, you need to remove the heater core clip and bracket.
Try to remove the plastic frame without removing the passenger air bag.
Remove the mounting clip and bracket(plastic frame). Thing can be narrow sometime, but you are almost there.
Was this
answer
helpful?
Yes
No
Tuesday, November 10th, 2009 AT 1:30 AM
Tiny
HIDME
  • MEMBER
  • 27 POSTS
The instruction is basically right, but it would be more helpful if it give more detail. I didn't need to remove the the whole instrument penal, nor airbag. Just like said in the instruction, only remove the lower part of panel.
Then remove the carpet and heater duct, then heater core cover. Both heater duct connect rear air duct and heater core cover need to loose screw and heat stakes. The picture in this instruction is in different angle. When open the heater core cover, you see it in different angle. This is the right core. GM gives wrong information, when search almost anywhere, they give you another core with shorter pipe(no elbow), which does not fit.
Thank you for your information.
Was this
answer
helpful?
Yes
No
Monday, November 16th, 2009 AT 9:45 AM
Tiny
MATHIASO
  • MECHANIC
  • 1,209 POSTS
If you can take picture of the whole thing, we will get it out.
It just require removing anything around it to get to the coor and remove it, that is all if you see that it will need to remove passenger air bag or other thing, make sure to desable them in right way. Label any parts, so the installation can be easier. It can be time consuming but at the end of the day, a good is what matter.
Send me picyure of the situation.

Thanks
Was this
answer
helpful?
Yes
No
Monday, November 16th, 2009 AT 10:53 AM

Please login or register to post a reply.

Sponsored links