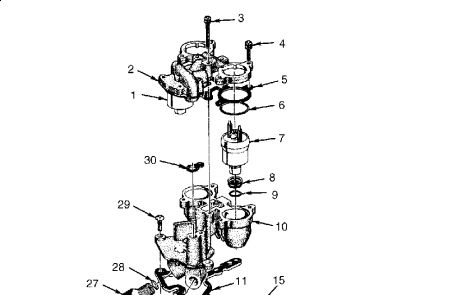
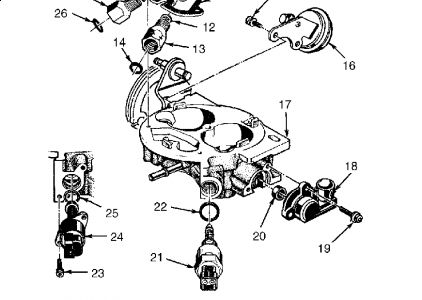
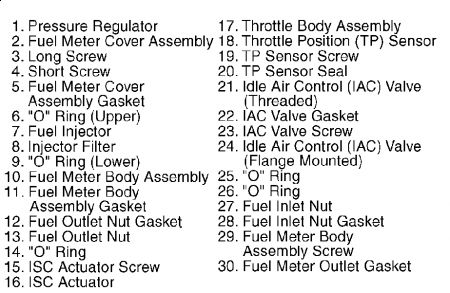
THROTTLE BODY (TBI) Identification An 8-digit unit identification number is stamped on throttle body assembly. Number is stamped vertically on front of throttle body, at Throttle Position (TP) sensor side. Removal 1. Remove air cleaner, adapter and gasket. Relieve fuel pressure. See FUEL SYSTEM PRESSURE RELIEF (TBI) under FUEL SYSTEM. 2. Disconnect electrical harness connectors from IAC valve, TP sensor and fuel injectors. Disconnect fuel lines from throttle body. Discard fuel line "O" rings. Disconnect grommet with wires from throttle body. 3. Disconnect throttle linkage, return spring and cruise control linkage (if equipped). Label and disconnect all vacuum hoses from throttle body. Remove throttle body mounting bolts/nut. Remove throttle body. Disassembly (Fuel Meter Assembly Model 220) 1. Place throttle body on Holding Fixture (J-9789-118 or BT-30-15) to prevent damage to throttle valve. Remove fuel meter cover assembly -to-fuel meter body screws (note location of short screw). See Fig. 2. Remove fuel meter cover assembly. Remove and discard pressure regulator dust seal. Fuel meter cover assembly and pressure regulator are serviced as an assembly. DO NOT remove pressure regulator from cover assembly. 2. Remove fuel injectors. Note location of fuel inlet and outlet nuts and remove. Discard gaskets. Remove fuel meter body assembly -to-throttle body screws. See Fig. 2. Remove fuel meter body assembly. Remove and discard fuel meter body assembly gasket and fuel meter outlet gasket. 3. Remove TP sensor, IAC valve, ISC actuator, rubber components and gaskets. Clean all remaining (metal) parts in a cold immersion-type cleaner such as Carbon X (X-55). Blow dry NOTE: Identification number is stamped on throttle body near TP sensor. Identification number must be used for ordering replacement components. NOTE: Disassembling throttle body unit for immersion in cleaning solvent requires removal of fuel meter assembly, TP sensor, IAC valve and governor assembly (if equipped). Throttle valve screws are staked in position and should NOT be removed. WARNING: On throttle bodies without governor assembly, pressure regulator spring is under heavy tension and may cause personal injury if released. DO NOT immerse cover in any type of cleaning solvent.with compressed air. Inspect mating surfaces for damage which may prevent gasket sealing. Repair or replace faulty components. Fig. 3: Exploded View Of Throttle Body (TBI 220) Courtesy of GENERAL MOTORS CORP. Disassembly (Fuel Meter Assembly Model 295) 1. Place throttle body on Holding Fixture (J-9789-118 or BT-30-15) to prevent damage to throttle valve. Remove fuel meter body cover screws and remove fuel meter body cover. See Fig. 4. If fuel pres sure regulator cover is removed, regulator diaphragm must be replaced to prevent fuel leaks. 2. Remove fuel injectors. Note location of fuel inlet and outlet nuts and remove. Discard gaskets and "O" rings. Remove fuel meter body assembly -to-throttle body screws. See Fig. 4. Remove fuel meter body assembly. Remove and discard fuel meter body assembly gasket. 3. Remove TP sensor, IAC valve, fuel pressure regulator, governor drive motor and governor throttle drive assembly, lever and bearing assembly, rubber components, gaskets and diaphragms. Clean all remaining (metal) parts in a cold immersion-type cleaner such as Carbon X (X-55). Blow dry with compressed air. Inspect mating surfaces for damage which may prevent gasket sealing. Repair or replace faulty components. Reassembly (Fuel Meter Assembly) 1. On TBI 220, install NEW pressure regulator dust seal into recess of throttle body. Install NEW fuel meter outlet gasket on fuel meter body assembly. On all models, install NEW fuel meter body gasket on throttle body. Install TP sensor, IAC valve, rubber components, gaskets and diaphragms (if equipped). 2. On TBI 220, install ISC actuator. On TBI 295, install governor drive motor and governor throttle drive assembly, lever and bearing assembly, and fuel pressure regulator. On all models, install fuel meter body assembly onto throttle body. Apply thread locking compound (Loctite 262) to fuel meter body assembly screws and tighten to specification. See TORQUE SPECIFICATIONS. 3. Lubricate fuel inlet and outlet "O" rings with clean engine oil. Install fuel inlet and outlet "O" rings, gaskets and nuts. Install fuel injectors. On TBI 220, install fuel meter cover assembly. On TBI 295, install fuel meter body cover. On all models, apply thread locking compound (Loctite 262) to cover attaching screws. Tighten screws. Installation To install, reverse removal procedure. Ensure throttle body and intake manifold sealing surfaces are clean. Use NEW throttle body gasket and fuel line "O" rings. Check fuel system for leaks by turning ignition on, but DO NOT start engine.
Thursday, July 30th, 2009 AT 2:07 PM

