Hi and thanks for using 2CarPros.
What I think is happening is either the pressure switch is bad or the purge solenoid is bad allowing fuel to enter the EVAP system and causing a hard start when you refuel.
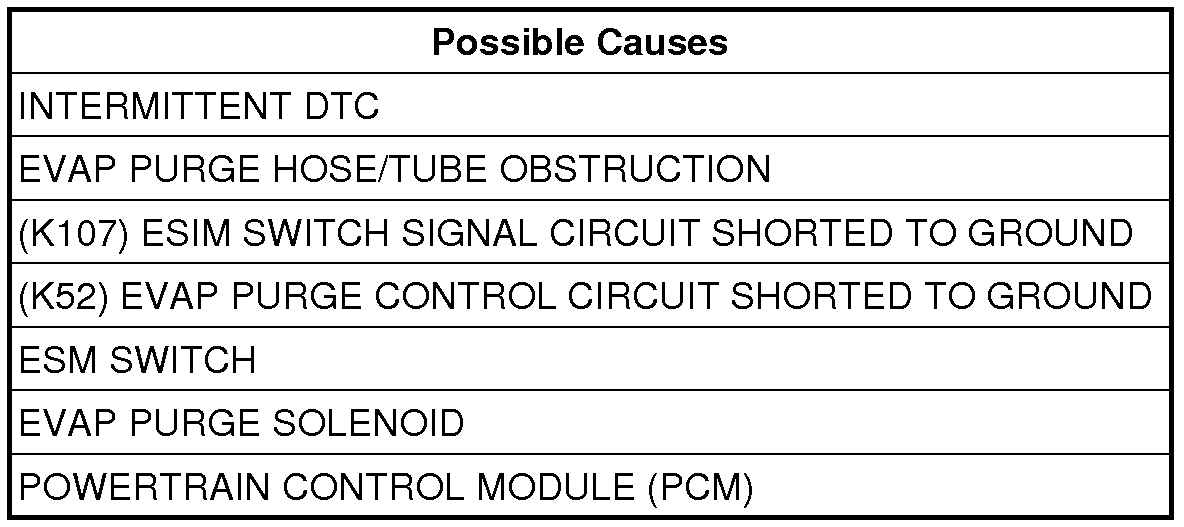
I attached a picture to showing possible causes for the code and a schematic of the system.
Now, I have to say, most likely the purge solenoid is bad. However, here are the diagnostic checks. It will require a live data scanner.
Here are the directions. They are somewhat involved. See pictures 3 and 4
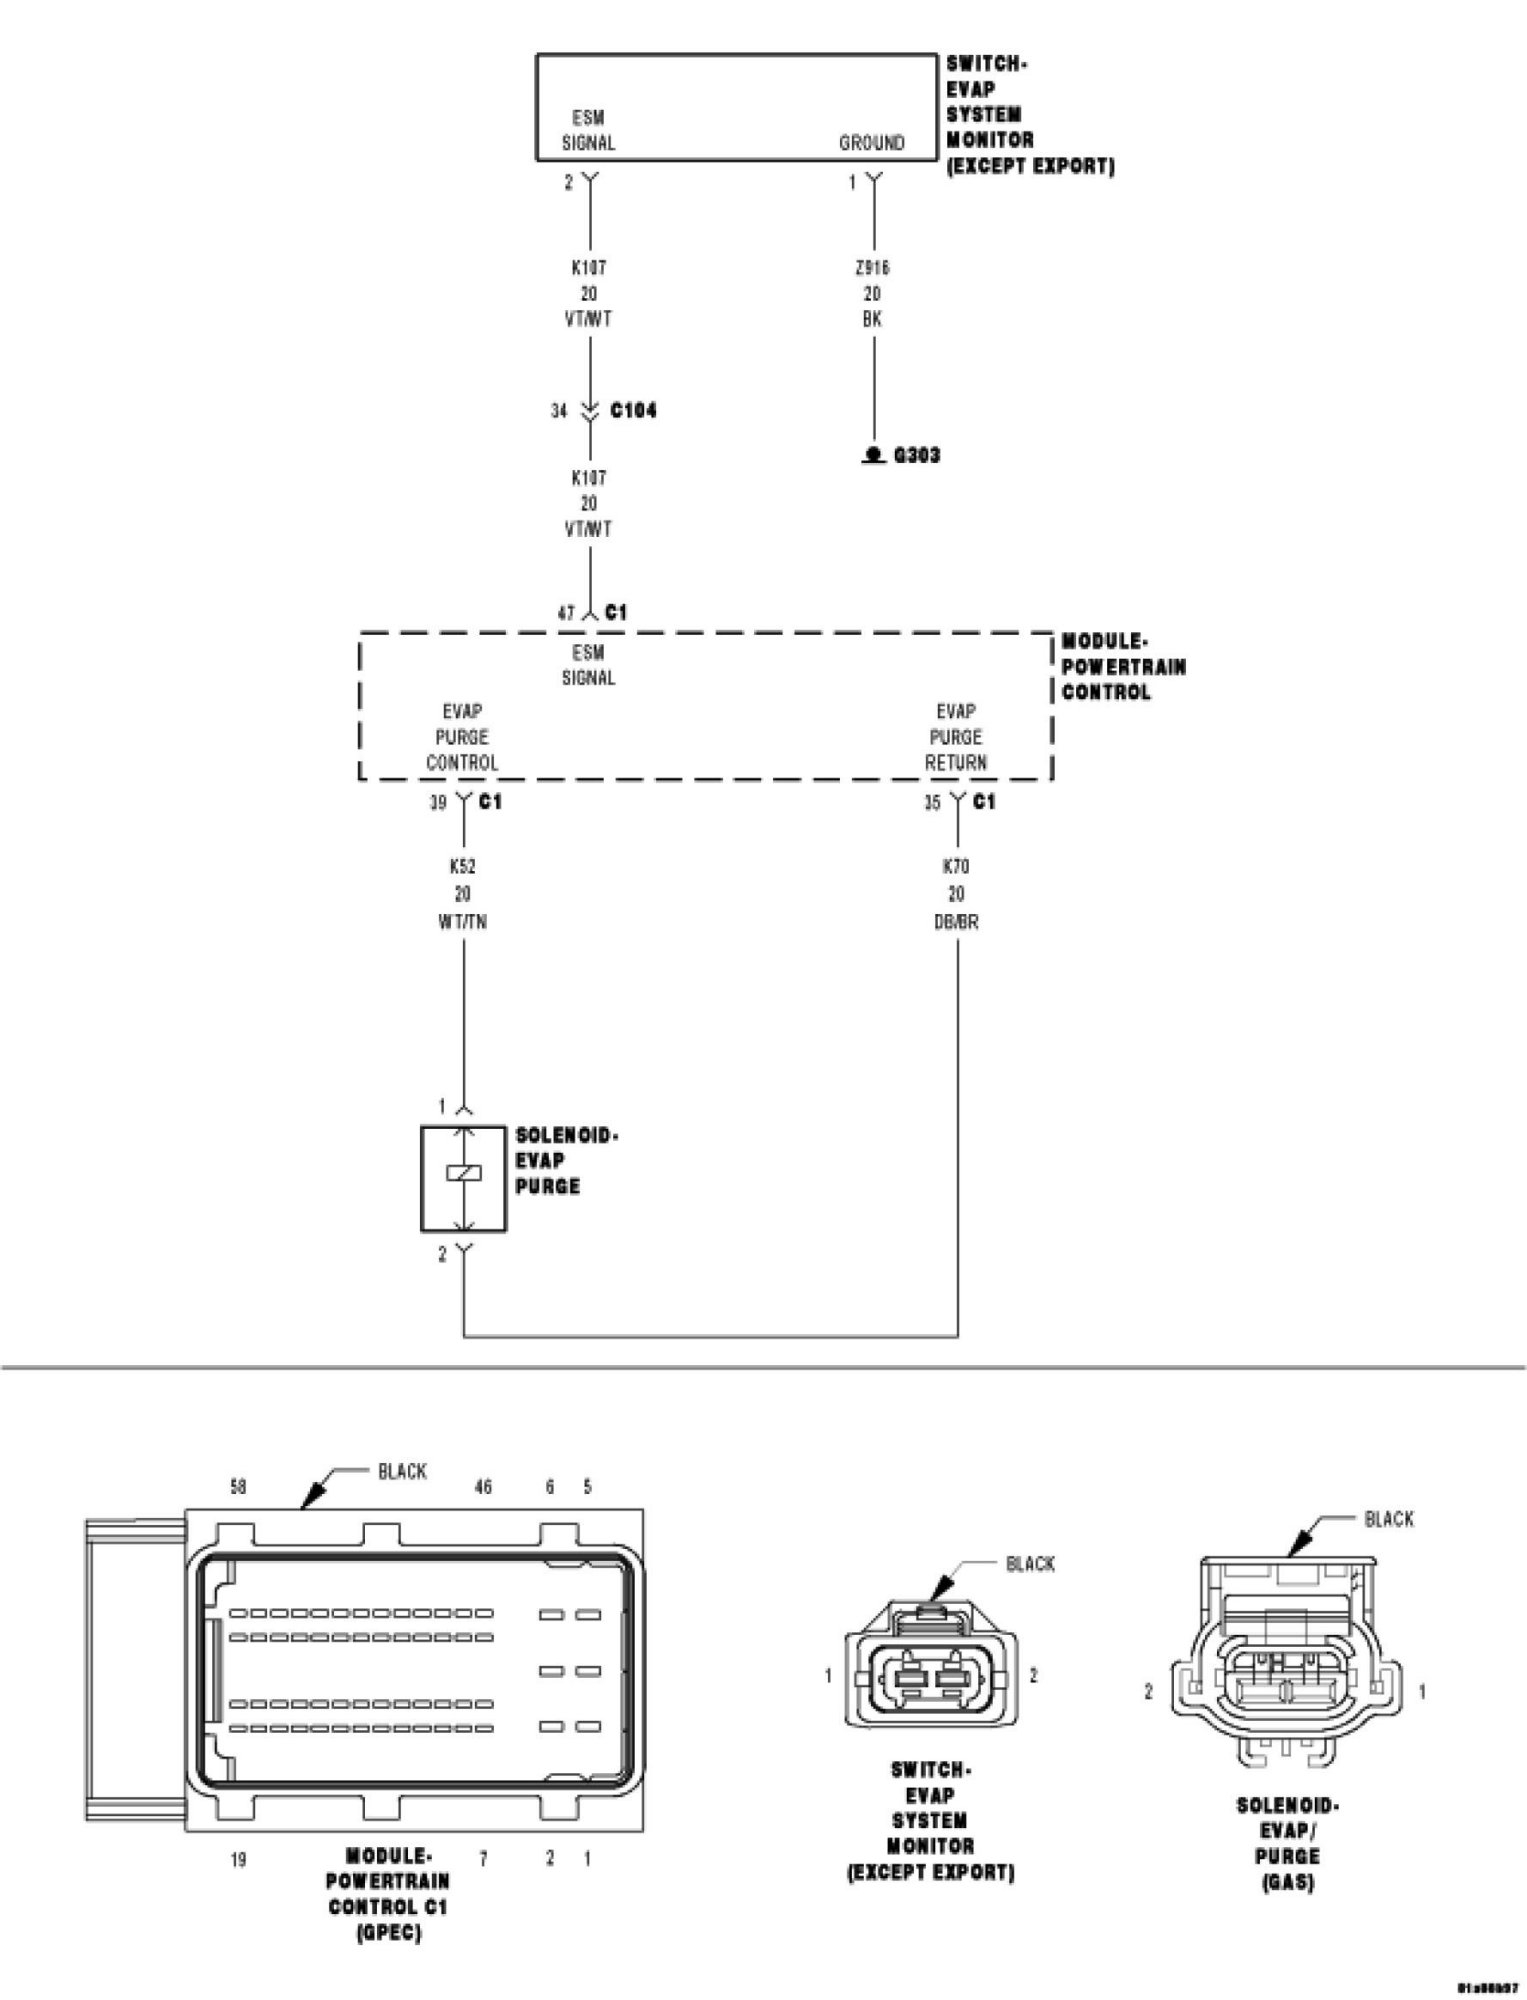
For a complete wiring diagram Consult Diagrams/Electrical.
- When Monitored:
Immediately after key off.
- Set Condition:
At key off, the PCM energizes the Purge Solenoid for a calibrated amount of time (30 seconds maximum) and stores the state of the ESIM switch. The state is evaluated again at the next key on. If the PCM does not detect that the ESIM switch is open, an error is detected. Two Trip Fault. Three good trips to turn off the MIL.
Always perform the Pre-Diagnostic Troubleshooting procedure before proceeding. See: Computers and Control Systems > Initial Inspection and Diagnostic Overview > Pre-Diagnostic Troubleshooting Procedure.
Diagnostic Test
1. EVAP SYSTEM PRETEST
Ignition on, engine not running.
With a scan tool, select View DTCs. Record the Freeze Frame data if any DTC(s) are present.
Review the vehicle repair history for items related to the current condition.
Inspect the vehicle for any aftermarket accessories that may have been installed incorrectly.
Check for any related technical service bulletins (TSBs) and, if any apply, follow the recommended procedure.
Select the appropriate response from the list below:
A technical service bulletin (TSB) repaired the condition.
- Test complete.
A DTC is present, no TSBs apply, or the TSB did not repair the condition.
- Go to 2
2. DTC IS ACTIVE
Ignition on, engine not running.
With a scan tool, select Data Display and view the ESIM Switch state.
Is the ESIM Switch state 'Closed'?
Yes
- Go to 3
No
- Refer to the INTERMITTENT CONDITION Diagnostic Procedure. See: Computers and Control Systems > Symptom Related Diagnostic Procedures > Checking For An Intermittent DTC
- Perform the PCM Verification Test Ver. 1See: A L L Diagnostic Trouble Codes ( DTC ) > Verification Tests > Powertrain Verification Test.
3. ESIM SWITCH STATE
With a scan tool, select Data Display and view the ESIM Switch state.
Disconnect the purge hose from the EVAP canister.
Does the ESIM Switch state change from 'Closed' to 'Open' when the purge hose was disconnected?
Yes
- Go to 4
No
- Go to 7
4. EVAP PURGE HOSE/TUBE OBSTRUCTION
Inspect the Evap Purge hose/tube for proper routing and installation between the EVAP Purge Solenoid and the Fuel Tank and between the Fuel Tank and the Evap Purge Canister.
Make sure the hose/tube is not damaged or kinked and is free from any obstructions or blockage.
Were any problems found?
Yes
- Repair or replace as necessary.
- Perform the PCM Verification Test Ver. 1See: A L L Diagnostic Trouble Codes ( DTC ) > Verification Tests > Powertrain Verification Test.
No
- Go to 5
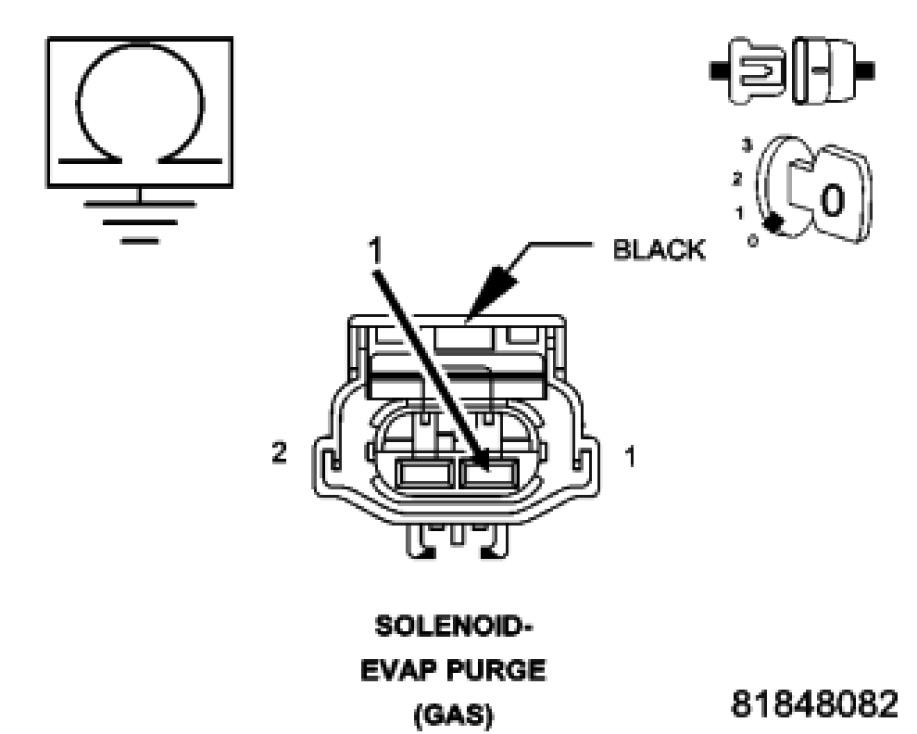
5. (K52) EVAP PURGE CONTROL CIRCUIT SHORTED TO GROUND
Turn the ignition off.
Disconnect the PCM harness connector.
Measure the resistance between ground and the (K52) Evap Purge Control circuit in the EVAP Purge Solenoid harness connector.
Is the resistance below 100 ohms?
Yes
- Repair the (K52) Evap Purge Control circuit for a short to ground.
- Perform the PCM Verification Test Ver. 1See: A L L Diagnostic Trouble Codes ( DTC ) > Verification Tests > Powertrain Verification Test.
No
- Go to 6
6. EVAP PURGE SOLENOID
Using the wiring diagram/schematic as a guide, inspect the wiring and connectors between the Evap Purge Solenoid and the Powertrain Control Module (PCM).
Look for any chafed, pierced, pinched, or partially broken wires.
Look for broken, bent, pushed out or corroded terminals.
Search for any Technical Service Bulletins that may apply.
Were any problems found?
Yes
- Repair as necessary.
- Perform the PCM Verification Test Ver. 1See: A L L Diagnostic Trouble Codes ( DTC ) > Verification Tests > Powertrain Verification Test.
No
- Replace the Evap Purge Solenoid.
- Perform the PCM Verification Test Ver. 1See: A L L Diagnostic Trouble Codes ( DTC ) > Verification Tests > Powertrain Verification Test.
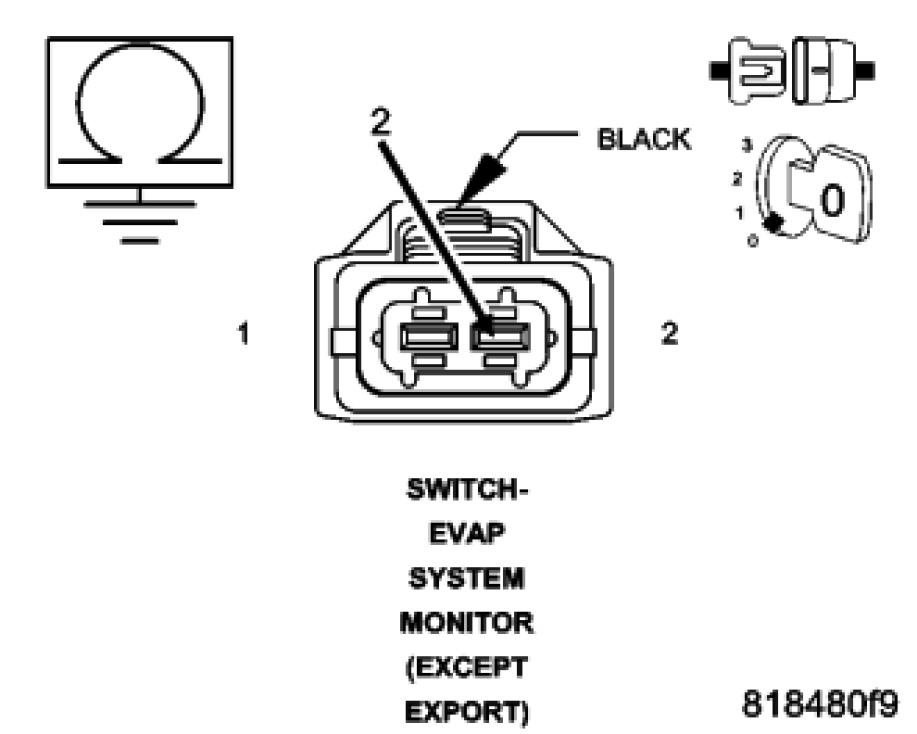
7. ESIM ASSEMBLY
With a scan tool, select Data Display and view the ESIM Switch state.
Disconnect the Evap System Monitor Switch electrical connector.
Does the ESIM Switch state change from CLOSED to OPEN when the switch is disconnected?
Yes
- Replace the ESIM Assembly.
- Perform the PCM Verification Test Ver. 1See: A L L Diagnostic Trouble Codes ( DTC ) > Verification Tests > Powertrain Verification Test.
No
- Go to 8
8. (K107) SIGNAL CIRCUIT SHORTED TO GROUND
imageOpen In New TabZoom/Print
Turn the ignition off.
Disconnect the PCM harness connector.
Measure the resistance between ground and the (K107) ESIM Switch Signal circuit in the ESIM Assembly harness connector.
Is the resistance below 100 ohms?
Yes
- Repair the short to ground in the (K107) ESIM Switch Signal circuit.
- Perform the PCM Verification Test Ver. 1See: A L L Diagnostic Trouble Codes ( DTC ) > Verification Tests > Powertrain Verification Test.
No
- Go to 9
9. POWERTRAIN CONTROL MODULE (PCM)
Using the wiring diagram/schematic as a guide, inspect the wiring and connectors between the Evap Purge Solenoid and the Powertrain Control Module (PCM) and between the Evap System Monitor Switch and the Powertrain Control Module (PCM).
Look for any chafed, pierced, pinched, or partially broken wires.
Look for broken, bent, pushed out or corroded terminals.
Search for any Technical Service Bulletins that may apply.
Were any problems found?
Yes
- Repair as necessary.
- Perform the PCM Verification Test Ver. 1See: A L L Diagnostic Trouble Codes ( DTC ) > Verification Tests > Powertrain Verification Test.
No
- Replace and program the Powertrain Control Module (PCM).
- Perform the PCM Verification Test Ver. 1See: A L L Diagnostic Trouble Codes ( DTC ) > Verification Tests > Powertrain Verification Test.
_________________________________________________________________________________
If you determine the purge solenoid is bad, here are the directions for removing and replacing it. The remaining pics correlate with these directions.
________________________________________________________________________________
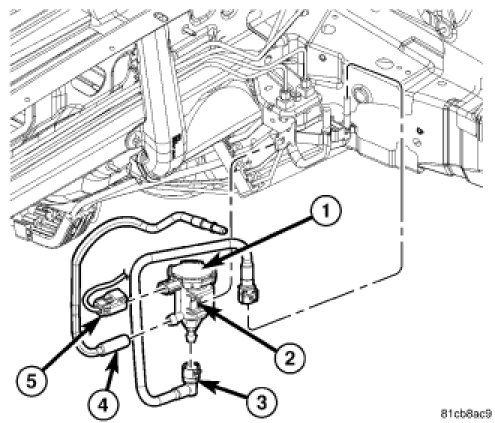
EVAP PURGE SOLENOID - REMOVAL
REMOVAL
1. Disconnect and isolate negative battery cable at battery.
2. Remove the PCM, See: Engine Control Module > Removal and Replacement > Powertrain Control Module - Removal.
3. Disconnect electrical connector (5) from evaporator purge solenoid (1).
4. Remove purge hose (4) from evaporator purge solenoid (1).
5. Remove quick connect fuel tank hose (3) from evaporator purge solenoid (1).
6. Release tab (2) to remove evaporator purge solenoid (1) from bracket.
__________________
Replacement
1. Install evaporator purge solenoid (1) to bracket. Make sure the tab (2) secures the solenoid (1) to the bracket.
2. Install quick connect fuel tank hose (3) to evaporator purge solenoid (1).
3. Install purge hose (4) to evaporator purge solenoid (1).
4. Connect electrical connector (5) to evaporator purge solenoid (1).
5. Install the PCM, See: Engine Control Module > Removal and Replacement > Powertrain Control Module - Installation.
6. Connect negative battery cable, tighten nut to 5 Nm (45 in. lbs.).
______________________________________
I know this is extensive, but thought I would add everything. Let me know if it helps or if you have other questions.
Take care,
Joe
Images (Click to enlarge)
Dec 30, 2018 at 9:34 PM