Hi,
It sounds like the key lock cylinder has failed. If you are able to turn it partially by only placing the tip of the key in it, the tumbler must be bad. That could also be causing the issue with it not turning the entire way to the start position.
Now, to test the key lock unit requires removal of the part. In addition, the steering column needs partially removed. To add insult to injury, if you replace it, the vehicle's computer will need programmed to recognize the new key and lock assembly. It's not an easy one to do.
_______________________________
Here are the directions that explain how to remove and inspect the ignition lock assembly. Based on your description, I suspect this is the problem, but testing will confirm. The attached pictures will correlate with the directions.
______________________________
1999 Toyota Camry Solara SEV6 V6-3.0L (1MZ-FE)
Disassembly and Assembly
Vehicle Steering and Suspension Steering Steering Column Service and Repair Procedures With Tilt Column Disassembly and Assembly
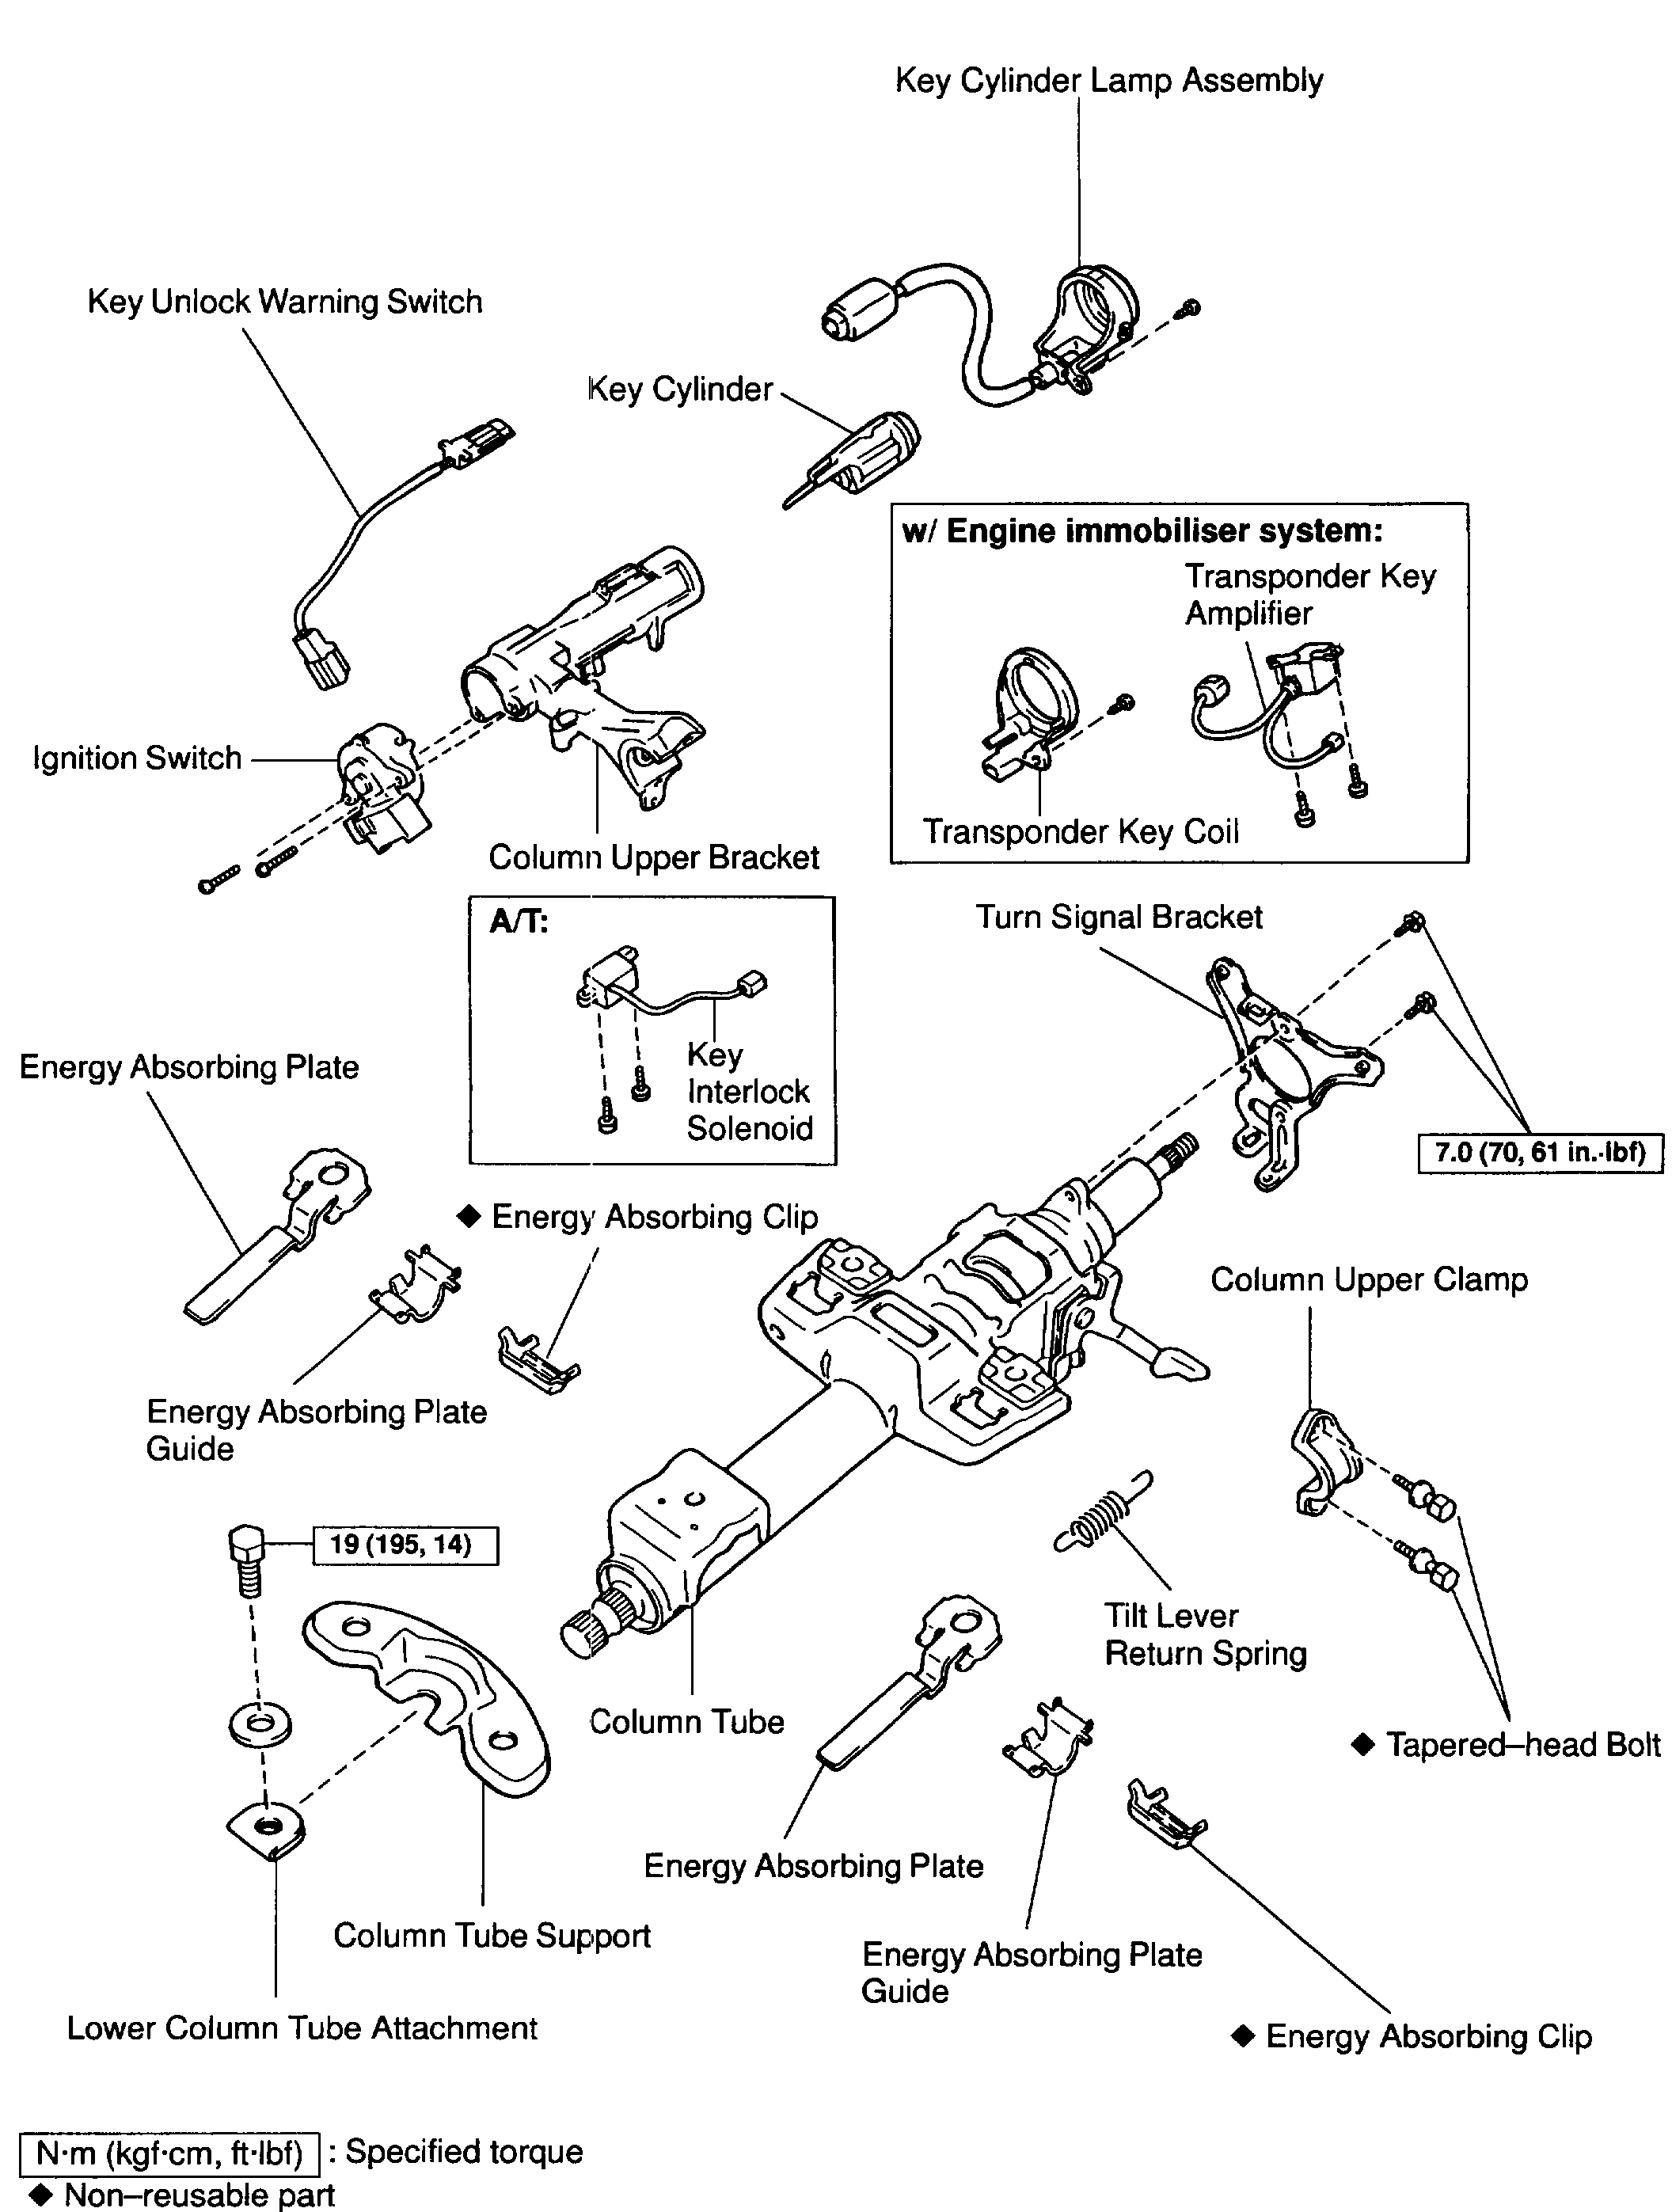
DISASSEMBLY AND ASSEMBLY
pic 1
DISASSEMBLY
NOTICE: When using a vise, do not overtighten it.
1. w/ Engine immobilizer system:
REMOVE TRANSPONDER KEY COIL AND KEY CYLINDER LAMP ASSEMBLY
a. Remove the screw and transponder key coil with key cylinder lamp assembly.
b. Remove the key cylinder lamp assembly from the transponder key coil.
2. w/o Engine immobilizer system:
REMOVE KEY CYLINDER LAMP ASSEMBLY
Remove the screw and key cylinder lamp assembly.
pic 2
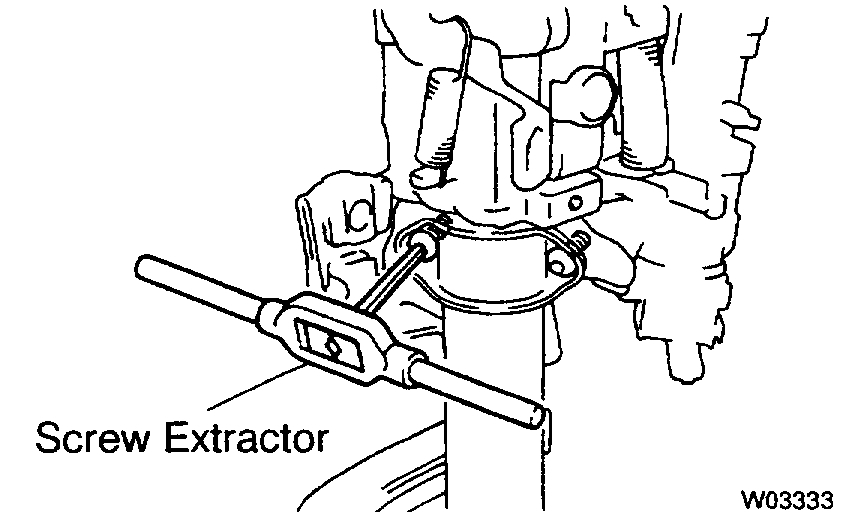
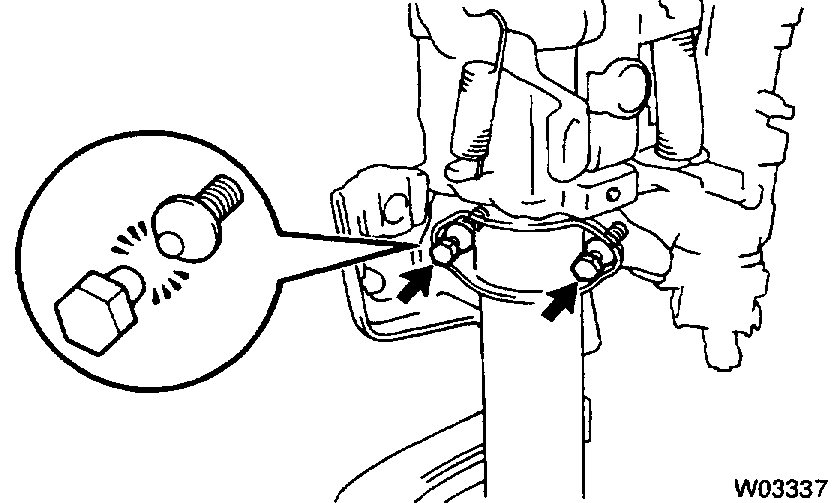
3. REMOVE COLUMN UPPER BRACKET AND COLUMN UPPER CLAMP
a. Using a centering punch, mark the center of the 2 tapered-head bolts.
b. Using a 3-4 mm (0.12-0.16 inch) drill, drill into the 2 bolts.
c. Using a screw extractor, remove the 2 bolts, column upper bracket and column upper clamp.
4. REMOVE TURN SIGNAL BRACKET
Remove the 2 bolts and turn signal bracket.
5. REMOVE TILT LEVER RETURN SPRING
6. REMOVE COLUMN TUBE SUPPORT
a. Remove the bolt and washer.
b. Remove the column tube support with lower column tube attachment.
c. Remove the lower column tube attachment from the column tube support.
pic 3
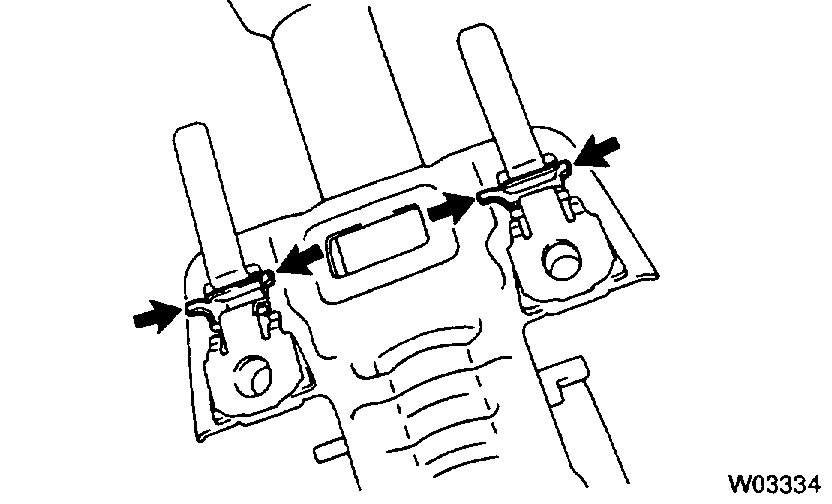
7. REMOVE 2 ENERGY ABSORBING PLATES
a. Using pliers, remove the 2 energy absorbing clips.
b. Remove the 2 energy absorbing plates, 2 energy absorbing plate guides.
INSPECTION
pic 4
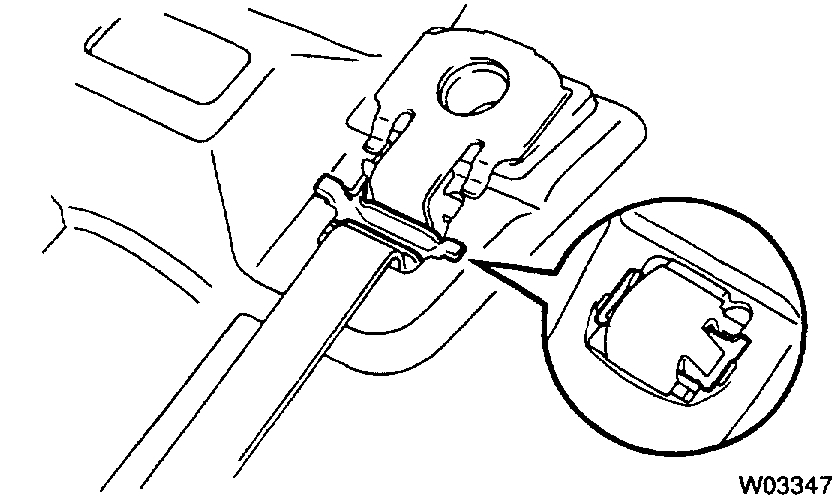
1. INSPECT STEERING LOCK OPERATION
Check that the steering lock mechanism operates properly.
pic 5
2. IF NECESSARY, REPLACE KEY CYLINDER
a. Place the ignition key at the ACC position.
b. Push down the stop pin with a screwdriver, and pull out the cylinder.
c. Install a new cylinder.
HINT: Make sure the key is at the ACC position.
3. INSPECT IGNITION SWITCH
4. IF NECESSARY, REPLACE IGNITION SWITCH
a. Remove the 2 screws and ignition switch.
b. Install a new ignition switch with the 2 screws.
5. INSPECT KEY UNLOCK WARNING SWITCH
6. IF NECESSARY, REPLACE KEY UNLOCK WARNING SWITCH
a. Slide out the key unlock warning switch.
b. Slide a new key unlock warning switch.
7. A/T: INSPECT KEY INTERLOCK SOLENOID
8. A/T: IF NECESSARY, REPLACE KEY INTERLOCK SOLENOID
a. Remove the 2 screws and key interlock solenoid.
b. Install a new key interlock solenoid with the 2 screws.
9. w/ Engine immobilizer system: INSPECT TRANSPONDER KEY COIL
10. w/ Engine immobilizer system: IF NECESSARY, REPLACE TRANSPONDER KEY COIL
11. w/ Engine immobilizer system: IF NECESSARY, REPLACE TRANSPONDER KEY AMPLIFIER
a. Remove the 2 screws and transponder key amplifier.
b. Install a new transponder key amplifier with the 2 screws.
REASSEMBLY
NOTICE: When using a vise, do not overtighten it.
pic 6
1. INSTALL 2 ENERGY ABSORBING PLATES
a. Install the 2 energy absorbing plate guides and 2 energy absorbing plates.
b. Install the 2 new energy absorbing clips.
2. INSTALL COLUMN TUBE SUPPORT
a. Install the column tube attachment to the column tube support.
b. Install the column tube support, bolt and washer.
Torque: 19 Nm (195 kgf-cm, 14 ft. lbs.)
3. INSTALL TILT LEVER RETURN SPRING
4. INSTALL TURN SIGNAL BRACKET
Install the turn signal bracket with the 2 bolts.
Torque: 7.0 Nm (70 kgf-cm, 61 inch lbs.)
pic 7
5. INSTALL COLUMN UPPER BRACKET AND COLUMN UPPER CLAMP
a. Install the column upper bracket and column upper clamp with 2 new tapered-head bolts.
b. Tighten the 2 new tapered-head bolts until the bolt heads break off.
6. w/ Engine immobilizer system: INSTALL KEY CYLINDER LAMP ASSEMBLY AND TRANSPONDER KEY COIL
a. Install the key cylinder lamp assembly to the transponder key coil.
b. Install the transponder key coil and key cylinder lamp assembly with the screw.
7. w/o Engine immobilizer system: INSTALL KEY CYLINDER LAMP ASSEMBLY
Install the key cylinder lamp assembly with the screw.
______________________________________
Please let me know if I can help or if you have other questions, feel free to ask.
Take care,
Joe
Images (Click to enlarge)
Jan 8, 2020 at 7:25 PM