Hi,
Here are the directions for removal and replacement of the timing chain. The timing marks and procedures are included in the directions and attached pictures.
__________________________________________________________________
1991 Nissan-Datsun Truck D21 Hardbody 4WD L4-2389cc 2.4L SOHC MFI (KA24E)
Removal and Installation
Vehicle Engine, Cooling and Exhaust Engine Timing Components Timing Chain Service and Repair Procedures Removal and Installation
REMOVAL AND INSTALLATION
*** THIS ARTICLE INCLUDES UPDATES MADE BY TSB 95027, DATED MARCH 22, 1995 ***
CAUTION: After removing timing chain, do not turn crankshaft and camshaft separately, or valves will strike piston heads.
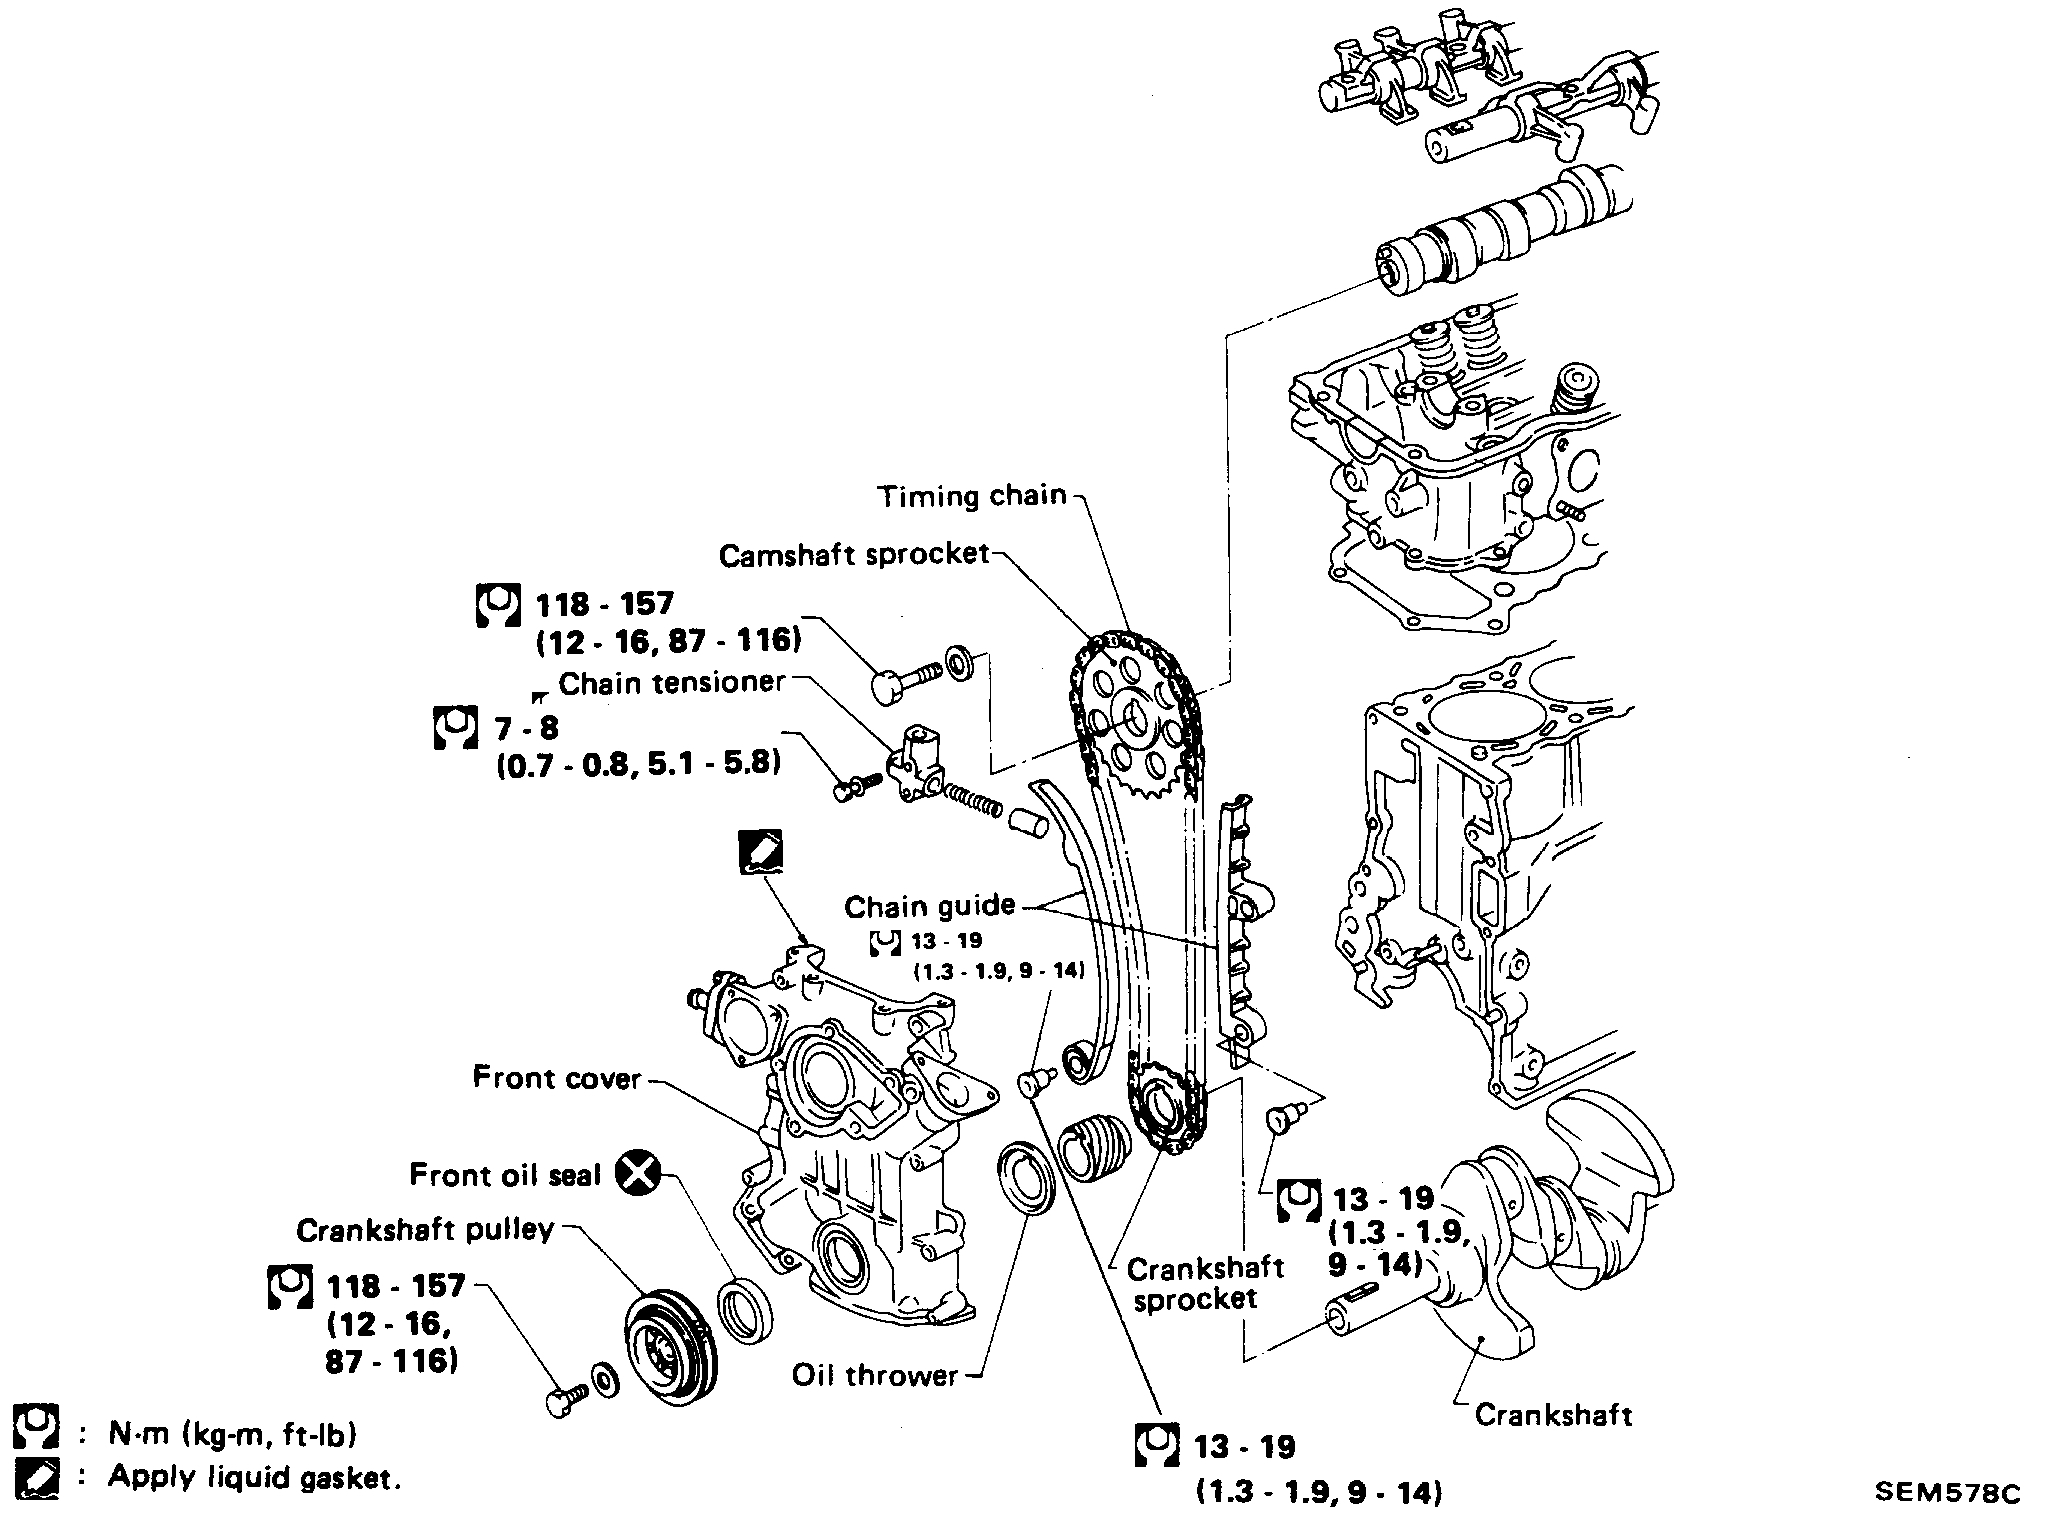
Timing Components
pic 1
REMOVAL
1. Disconnect battery terminal.
2. Drain coolant from radiator.
3. Remove radiator shroud and cooling fan.
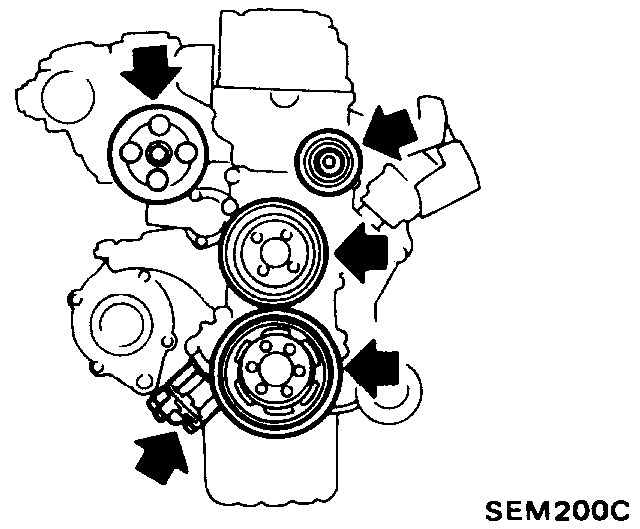
4. Remove the following belts.
^ Power steering drive belt.
^ Compressor drive belt.
^ Alternator drive belt.
5. Remove all spark plugs.
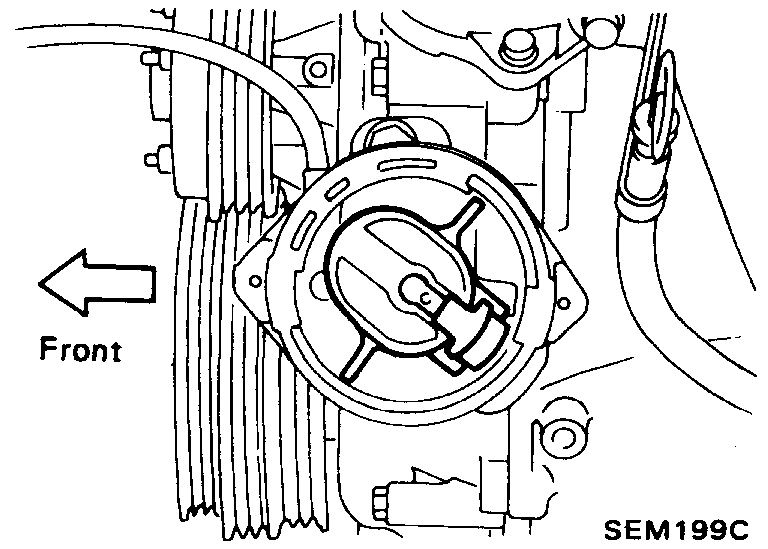
Setting TDC- Distributor
Pic 2
6. Set No.1 piston at T.D.C. on its compression stroke.
7. Remove the following parts.
External Parts Removal
Pic 3
^ Power steering pump, idler pulley and power steering pump brackets.
^ Compressor idler pulley.
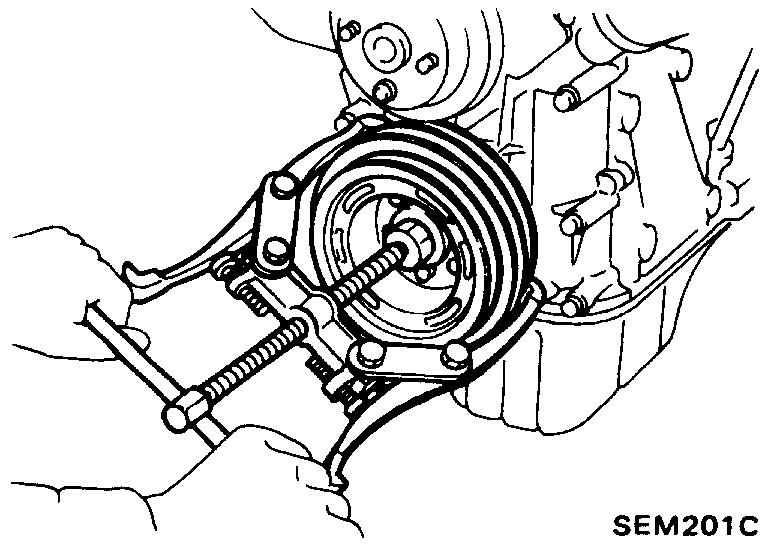
Removing Crankshaft Pulley
Pic 4
^ Crankshaft pulley.
Removing Oil Pump
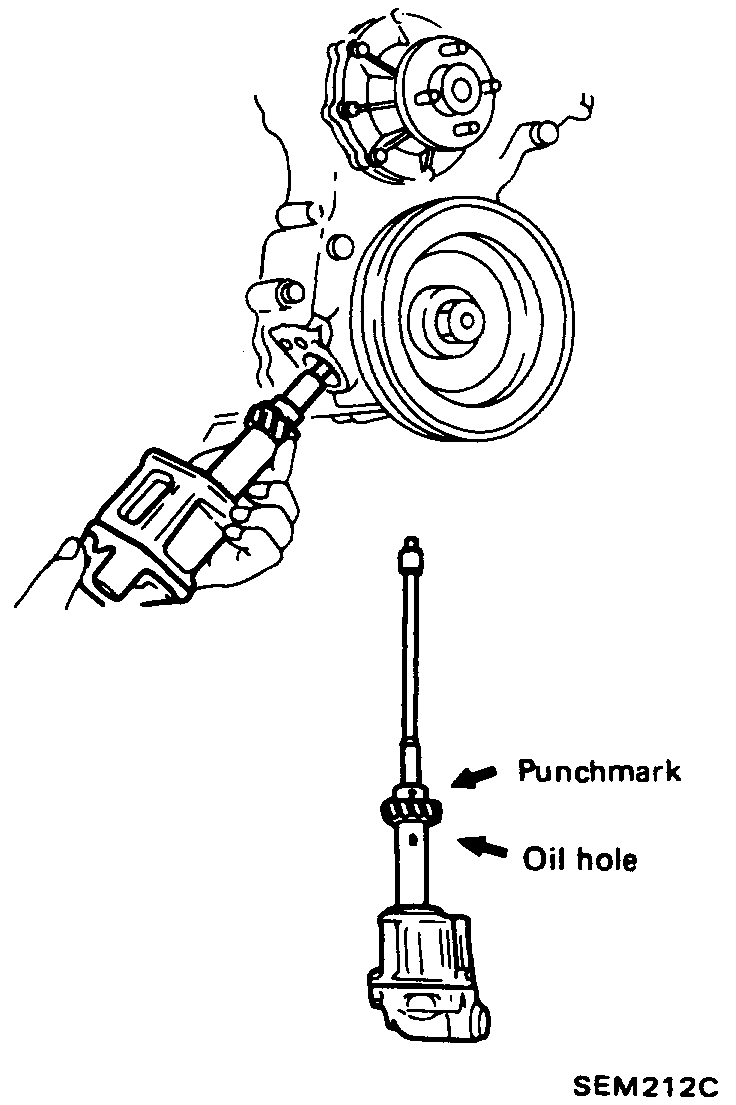
Pic 5
^ Oil pump with pump drive spindle.
^ Rocker cover.
8. Remove oil pan. See: Oil Pan, Engine > Procedures > Removal and Installation
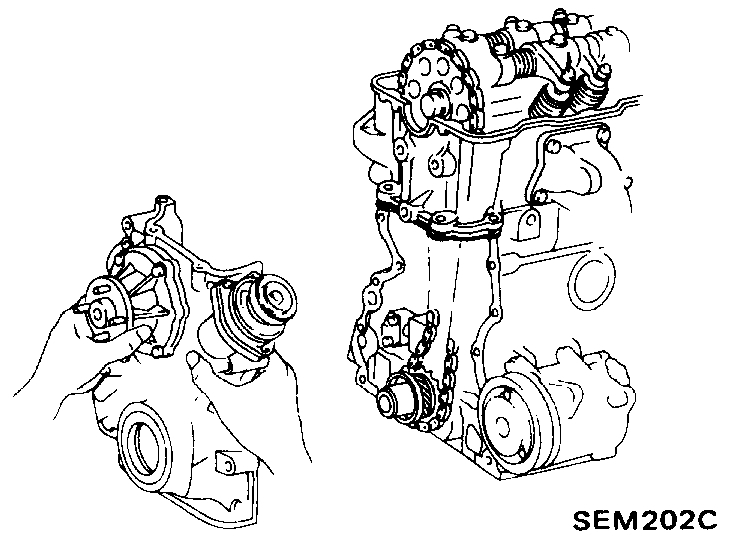
Removing Front Cover
Pic 6
9. Remove front cover.
Timing Parts- Locations
Pic 7
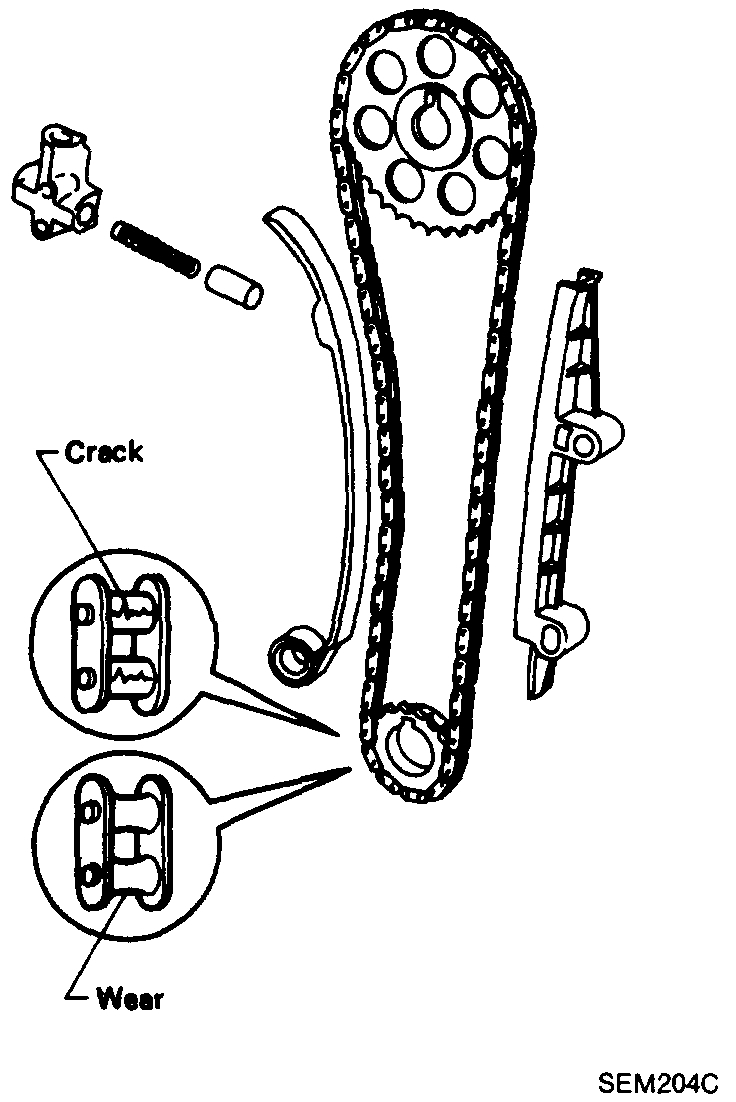
10. Remove the following parts.
^ Chain tensioner.
^ Chain guides.
^ Timing chain and sprocket.
^ Oil thrower, oil pump drive gear and crankshaft sprocket.
INSPECTION
Timing Chain Component Inspection
pic 8
1. Check for cracks and excessive wear at roller links. Replace If necessary.
INSTALLATION
After removing timing chain, do not rotate crankshaft and camshaft separately because valves will hit piston head.
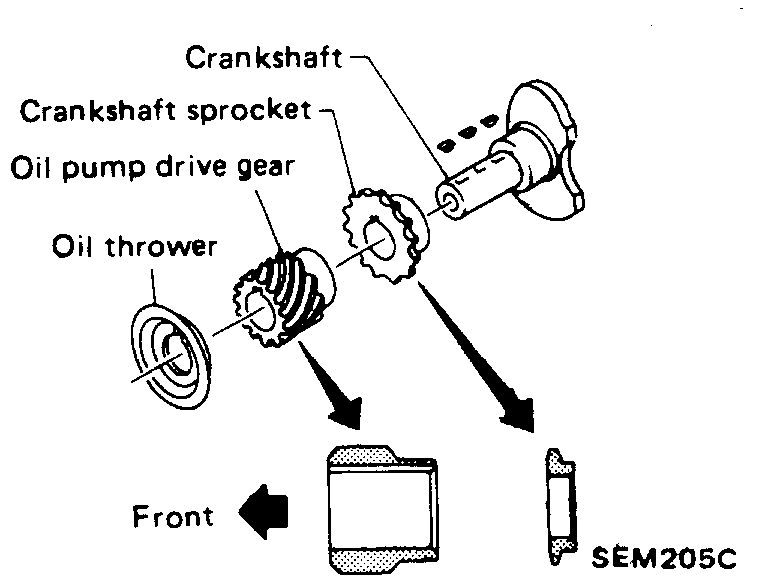
Front Of Crankshaft
pic 9
1. Install crankshaft sprocket, oil pump drive gear and oil thrower.
^ Make sure that mating marks of crankshaft sprocket face engine front.
2. Install camshaft sprocket.
3. Confirm that No.1 piston is set at T.D.C. on its compression stroke.
4. Install timing chain.
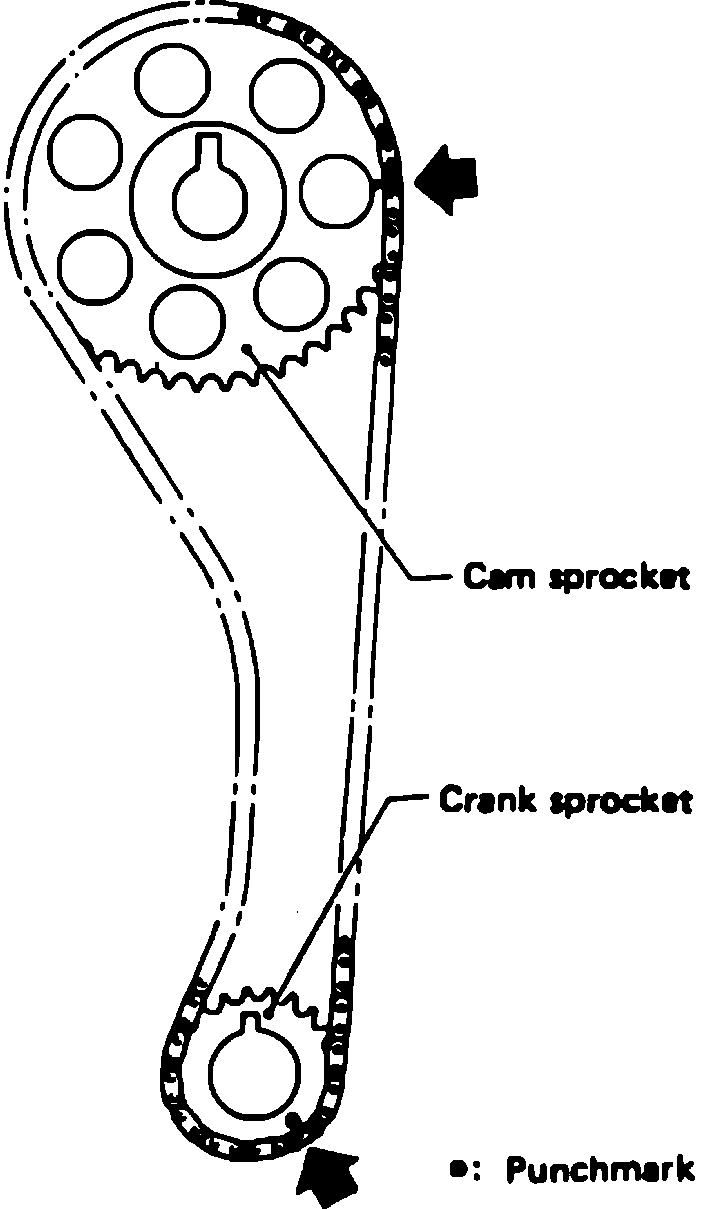
Fig. 3 Timing Mark Alignment.
pic 10
^ Set timing chain by aligning its mating marks with those of crankshaft sprocket and camshaft sprocket.
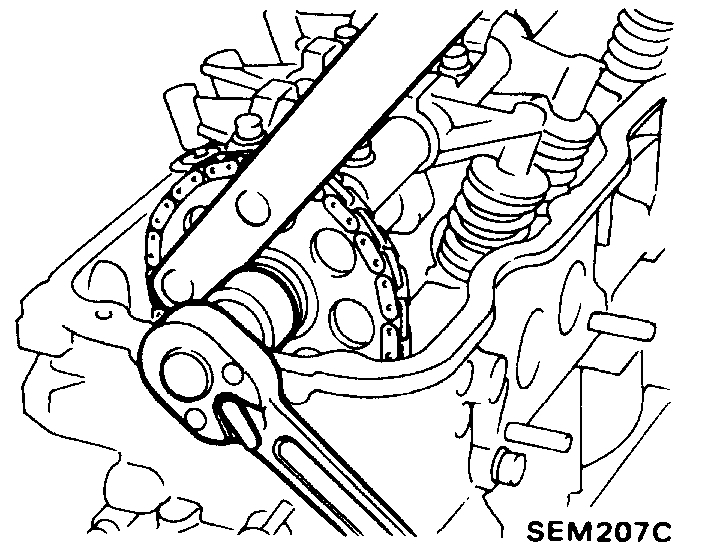
Tightening Camshaft Sprocket Bolt
pic 11
5. Tighten camshaft sprocket bolt.
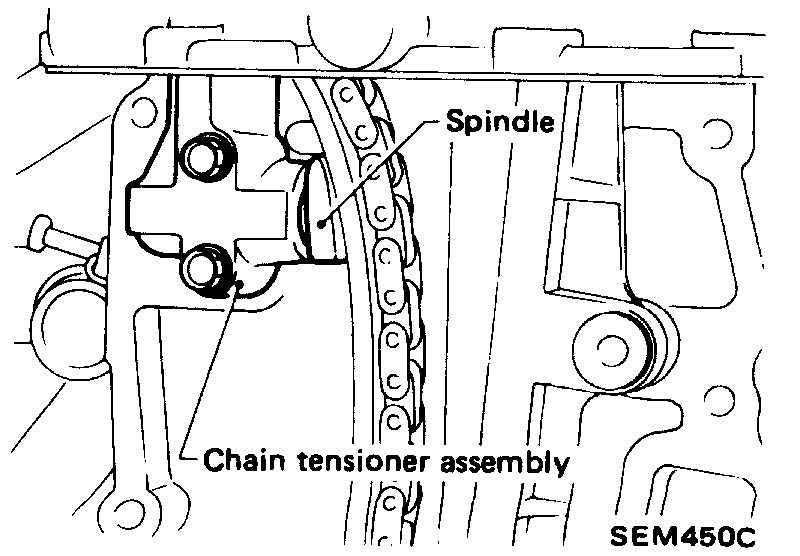
Timing Chain Tensioner
pic 12
6. Install chain guide and chain tensioner.
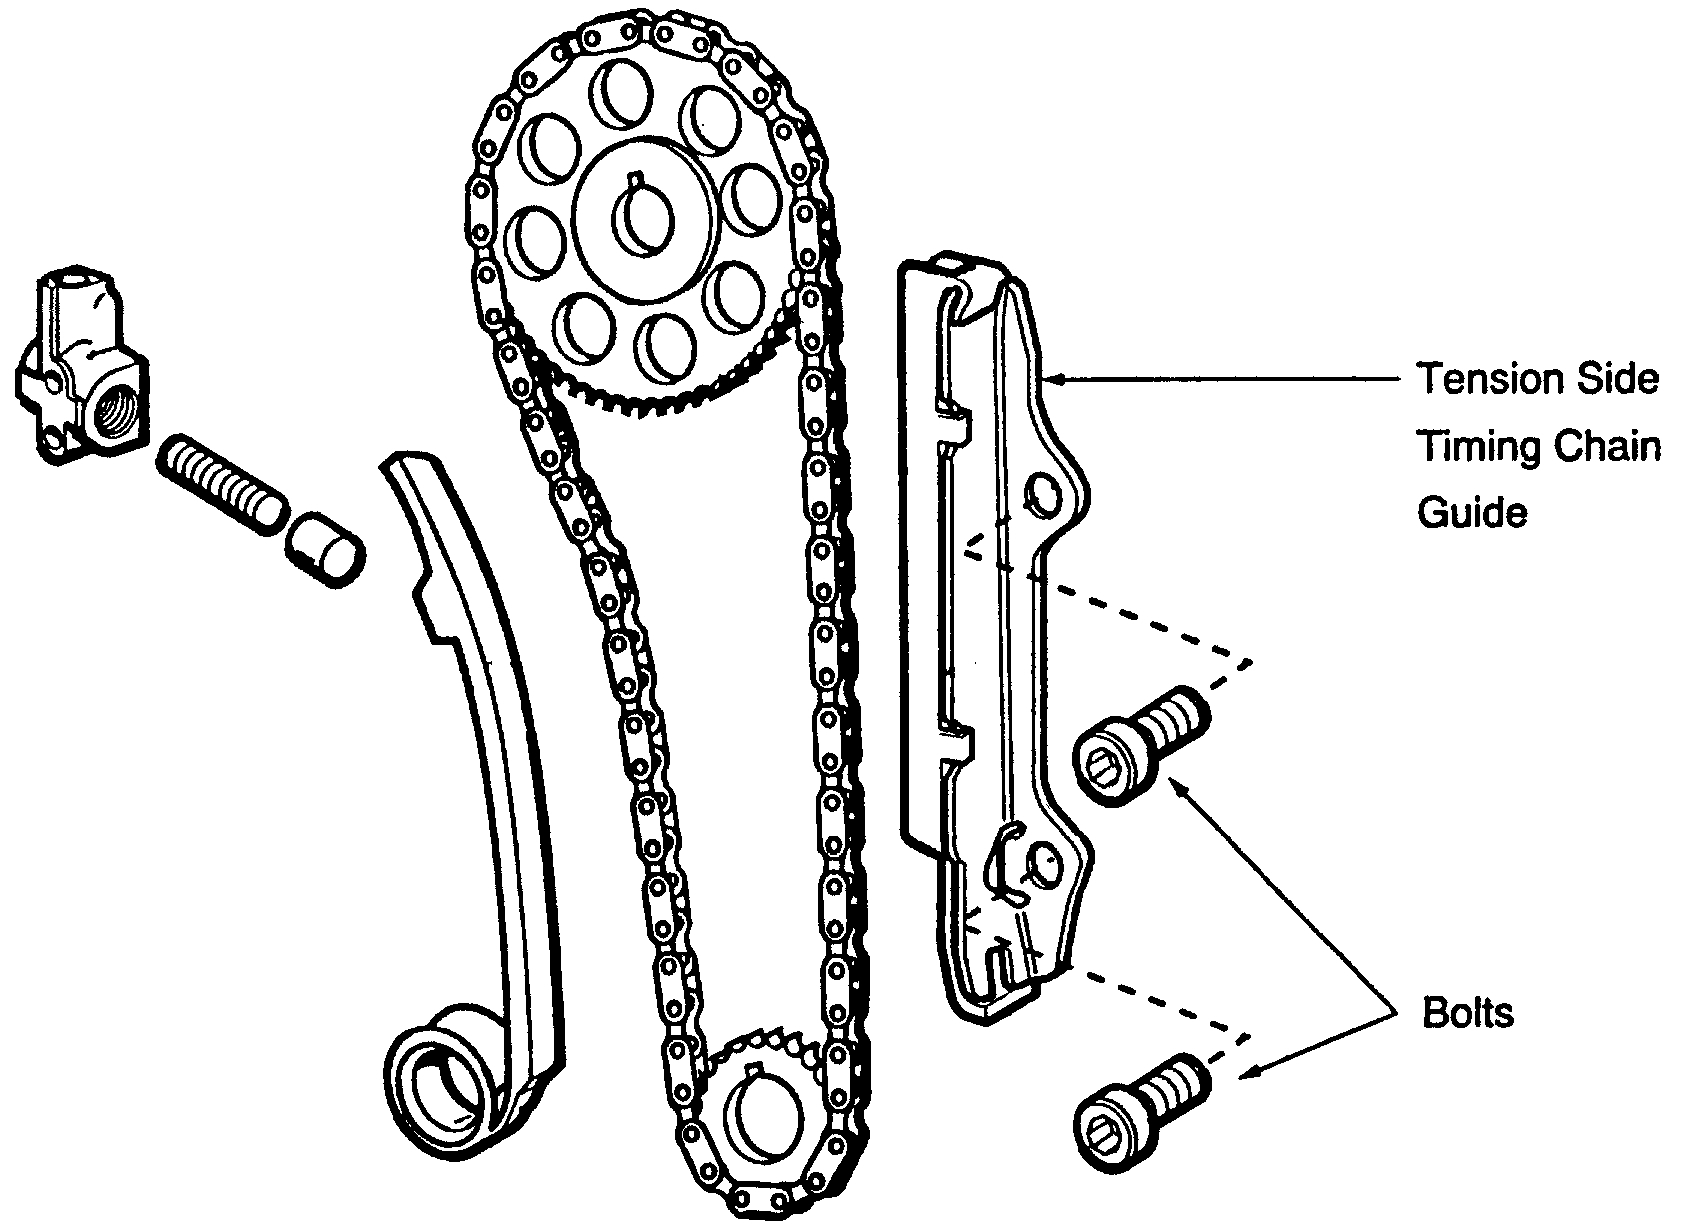
CAUTION: SERVICE INFORMATION
pic 13
If servicing the timing chain or replacing a long block, check to see if it has the steel-backed tension side guide. If not, please replace it with the countermeasure guide, including the two bolts listed. Due to the changes made to the guide, new style bolts are required. Refer to TSB 95027.
Applying Sealant To Front Cover
pic 14
7. Apply liquid gasket to front cover.
8. Apply lithium grease to sealing lip of crankshaft oil seal.
9. Install front cover.
^ Be careful not to damage cylinder head gasket.
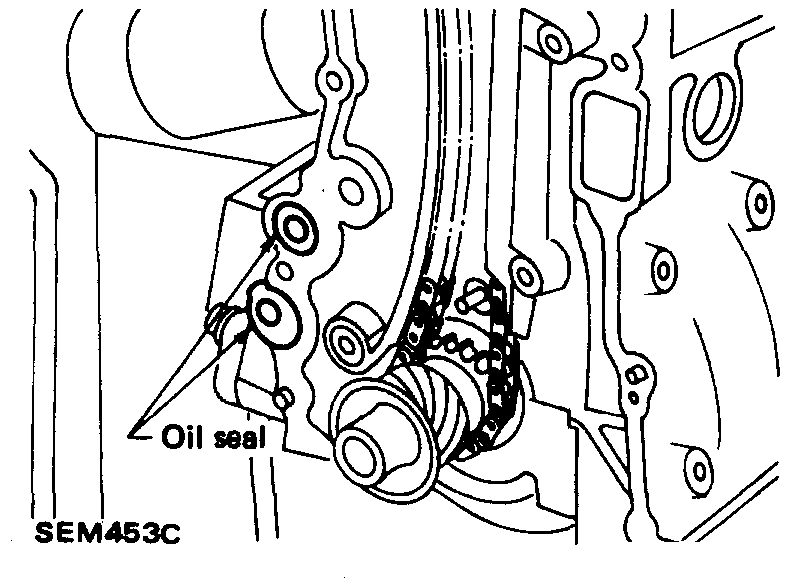
Front Cover Oil Seals
pic 15
^ Do not forget oil seal.
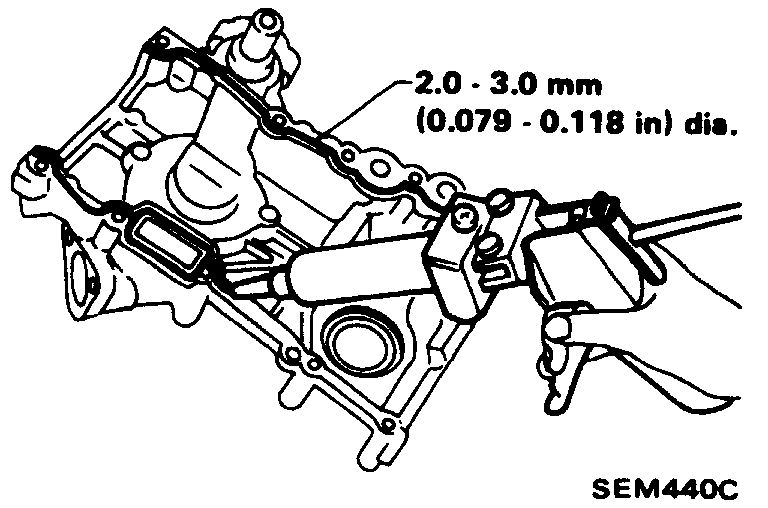
10. Install rubber plug.
11. Install oil pan. See: Oil Pan, Engine > Procedures > Removal and Installation
12. Install oil pump and distributor driving spindle with new gasket in front cover.
Installing Oil Pump
pic 16
a. Assemble oil pump and driving spindle, aligning punchmark on driving spindle with oil hole.
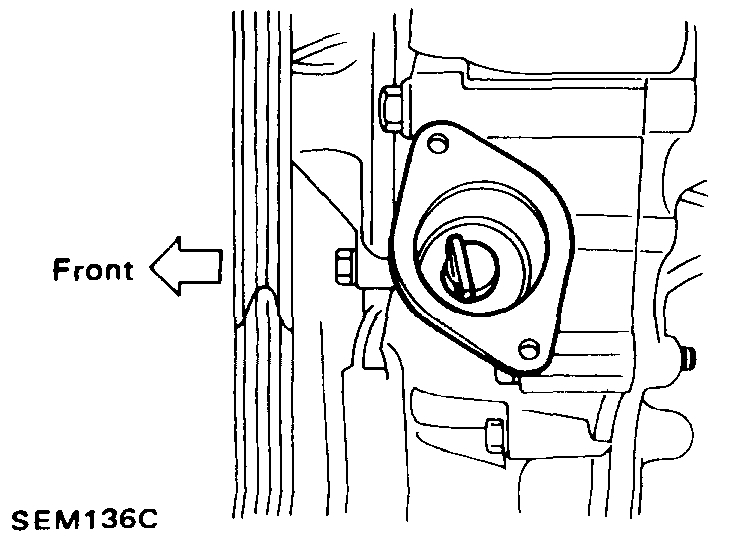
Distributor Driving Spindle
pic 17
b. Make sure that driving spindle is set as shown in image.
13. Install distributor.
Setting TDC- Distributor
pic 18
14. Make sure that No. 1 piston is set at T.D.C. and that distributor rotor is set at No.1 cylinder spark position.
____________________________________________
Let me know if this helps.
Take care,
Joe
Images (Click to enlarge)
Jul 27, 2020 at 8:30 PM