Welcome to 2CarPros.
According the the directions, the cam needs removed. Here are the directions for replacing the seals (both front and rear). The attached pitures correlate with the directions.
_________________________
CAUTION:
- Make sure that all rockers are in alignment with their valves when torquing the rocker assembly bolts.
- To prevent the rocker arm assembly from coming apart, leave the camshaft holder bolts in the holes.
- Handle the rocker arms carefully so that the oil does not come out of the hydraulic tappets.
Pic 1
1. Install the camshaft and rubber cap, then install the camshaft seal with the open side (spring) facing in.
NOTE:
- Position the camshaft with pin hole at the top.
- Do not apply oil to the camshaft holder mating surface of the camshaft seal.
- Apply liquid gasket, Part No. 08718-0001 or 08718-0003 around the rubber cap.
Pic 2
2. Apply liquid gasket to the head mating surfaces of the No. 1 and the No. 5 camshaft holders. Apply liquid gasket to the shaded areas.
Pic 3
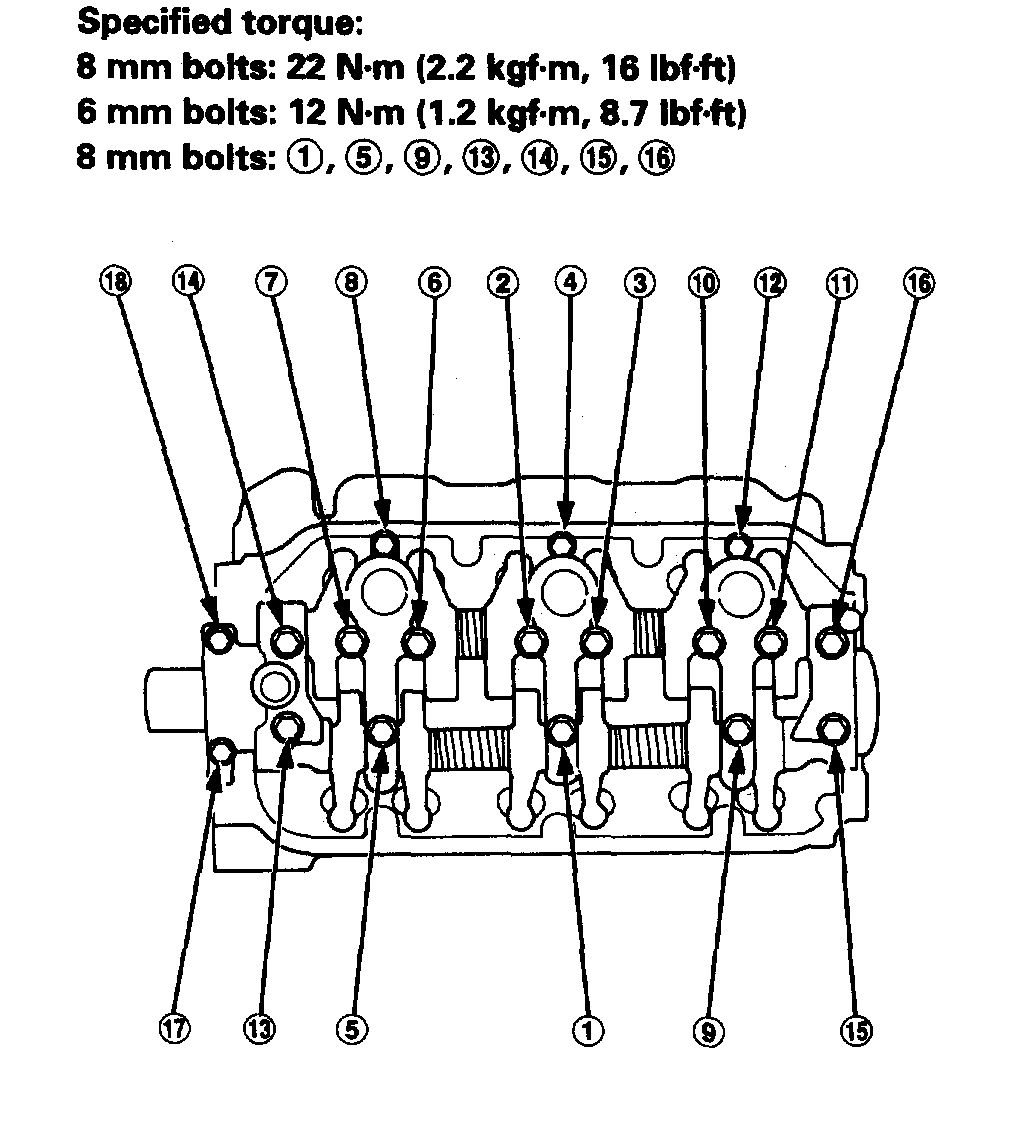
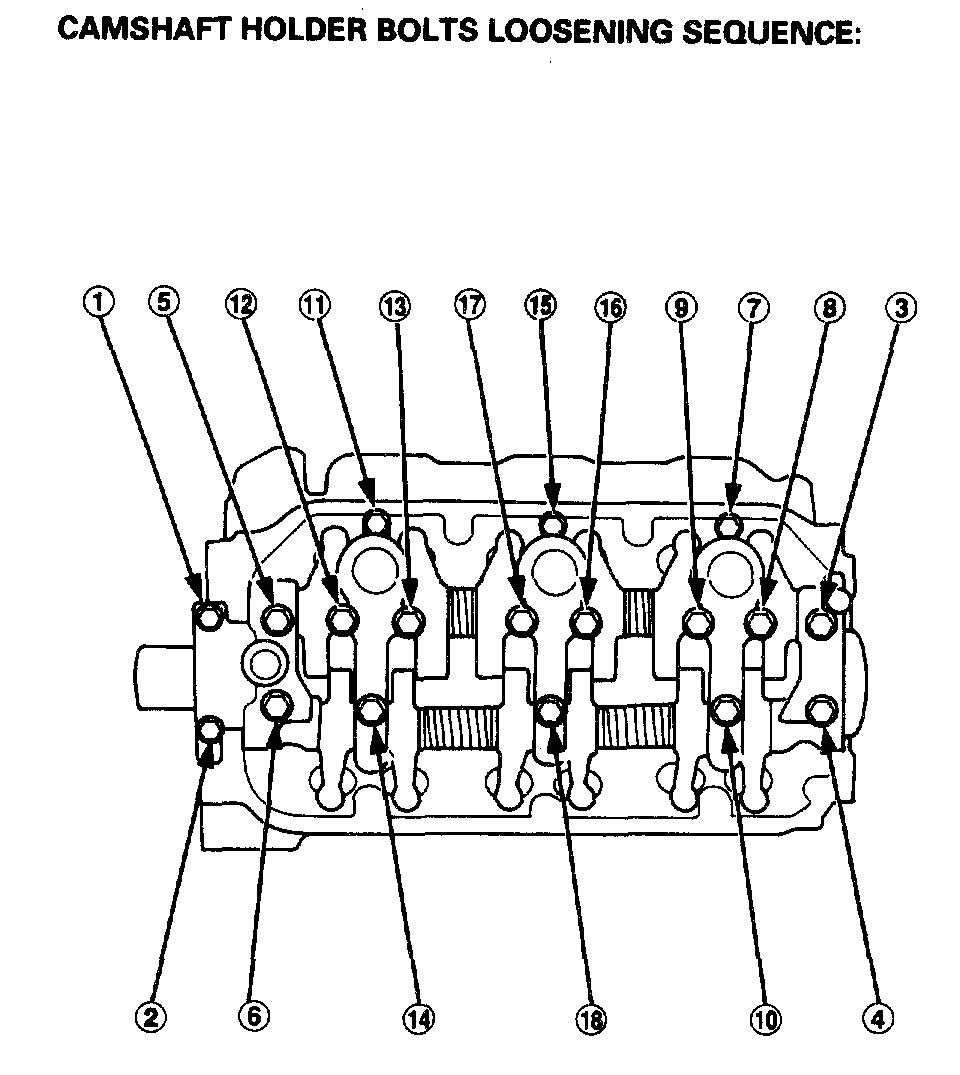
3. Tighten each bolt 2 turns at a time in the sequence to ensure that the rockers do not bind on the valves.
__________________________________
Now, to access the front seal, you will have to remove the cam gear. Thus, the timing belt needs removed. I will provide those directions. This process is quite extensive and when you reinstall the belt, you must follow the directions to ensure the timing is correct. All remaining pics correlate with timing belt removal and replacement.
__________________________________
TIMING BELT AND BALANCER BELT
Removal
NOTE:
- Replace the timing belt and timing balance belt at 105,000 miles (168,000 km) according to the maintenance schedule (normal conditions, severe conditions). If the vehicle regularly is driven in one or more of the following conditions, replace the timing belt and timing balancer belt at 60,000 miles (U.S.A.) 100,000 km (Canada).
- In very high temperatures (over 110°F, 43°C).
- In very low temperature (under -20°F, -29°C).
- Turn the crankshaft pulley so the No. 1 piston is at top dead center (TDC) before removing the belt.
- Inspect the water pump before installing the timing belt.
1. Remove the engine cover.
2. Remove the intake air duct and air cleaner housing assembly.
3. Loosen the mounting bolt, lock bolt and adjusting rod, then remove the alternator belt.
4. Loosen the idler pulley center nut and adjusting bolt, then remove the air conditioning (A/C) compressor belt.
Pic 4
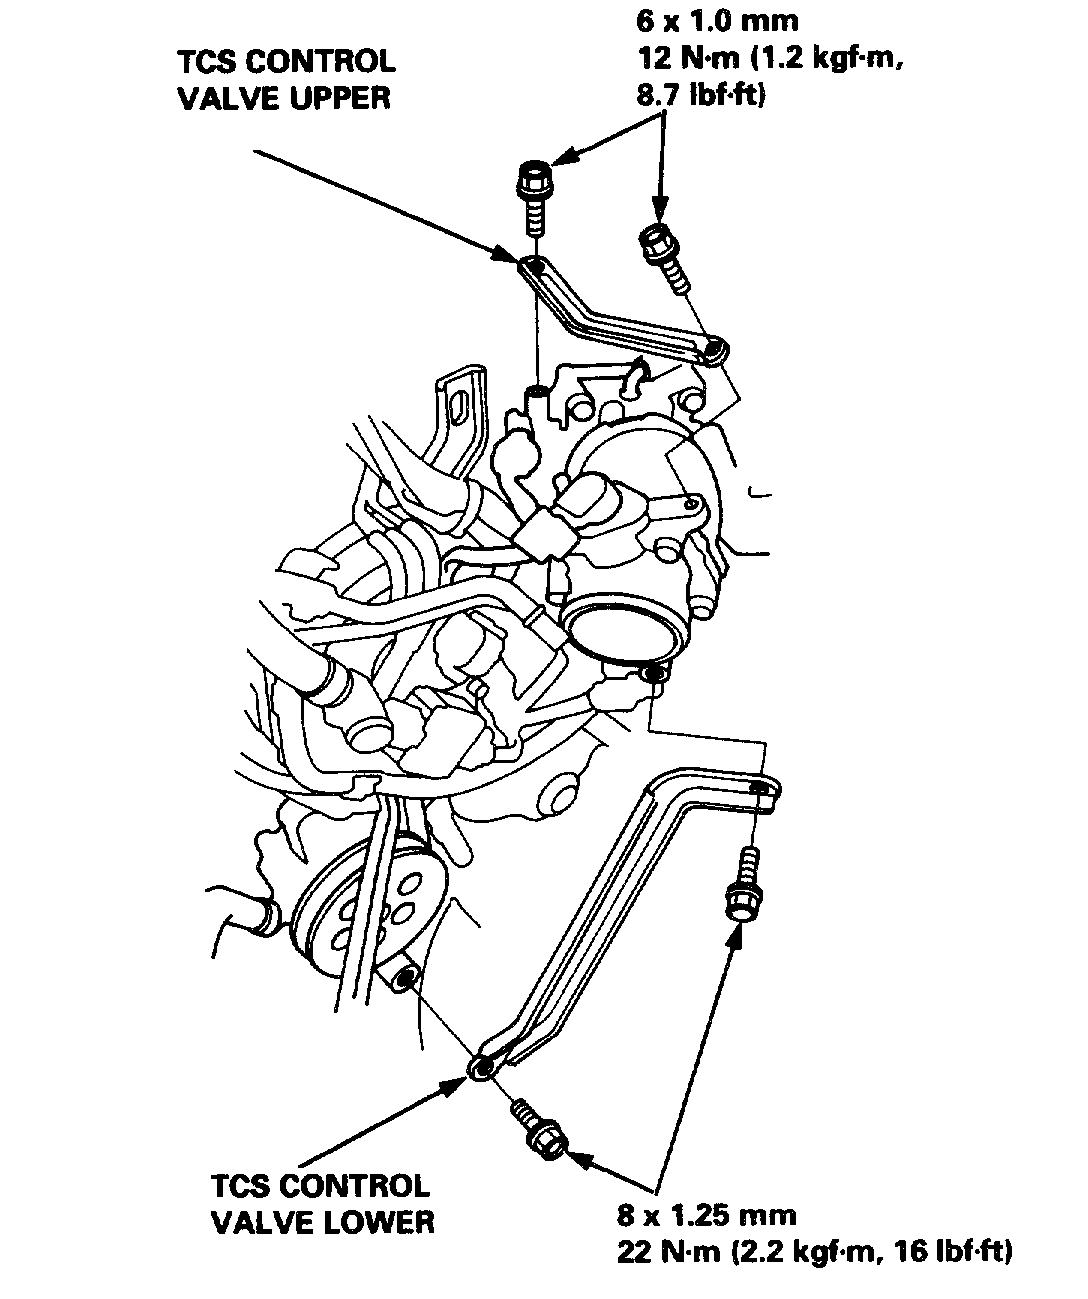
5. Remove the TCS control valve upper and lower
NOTE: Refer to Brakes when installing the brackets.
6. Loosen the adjusting bolt, locknut and mounting bolt, then remove the power steering (P/S) pump belt.
Pic 5
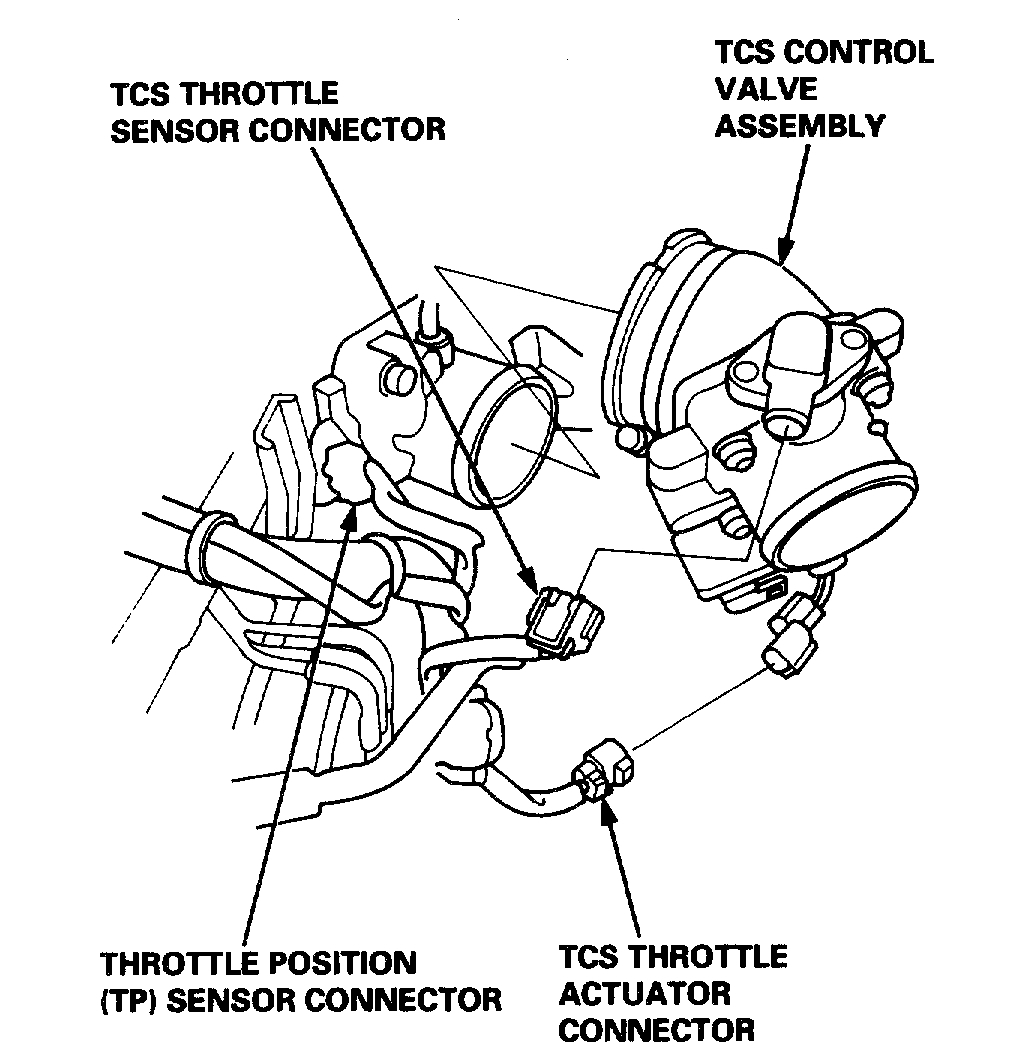
7. Disconnect the TCS throttle sensor connector, the TCS throttle actuator connector, and the throttle position (TP) sensor connector, then remove the TCS control valve assembly.
Pic 6
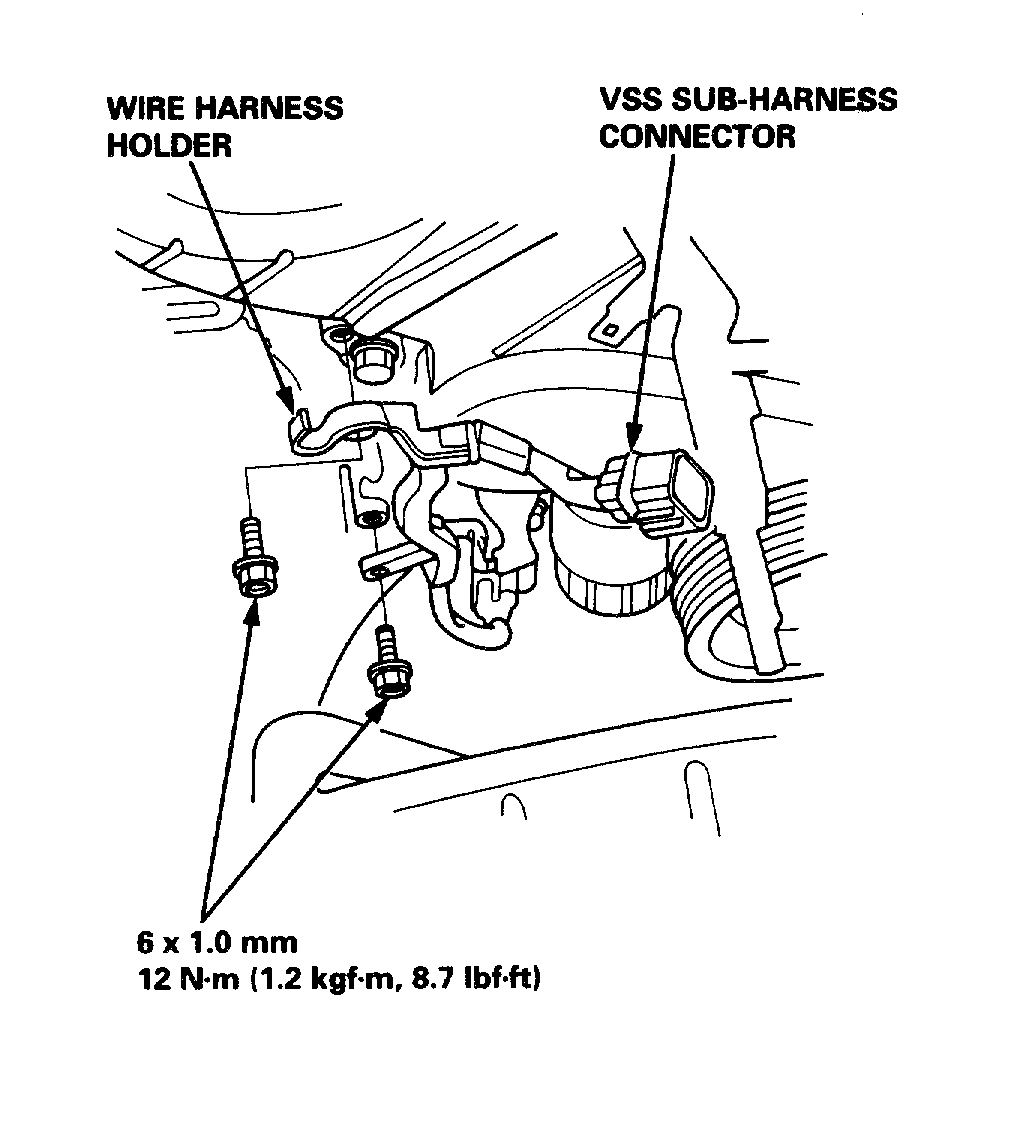
8. Disconnect the vehicle speed sensor (VSS) sub-harness connector, then remove the wire harness holder.
Pic 7
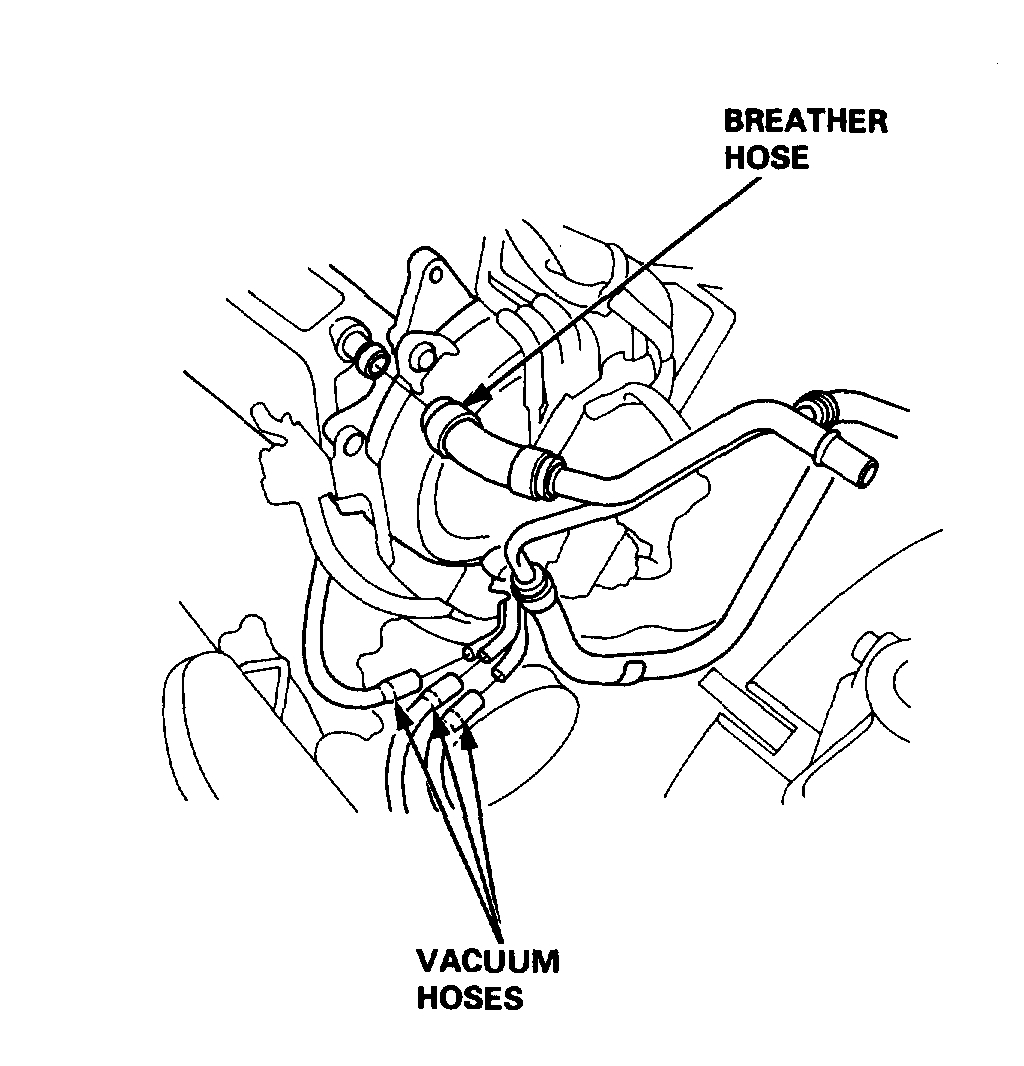
9. Remove the breather hose and vacuum hoses.
Pic 8
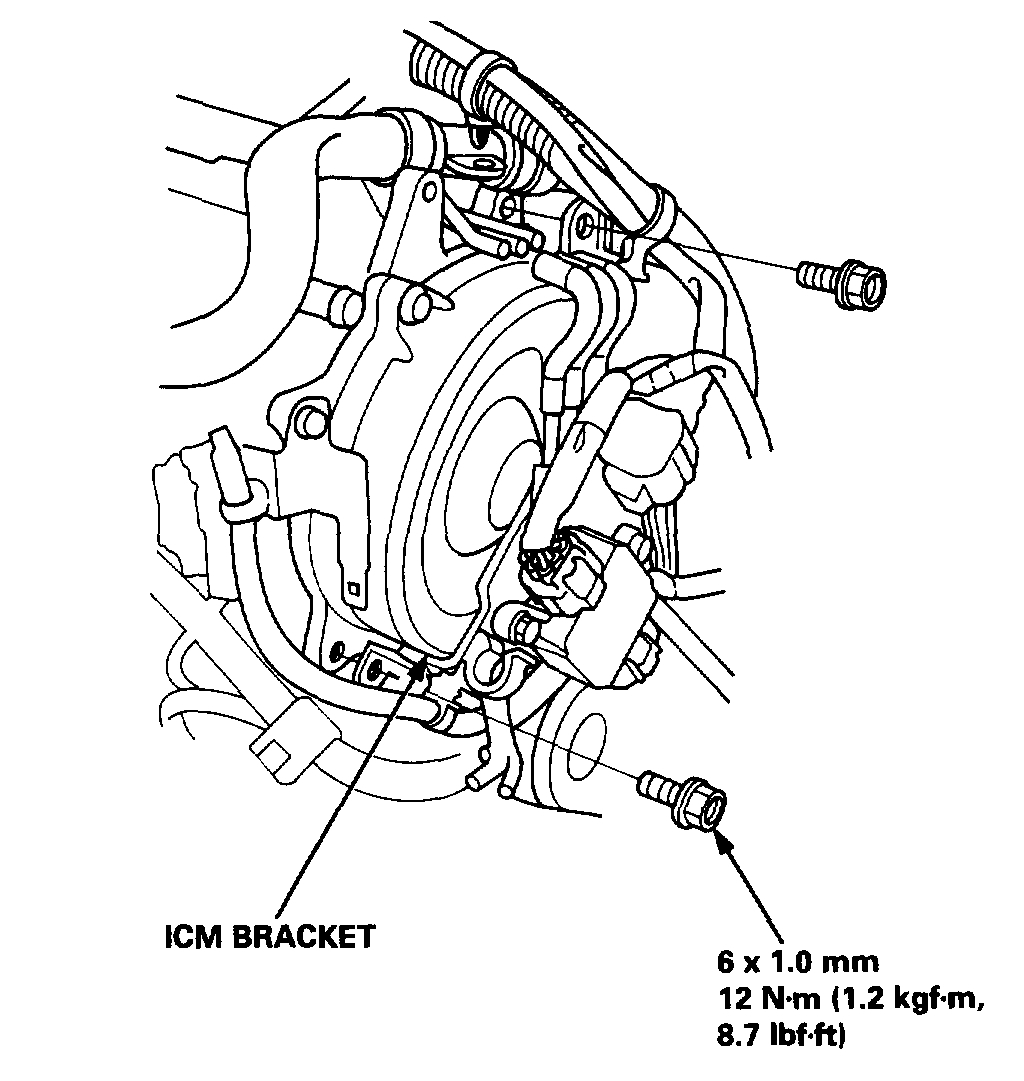
10. Remove the vacuum hoses and ignition control module (ICM) bracket.
Pic 9
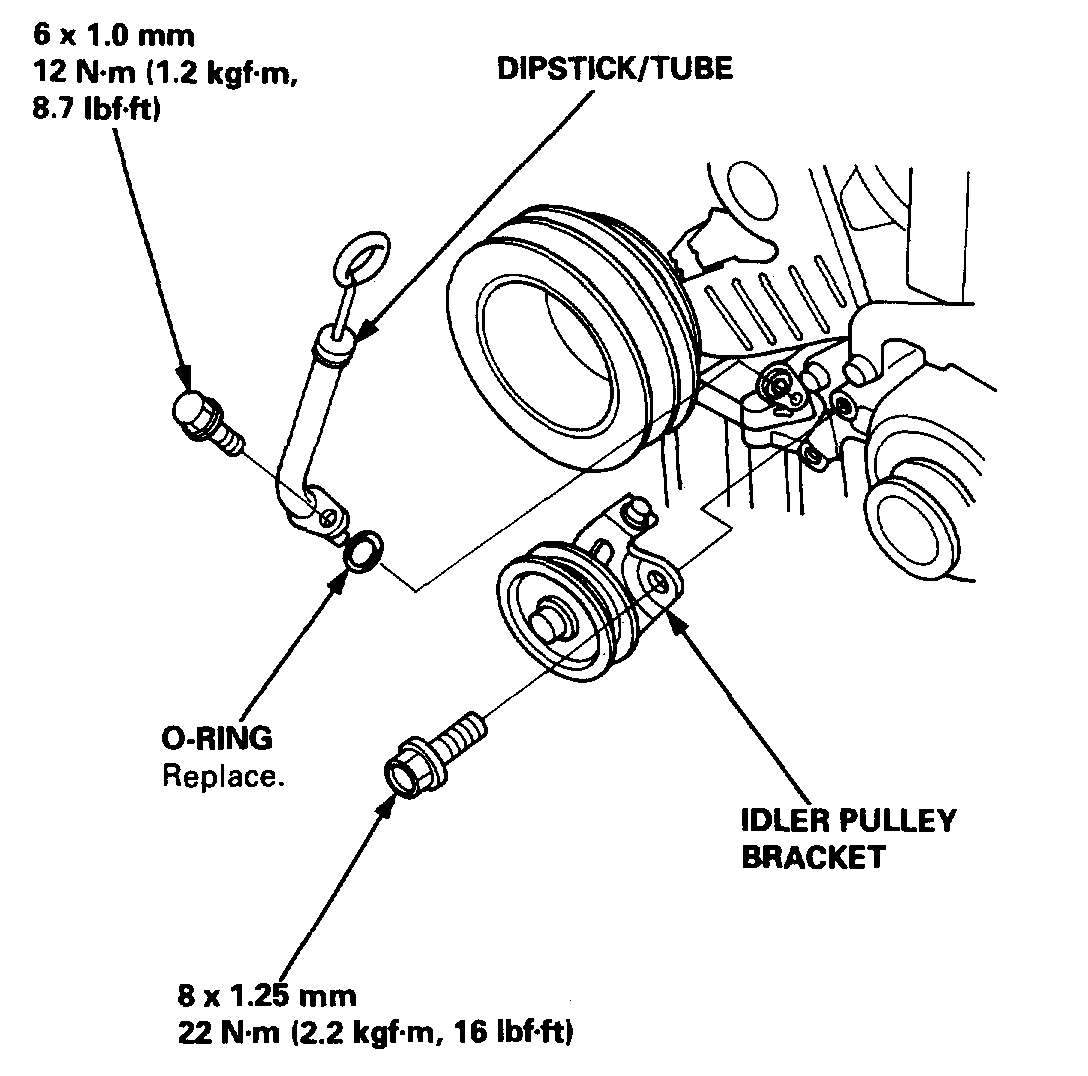
11. Remove the idler pulley bracket, dipstick and tube.
12. Remove the crankshaft pulley.
Pic 10
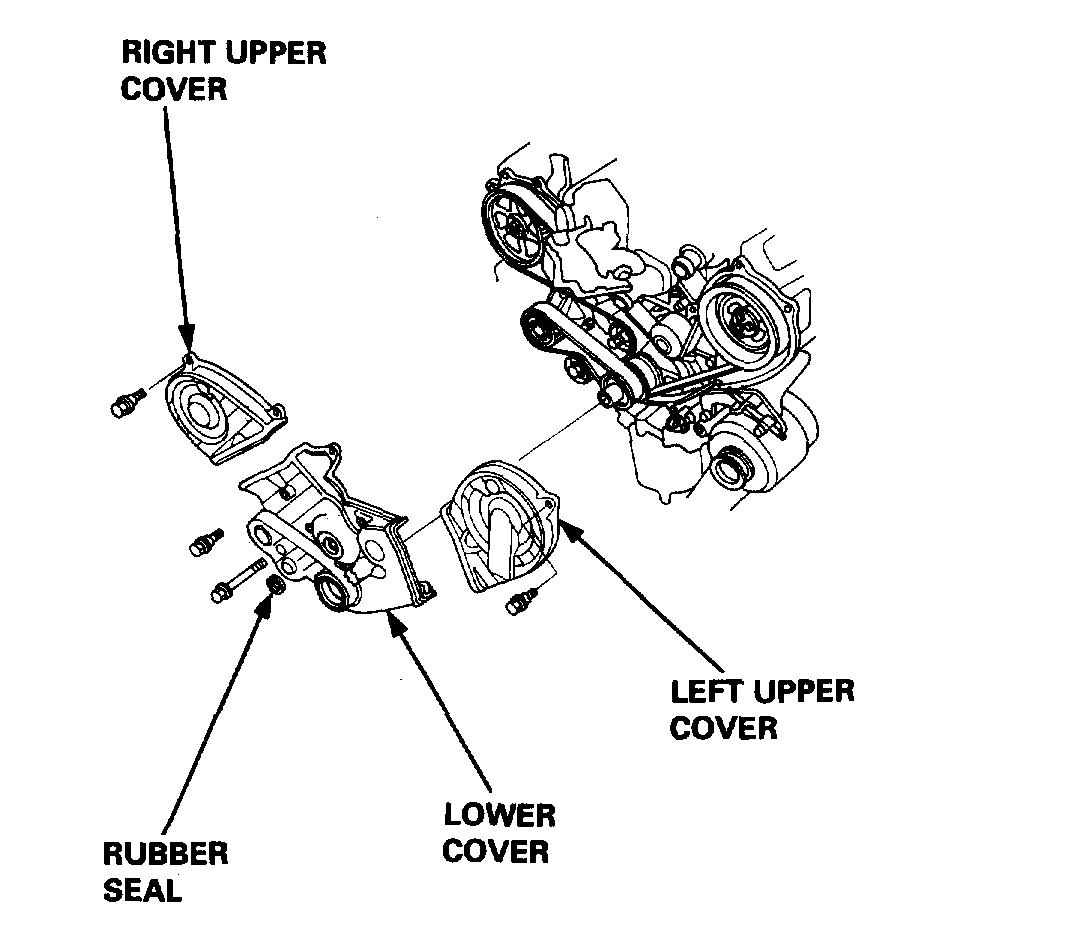
13. Remove the upper and lower covers.
NOTE: Do not use the upper and lower covers for storing removed items.
Pic 11
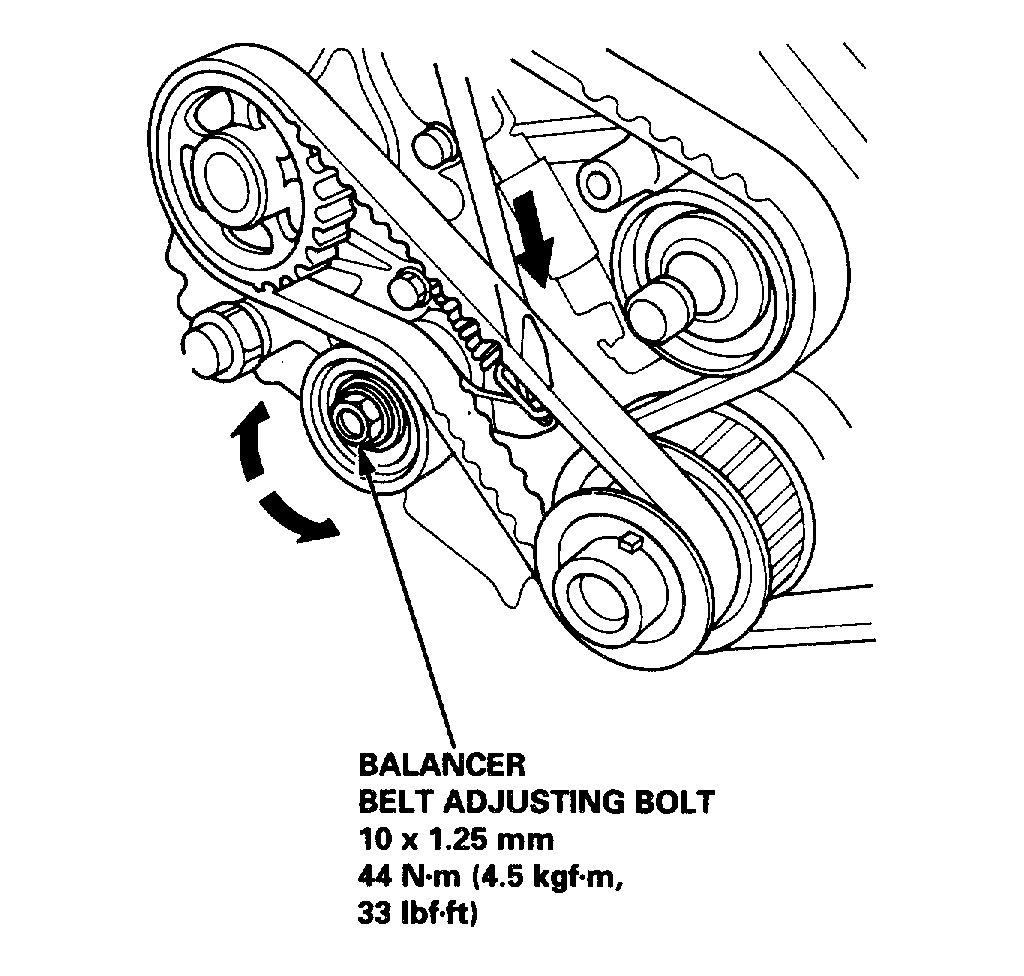
14. Loosen the balancer belt adjusting bolt 180°. Push the tensioner to remove tension from the balancer belt, then retighten the adjusting bolt.
15. Remove the balancer belt.
Pic 12
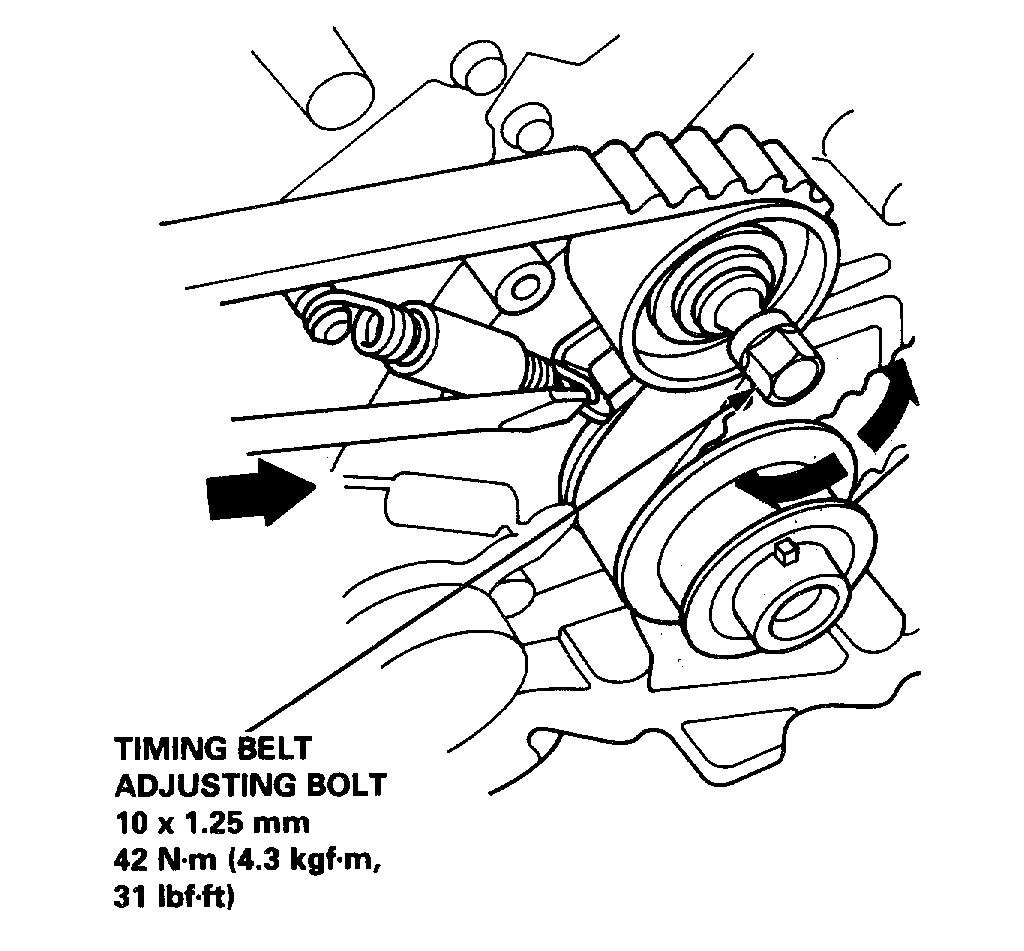
16. Loosen the timing belt adjusting bolt 180°. Push the tensioner to remove tension from the timing belt, then retighten the adjusting bolt.
17. Remove the timing belt.
Installation
Install the timing belt and balancer belt in the reverse order of removal; only key points are described here.
CAUTION: Do not rotate the crankshaft pulley or camshaft pulleys with the timing belt removed. The pistons may hit the valves and cause damage.
NOTE: When installing only the balancer belt, go to step 12.
1. Remove the spark plugs.
2. Remove the balancer belt drive pulley and timing belt guide plate.
Pic 13
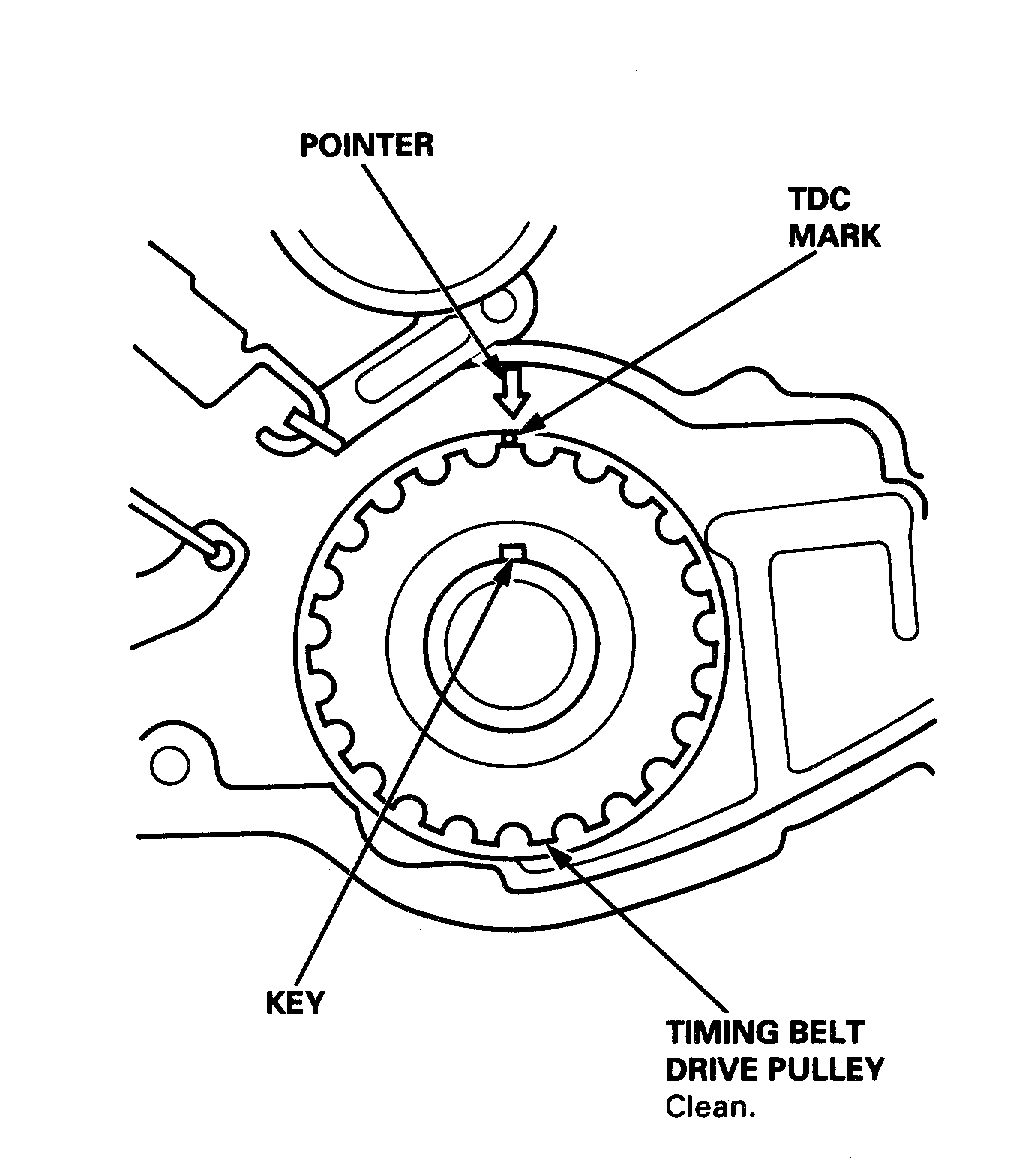
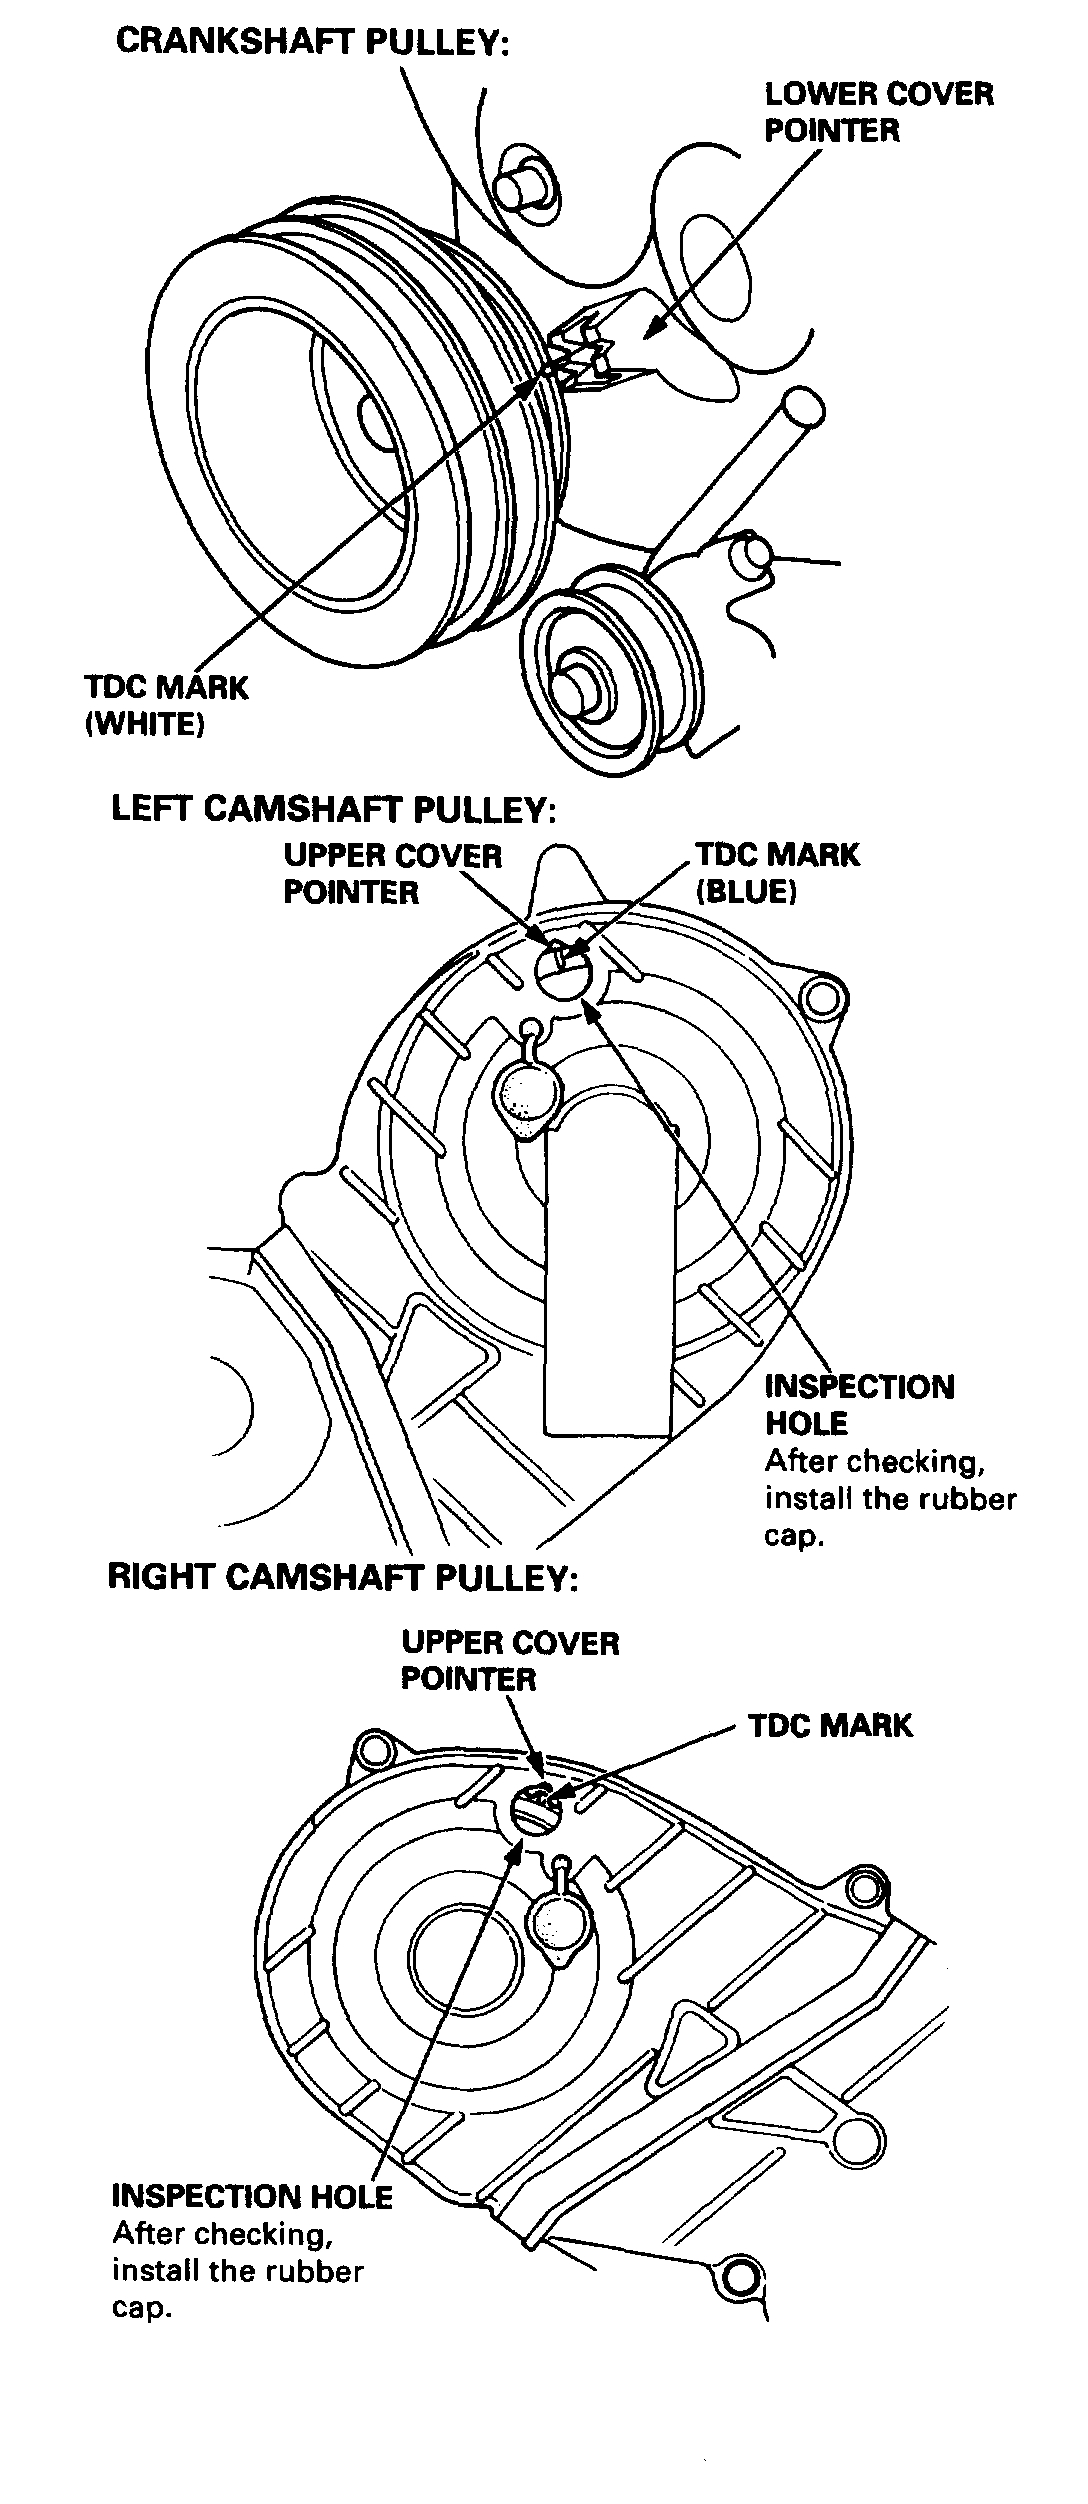
3. Set the timing belt drive pulley so that the No. 1 piston is at top dead center (TDC). Align the TDC mark on the timing belt drive pulley with the pointer on the oil pump.
Pic 14
4. Set the camshaft pulleys so that the No. 1 piston is at TDC. Align the TDC marks on the camshaft pulleys to the pointers on the back covers.
Pic 15
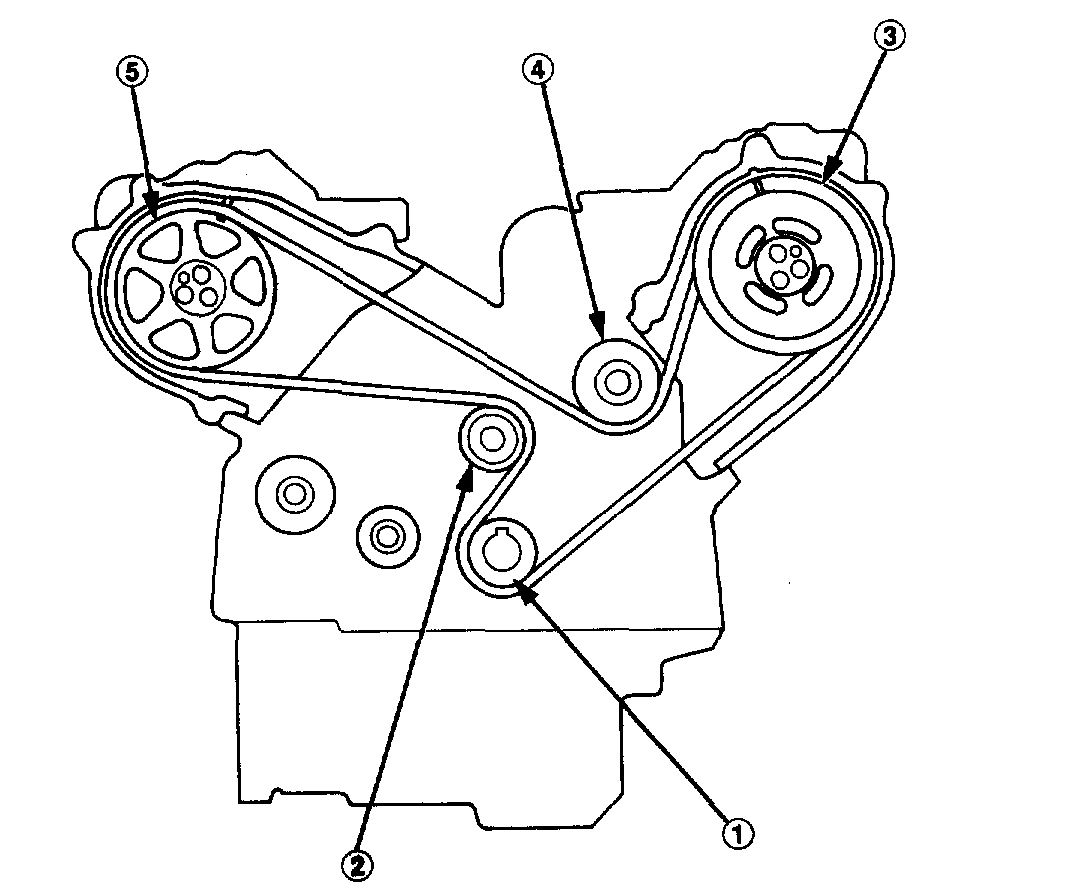
5. Install the timing belt in the sequence.
(1)Timing belt drive pulley (crankshaft) -> (2) Adjusting pulley -> (3) Left camshaft pulley -> (4) Water pump pulley -> (5) Right camshaft pulley.
NOTE:
- For easier installation, turn the right camshaft pulley clockwise about a half tooth from the TDC position.
- Make sure the timing belt drive pulley and camshaft pulleys are at TDC.
6. Loosen and retighten the timing belt adjusting bolt to tension the timing belt.
7. Install the lower cover and crankshaft pulley.
8. Rotate the crankshaft pulley about 5 or 6 turns clock wise so the timing belt positions on the pulleys.
9. Adjust the timing belt tension.
10. Remove the crankshaft pulley and lower cover.
11. Install the timing belt guide plate and balancer belt drive pulley.
Pic 16
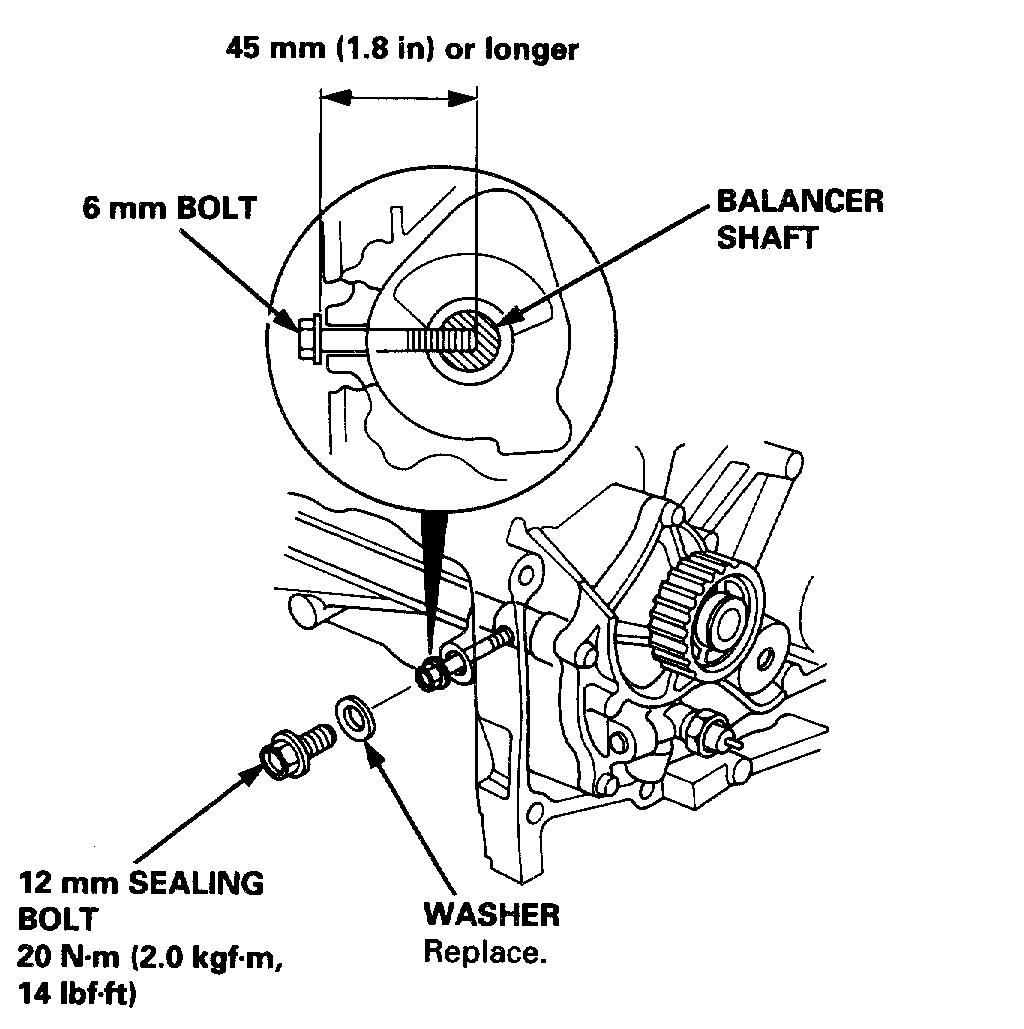
12. Align the maintenance hole and the balancer shaft hole. Insert a 6 mm bolt that is at least 45 mm (1.8 inch) long into the balancer shaft.
Pic 17
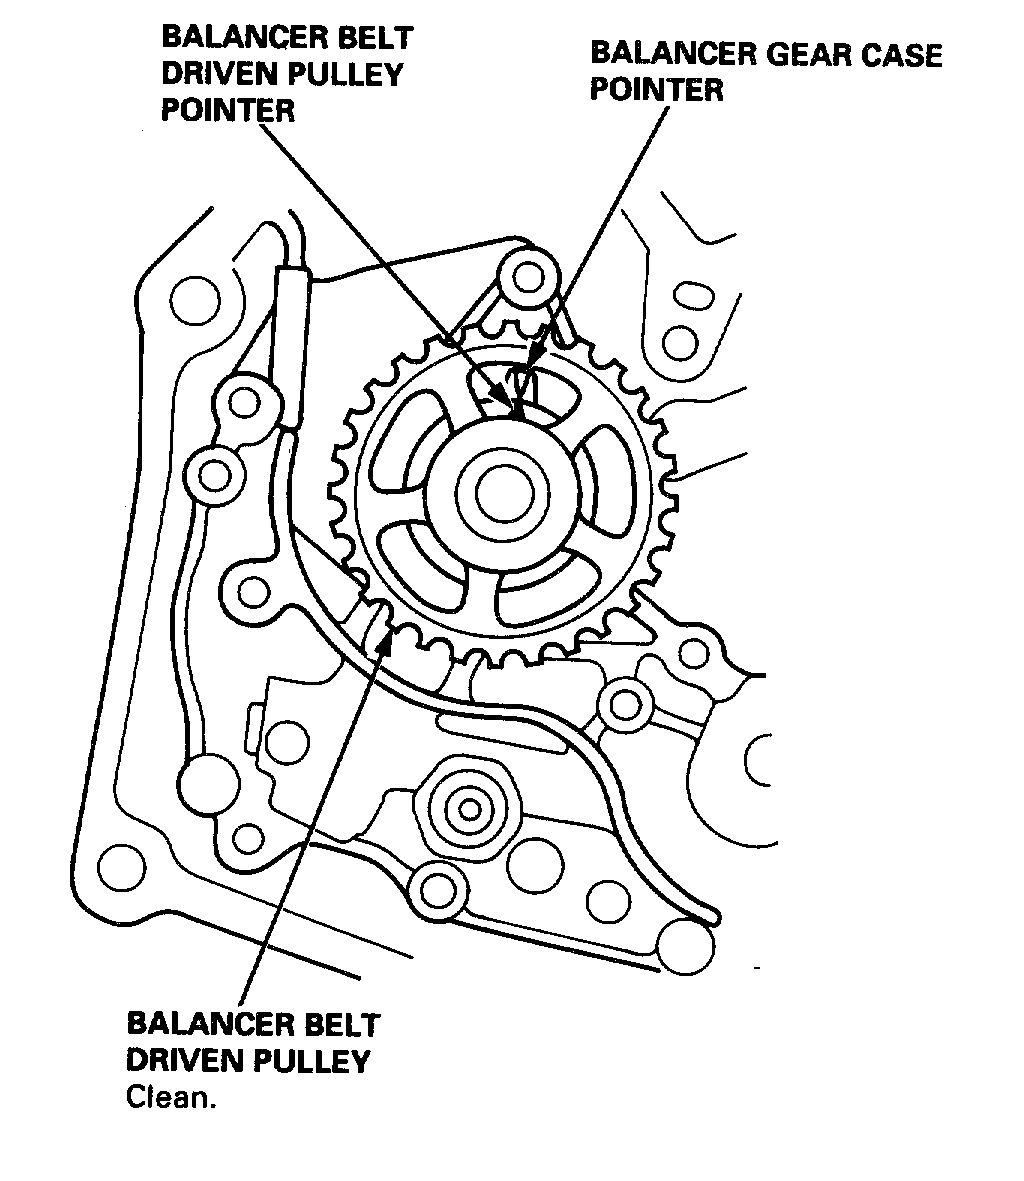
13. Check alignment of the pointers.
14. Set the timing belt drive pulley so that the No. 1 piston is at TDC.
15. Install the balancer belt drive pulley, then install the balancer belt.
16. Loosen and retighten the balancer belt adjusting bolt to tension the balancer belt.
17. Remove the 6 mm bolt. Install the sealing bolt in the maintenance hole. Use a new washer.
18. Install the crankshaft pulley, then rotate the crankshaft pulley about 5 or 6 turns clockwise so that the balancer belt positions on the pulleys.
19. Adjust the balancer belt tension.
20. Remove the crankshaft pulley.
Pic 18
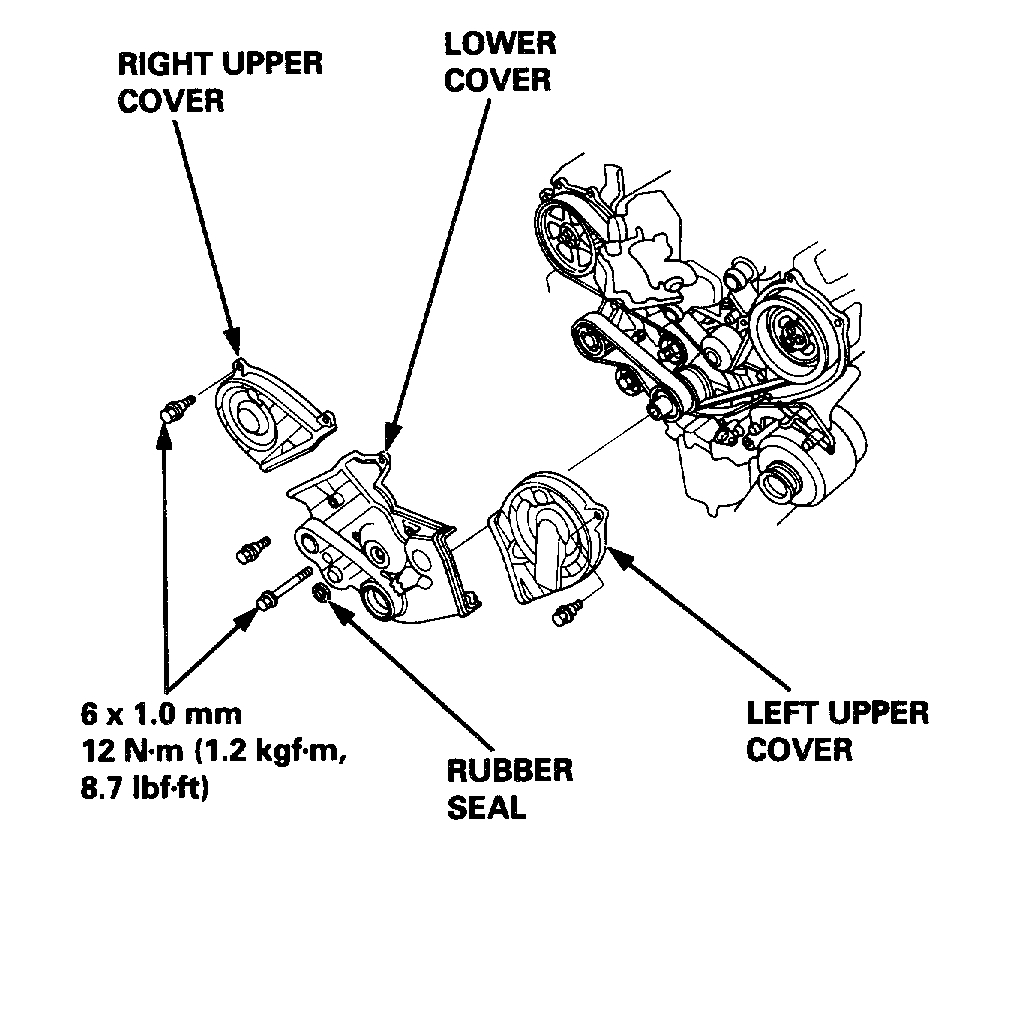
21. Install the upper and lower covers, then install the crankshaft pulley.
Pic 19
22. Check that the crankshaft pulley and camshaft pulleys are at TDC.
23. If the camshaft and crankshaft pulleys are not positioned at TDC, remove the timing belt and adjust the positioning following the procedure, then reinstall the timing belt.
24. After installation, adjust the tension of each belt.
- See Starting and Charging for alternator belt tension adjustment.
- See Heating and Air Conditioning for A/C compressor belt tension adjustment.
- See Steering and Suspension for P/S pump belt tension adjustment.
_________________________________
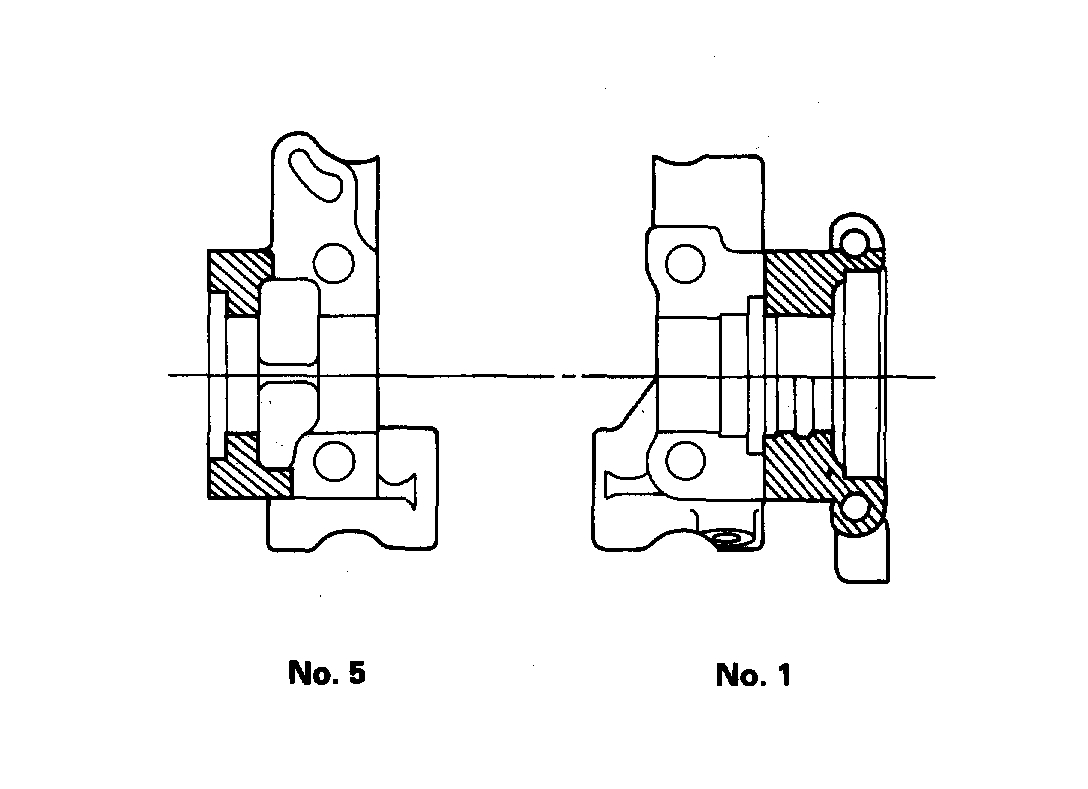
Here are the directions for removal of the rocker arms, which need removed to access the cam.
NOTE: Refer to rocker arm assembly removal. Identify parts as they are removed to ensure reinstallation in original locations. Inspect rocker shafts and rocker arms. Rocker arms must be installed in the same position if reused. When removing or installing the rocker arm assembly, do not remove the camshaft holder bolts. The bolts will keep the holders, springs and rocker arms on the shaft.
Removal
pic 20
NOTE:
- To prevent damage to the valves or rocker arm assembly, unscrew the camshaft holder bolts two turns at a time in a crisscross pattern.
- When removing the rocker arm assembly, do not remove the camshaft holder bolts. The bolts will keep the camshaft holders, the springs and the rocker arms on the shahs.
NOTE: Refer to camshaft when installing.
__________________________________
I hope this helps and doesn't confuse.
Take care and let me know if you have other questions.
Images (Click to make bigger)
Saturday, May 4th, 2019 AT 6:34 PM