Camshaft sensor location I need to replace it

Tiny
TIM RAXTER
  • MEMBER
  • 2001 JEEP GRAND CHEROKEE
  • 4.7L
  • V8
  • 4WD
  • AUTOMATIC
  • 200,000 MILES
Where is it located on the engine?
Thursday, January 30th, 2020 AT 12:34 AM

20 Replies

Tiny
SCGRANTURISMO
  • MECHANIC
  • 4,897 POSTS
Hello,

I have included the information that you requested in the diagrams down below. I hope that this helps. Please get back to us with how everything turns out.

Thanks,
Alex
2CarPros
Was this
answer
helpful?
Yes
No
Thursday, January 30th, 2020 AT 3:36 AM
Tiny
TIM RAXTER
  • MEMBER
  • 3 POSTS
Thank you !
Was this
answer
helpful?
Yes
No
Thursday, January 30th, 2020 AT 4:28 PM
Tiny
JACOBANDNICKOLAS
  • MECHANIC
  • 108,133 POSTS
I don't know if you need them, but here are the directions for replacing the sensor:

________________________________
Right Cylinder head
REMOVAL
The Camshaft Position Sensor (CMP) on this engine is bolted to the front/top of the right cylinder head.

Pic 1

It is easier to remove/install sensor from under vehicle.
1. Raise and support vehicle.
2. Disconnect electrical connector at CMP sensor.
3. Remove sensor mounting bolt.
4. Carefully pry sensor from cylinder head in a rocking action with two small screwdrivers. This engine is equipped with a sensor spacer shim. If equipped, this shim will be located at sensor bolt hole between cylinder head and sensor mounting tang (TSB W08-18-00). Save this shim for sensor installation.
5. Check condition of sensor O-ring.

INSTALLATION
The Camshaft Position Sensor (CMP) on this engine is bolted to the front/top of the right cylinder head.
1. Clean out machined hole in cylinder head.
2. Apply a small amount of engine oil to sensor O-ring.
3. Install sensor into cylinder head with a slight rocking action. Do not twist sensor into position as damage to O-ring may result.

CAUTION: Before tightening sensor mounting bolt, be sure sensor is completely flush to cylinder head. If sensor is not flush, damage to sensor mounting tang may result.

4. Install mounting bolt and tighten to 12 Nm (106 in. Lbs.) Torque.
5. Connect electrical connector to sensor.
6. Lower vehicle.

____________________

Take care,
Joe
Was this
answer
helpful?
Yes
No
+1
Sunday, February 2nd, 2020 AT 8:03 PM
Tiny
BENHORN
  • MEMBER
  • 1 POST
  • 2000 JEEP GRAND CHEROKEE
  • 88,000 MILES
I have a 2000 Jeep Grand Cherokee 4.7L V8. It is showing Code P0340 Camshaft Position Sensor. Often when I drive it three or four miles and turn off the engine and try to restart it, it will turn over long and hard but will not start. After about 15 or 20 minutes, it will start. I am in the process of replacing the camshaft position sensor and have removed it from the engine but cannot after working for and hour or so, get the electrical connection loose from the camshaft position sensor.

Can you tell me how to remove the electrical connection wire housing from the camshaft position sensor?
Was this
answer
helpful?
Yes
No
+2
Wednesday, October 14th, 2020 AT 2:49 PM (Merged)
Tiny
RACEFAN966
  • MECHANIC
  • 5,029 POSTS
It is a squeeze clip type lock. So there is a spot to squeeze the connector to unlock it and then pull it off the sensor. Here is the camshaft sensor location so you can change it out. Check out the diagrams (Below). Please let us know what happens.
Was this
answer
helpful?
Yes
No
Wednesday, October 14th, 2020 AT 2:49 PM (Merged)
Tiny
SCHMASH
  • MEMBER
  • 1 POST
  • 1999 JEEP GRAND CHEROKEE
  • 190,213 MILES
I have a 1999 Jeep Grand Cherokee 4.7L V8 and it is showing error code P0340 Camshaft Position Sensor Bank A - Circuit Malfunction. I have replaced the Camshaft Position Sensor And Crankshaft Position Sensor with Mopar Parts. Im still receiving the same error code and I can not get my Jeep to start to even attempt to take it to a mechanic to figure out what exactly is wrong. I was told to check the Continuity of the circuit and the sensor but I have no clue how. I have a OHM Meter but again I am clueless to what exactly I need to do. Please Help!
Was this
answer
helpful?
Yes
No
+1
Wednesday, October 14th, 2020 AT 2:49 PM (Merged)
Tiny
HMAC300
  • MECHANIC
  • 48,601 POSTS
Test orange wire for 5 volts, if volts less than 4.5 repair open in circuit.

3. Turn ignition off. Ensure CMP sensor connector is still disconnected. Using an ohmmeter,  check resistance between CMP sensor connector,  5 volt supply circuit (Orange wire) and signal circuit (Tan/Yellow wire).
If resistance is 5 ohms or more,  go to next step. If resistance is less than 5 ohms,  repair 5 volt supply circuit for short to signal circuit. Perform TEST VER 5A.
4. Ensure ignition is off. Ensure CMP sensor connector is still disconnected. Turn ignition on,  with engine off. Using a voltmeter,  check voltage on CMP sensor connector,  signal circuit (Tan/Yellow wire). If voltage is
less than 4.5 volts,  go to next step. If voltage is 4.5 5.5 volts,  go to step 9). If voltage is more than 5.5 volts,  repair signal circuit for short to voltage. Perform TEST VER 5A.
5. Turn ignition off. Ensure CMP sensor connector is still disconnected. Disconnect PCM connectors. PCM is located in engine compartment. See PCM LOCATION table under SYSTEM DIAGNOSTICS. Clean
and/or repair connectors as necessary. Using an ohmmeter,  check resistance of CMP sensor signal circuit (Tan/Yellow wire) between CMP sensor connector and PCM. If resistance is less than 5 ohms,  go to next
step. If resistance is 5 ohms or more,  repair open signal circuit. Perform TEST VER 5A.
6. Turn ignition off. Ensure CMP sensor and PCM connectors are still disconnected. Using ohmmeter,  check resistance between ground and CMP sensor connector,  signal circuit (Tan/Yellow wire). If resistance is 5
ohms or more,  go to next step. If resistance is less than 5 ohms,  repair signal circuit for short to ground. Perform TEST VER 5A.
7. Ensure ignition is off. Ensure CMP sensor and PCM connectors are still disconnected. Using ohmmeter,  check resistance between CMP sensor connector,  signal circuit (Tan/Yellow wire) and sensor ground
circuit (Black/Light Blue wire). If resistance is 5 ohms or more,  go to next step. If resistance is less than 5 ohms,  repair signal circuit for short to sensor ground circuit. Perform TEST VER 5A.
8. At this time,  PCM is assumed to be defective. Replace PCM. Perform TEST VER 5A.
9. Ensure ignition is off. Ensure CMP sensor connector is still disconnected. Using an ohmmeter,  check resistance between ground and CMP sensor connector,  sensor ground circuit (Black/Light Blue wire). If
resistance is less than 5 ohms,  go to next step. If resistance is 5 ohms or more,  go to step 12).
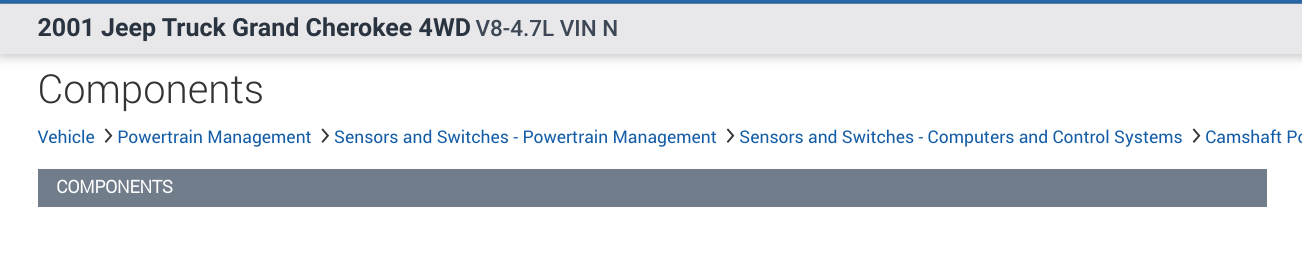
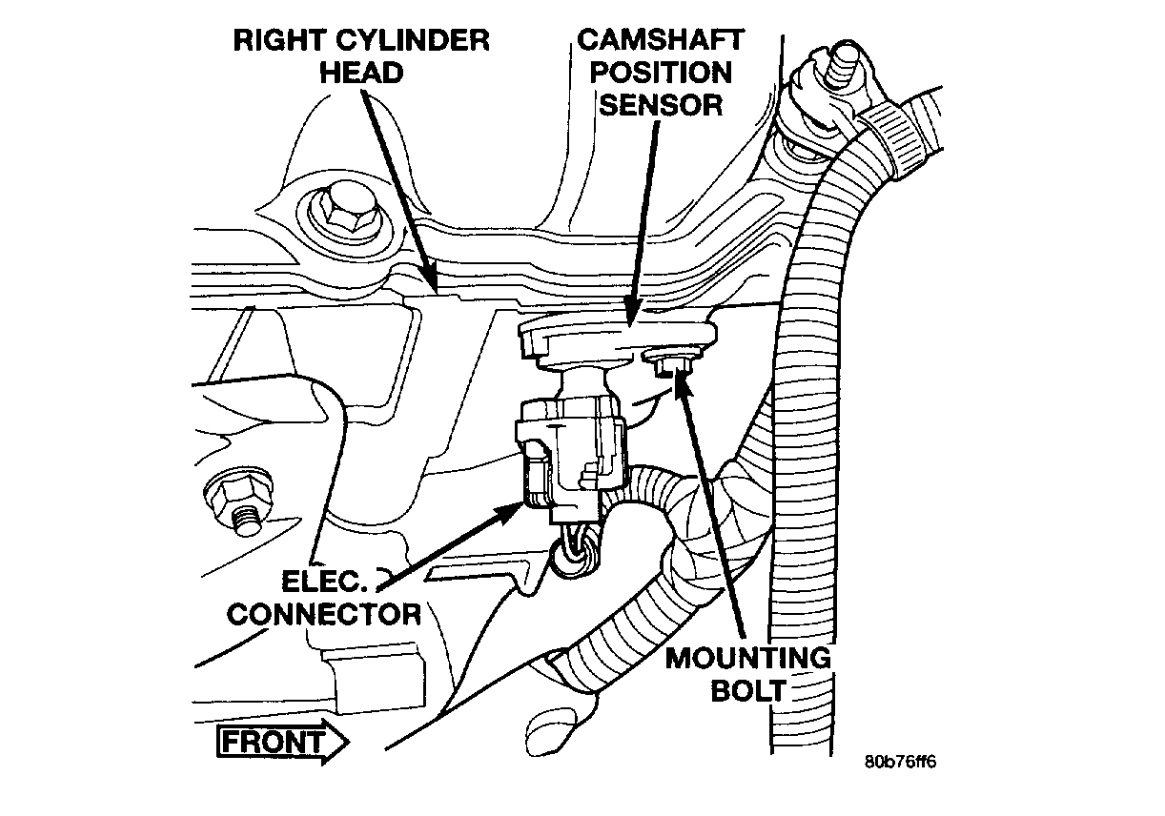
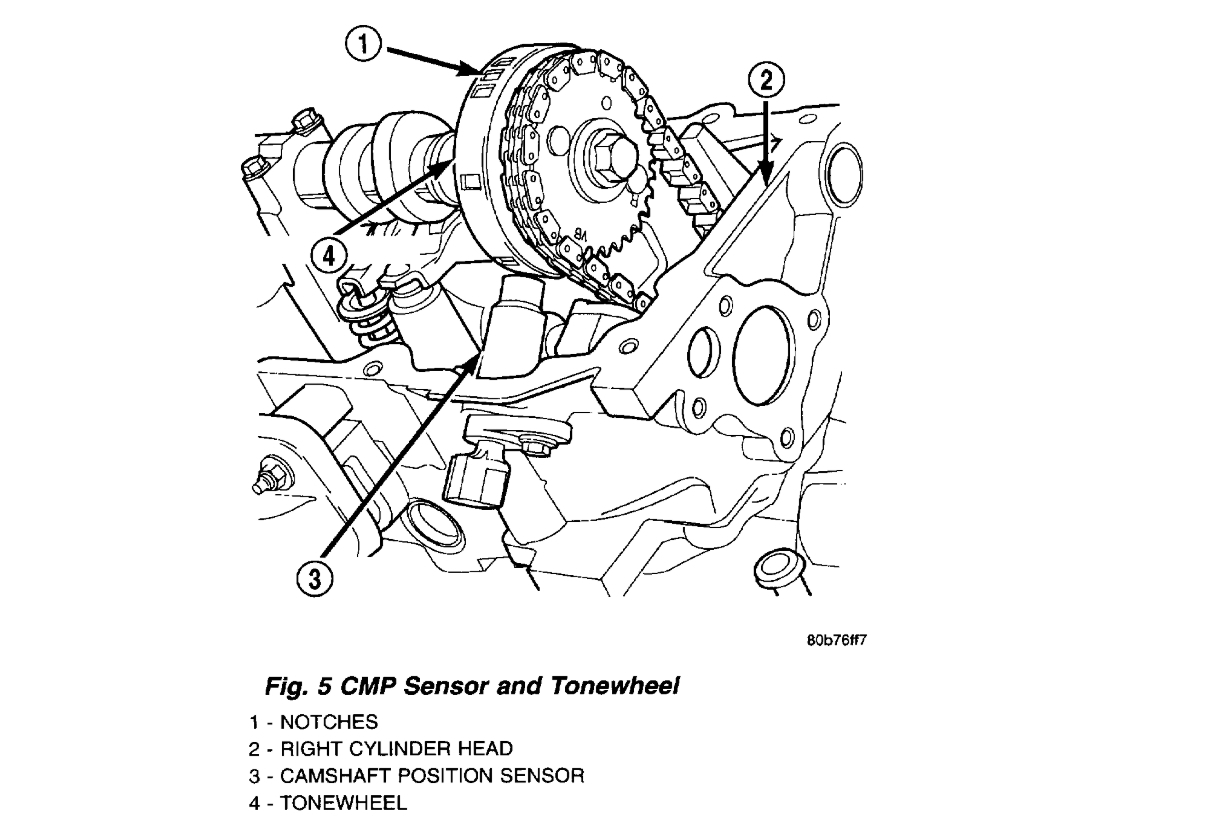
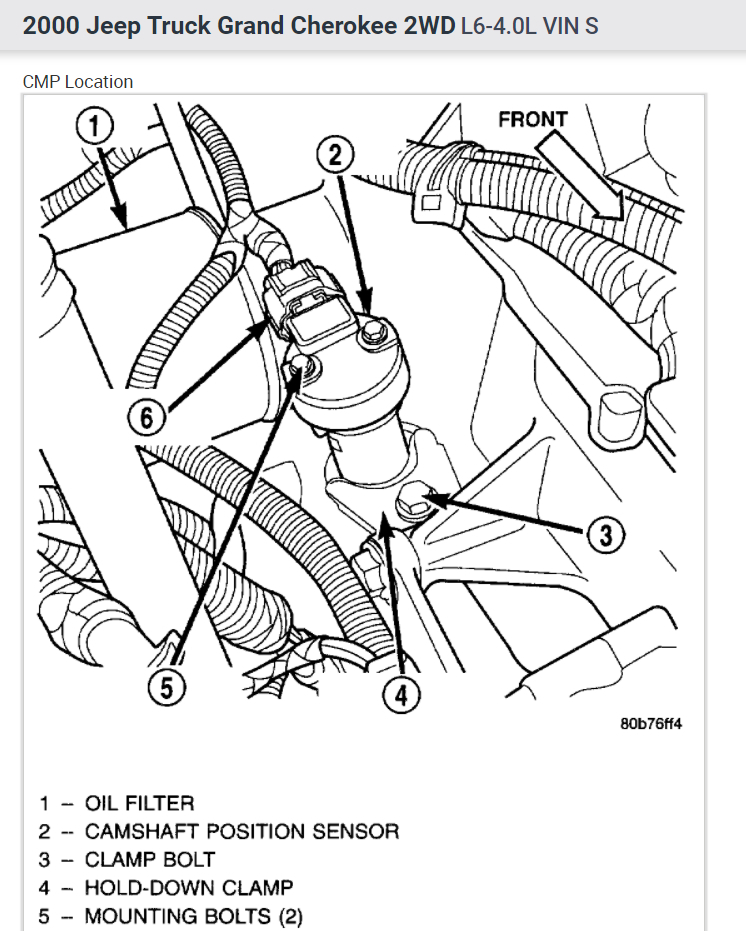
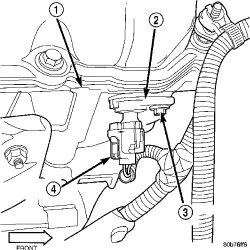
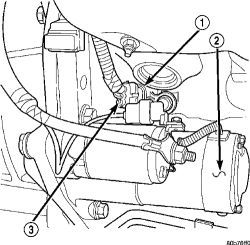
10. Ensure ignition is off. Ensure CMP sensor connector is still disconnected. Remove CMP sensor. See Fig. 28 or Fig. 29Â. Inspect tone wheel/flexplate for physical damage. Ensure tone wheel/flexplate rotates when
engine is cranked. If tone wheel/flexplate is okay,  go to next step. If tone wheel/flexplate is damaged,  repair or replace as necessary.
11. At this time,  CMP sensor is assumed to be defective. Replace CMP sensor. Perform TEST VER 5A.
12. Turn ignition off. Ensure CMP sensor connector is still disconnected. Disconnect PCM connectors. PCM is located in engine compartment. See PCM LOCATION table under SYSTEM DIAGNOSTICS. Clean
and/or repair connectors as necessary. Using an ohmmeter,  check resistance of CMP sensor ground circuit (Black/Light Blue wire) between CMP sensor connector and PCM. If resistance is less than 5 ohms,  go
to next step. If resistance is 5 ohms or more,  repair open sensor ground circuit. Perform TEST VER 5A.
13. At this time,  PCM is assumed to be defective. Replace PCM. Perform TEST VER 5A.
Test ver 5a is using a labscope so if you can't get it rnning by this time tow to a repair shop it still may not be your pcm. Also check for blown fusesin power dist box and check fuse 19 and 6 as well as automatic shutdown relay as that may be the problem as well.
Was this
answer
helpful?
Yes
No
+2
Wednesday, October 14th, 2020 AT 2:49 PM (Merged)
Tiny
RIVERMIKERAT
  • MECHANIC
  • 6,110 POSTS
Schm, ash, also make sure the connectors are clean and firmly seated on the sensors. Make sure the sensors are properly gapped. Using the Ohm meter, clip the leads to the sensor and crank the engine, while watching the meter. Does resistance go to zero?
Was this
answer
helpful?
Yes
No
+4
Wednesday, October 14th, 2020 AT 2:49 PM (Merged)
Tiny
CAZGILLO1
  • MEMBER
  • 1 POST
  • 1999 JEEP GRAND CHEROKEE
  • 4.7L
  • 4WD
  • AUTOMATIC
  • 222,000 MILES
Went to a mechanic earlier today where there was a P01391 code that came up. As a process of elimination he said to replace the cam sensor and cam sensor. Standing in his shop it seemed simple enough so I stopped at a local Jeep dealership and picked up the 2 sensors. Now with the Jeep up on the ramps I have no idea where they are even located at. Can you help?
Was this
answer
helpful?
Yes
No
Wednesday, October 14th, 2020 AT 2:49 PM (Merged)
Tiny
JACOBANDNICKOLAS
  • MECHANIC
  • 108,133 POSTS
The cam sensor is mounted to the top of the right cylinder head. See pic attached.

The crank sensor is mounted on the engine block above the starter. See pic attached.
Was this
answer
helpful?
Yes
No
+8
Wednesday, October 14th, 2020 AT 2:49 PM (Merged)
Tiny
2CP-ARCHIVES
  • MEMBER
  • 4,542 POSTS
  • 1997 JEEP GRAND CHEROKEE
  • 11,908 MILES
I have a 1997 jeep grand cherokee and it keeps stalling on me when I would start it so a mechanic told me it was the camshaft sensor so I changed that and it was running fine for 2 days and as im driving it it started to stall and pull back. I thought if I changed the sensor it would be fine but it seems like I just have the same problem do you think you can help me with this situation?
Was this
answer
helpful?
Yes
No
Wednesday, October 14th, 2020 AT 2:49 PM (Merged)
Tiny
CARADIODOC
  • MECHANIC
  • 33,729 POSTS
The engine won't run with a bad camshaft position sensor so there's no point in changing it, especially since no diagnostic tests pointed to that. Have you checked the diagnostic fault codes? Was the battery recently disconnected or run dead? When does this stalling occur, at any speed or just at idle such as when approaching a stop sign? Will the engine restart right away or does it have to cool down first for an hour?
Was this
answer
helpful?
Yes
No
Wednesday, October 14th, 2020 AT 2:49 PM (Merged)
Tiny
ROBWENTZ
  • MEMBER
  • 1 POST
  • 1996 JEEP GRAND CHEROKEE
  • 6 CYL
  • 4WD
  • AUTOMATIC
  • 105,000 MILES
Have 1996 jeep grand cherokee. Jeep stalls out. Replaced distibuter cap, rotor, plug wires & plugs. Also replaced camshaft position sensor. What would cause the stall outs?
Was this
answer
helpful?
Yes
No
Wednesday, October 14th, 2020 AT 2:49 PM (Merged)
Tiny
CARADIODOC
  • MECHANIC
  • 33,729 POSTS
Crankshaft position sensor is a common cause when they get warm. The new one must have a spacer on the end to properly set the air gap or that too can cause intermittent stalling. New sensors use either a thick paper spacer stuck to the end, or they will have a thin plastic rib molded to the end. If you reinstall a used sensor with the rib, you are to cut the remaining part of the rib off and use a new paper spacer.

To verify the stalling is related to these sensors, while it still won't restart, measure the voltage on the small wire feeding the ignition coil or any injector. I think it's dark green / orange. You should see 12 volts there for just one second when you turn on the ignition switch, but what's important is that voltage must come back during engine cranking.
Was this
answer
helpful?
Yes
No
Wednesday, October 14th, 2020 AT 2:49 PM (Merged)
Tiny
JEFFINOTOWN
  • MEMBER
  • 3 POSTS
  • 1995 JEEP GRAND CHEROKEE
  • 230,000 MILES
Having intermittent start problem, but now total failure. Getting no reading on ground wire for crank or camshaft sensor. Book says they splice together along with o2 and transmission speed sensor. I assume its related to a bad ground. But can't find splice or where they finally ground out. New crank sensor, coil, camshaft sensor, wire and plugs, not pcm, installed brand new on and same problem.I'm 90% sure its a bad ground, also tac jumps when running. Where is ground?
Was this
answer
helpful?
Yes
No
Wednesday, October 14th, 2020 AT 2:49 PM (Merged)
Tiny
CARADIODOC
  • MECHANIC
  • 33,729 POSTS
The sensor ground wires always go to ground through the Engine Computer so current can be monitored. You should find 0.2 volts on it. There will always be four ground wires on the computer. Two are sensor grounds and two are power grounds. By "power" grounds they mean high-power stuff like injectors and ignition coils that are pulsed on and off. If there is the slightest bit of resistance in those wires there will be a voltage drop each time one of those things fires. Those voltage drops are insignificant for those circuits but they would seriously interfere with the tiny changes in sensor voltage signals. That's why the low-power and highly precise sensors use their own ground wires.
Was this
answer
helpful?
Yes
No
+2
Wednesday, October 14th, 2020 AT 2:49 PM (Merged)
Tiny
JEFFINOTOWN
  • MEMBER
  • 3 POSTS
I started trying to trace all the ground wires back, I got to the right side of engine were the harness get huge, going to pcm, but wire started pulling sheathing off, so I stopped, I instead tried splicing at the primary hub on left side of engine, where 9 ground wires come together. I had 0 resistance on cps, cks, thottle, ect. So I tried to just slice and run a ground from there and see if I could get anything, but problem remains! Could it be the pcm itself? Or should I check the grounds on the pcm, and if so, I can find nothing online as to pin numbers to check the 4 grounds you mentioned. I figured all the wires are good to that one hub, there are 2 wires going back tward the pcm, but then 2 more appear on the other side of block, and after trying to pry appart, and having wire breaking. I stopped right there, and tried just running a seperate ground off that hub! No luck
Was this
answer
helpful?
Yes
No
+3
Wednesday, October 14th, 2020 AT 2:49 PM (Merged)
Tiny
CARADIODOC
  • MECHANIC
  • 33,729 POSTS
I'm trying to find a service manual for your vehicle but not having any luck so far. The best I can tell you right now is to look for the same color wire you're tracing at the computer, then do the resistance check from that terminal in the computer's connector to the sensors. On most other Chrysler products that was a black wire with a blue tracer.

To add to the misery I'm heading on a road trip to Detroit, Ohio, and Indianapolis tonight and will be gone two or three days. I'll check on your progress when I get back. In the meantime I'll keep looking for a service manual. If you can find a copy of the manufacturer's manual, that will show where each splice is located on a drawing. The guys at the Chrysler dealership I used to work at were real happy to find that and make photocopies of the relevant pages for people, and they had the dealership owner's blessings to do that. If you pursue that, look for a Jeep dealership. We didn't have the Jeep franchise so we didn't have service manuals specific to them.
Was this
answer
helpful?
Yes
No
+1
Wednesday, October 14th, 2020 AT 2:49 PM (Merged)
Tiny
JEFFINOTOWN
  • MEMBER
  • 3 POSTS
Where is the primary ground for everything? Sensors, pcm the whole kit and kubudle?I know this is a ground issue, where does everything ground out, especially the crank or cam, does it run threw the pcm to ground? And if so, where? I'm getting no spark on alll brand new parts that were working till today! Thank you SO much for the help, on a Sunday! Thank you!
Was this
answer
helpful?
Yes
No
+1
Wednesday, October 14th, 2020 AT 2:49 PM (Merged)
Tiny
CARADIODOC
  • MECHANIC
  • 33,729 POSTS
I never needed to find the grounds but I'm pretty sure the wires come out of the harness and are bolted to the inner fender near the head light or firewall.
Was this
answer
helpful?
Yes
No
Wednesday, October 14th, 2020 AT 2:50 PM (Merged)

Please login or register to post a reply.

Sponsored links