Good afternoon,
The seals are behind the camshaft gears and the crankshaft harmonic balancer.
The front of the engine has to be torn down. The belts, pulleys, mounts and the front cover. The timing belt will have to be removed and the gears removed to gain access to the seals.
This is a huge project for doing at home.
Roy
REMOVAL
1. Remove engine under cover.
2. Drain engine coolant.
3. Remove radiator assembly.
4. Remove drive belt.
imageOpen In New TabZoom/Print
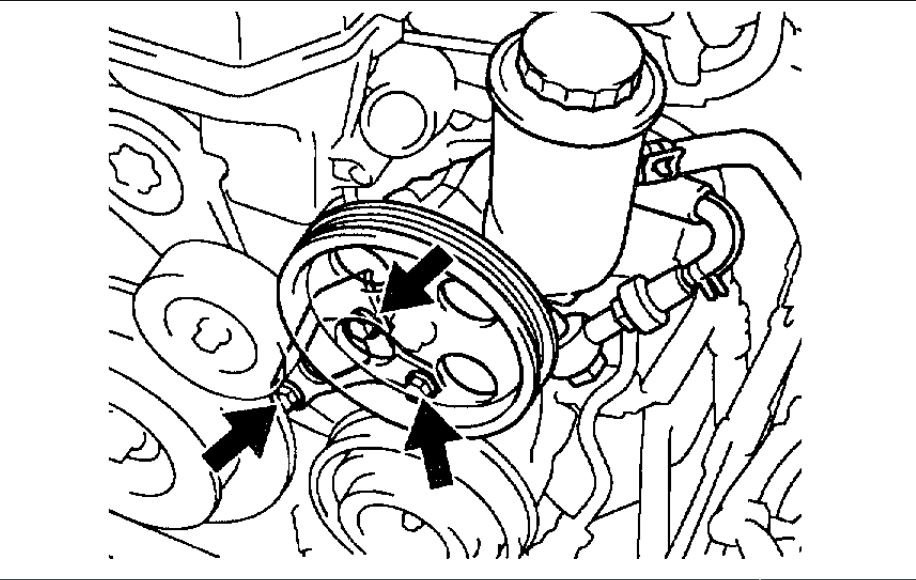
5. Remove PS pump and front bracket.
a. Remove the 3 bolts, plate washer and pump front bracket.
b. Disconnect the vane pump from the bracket.
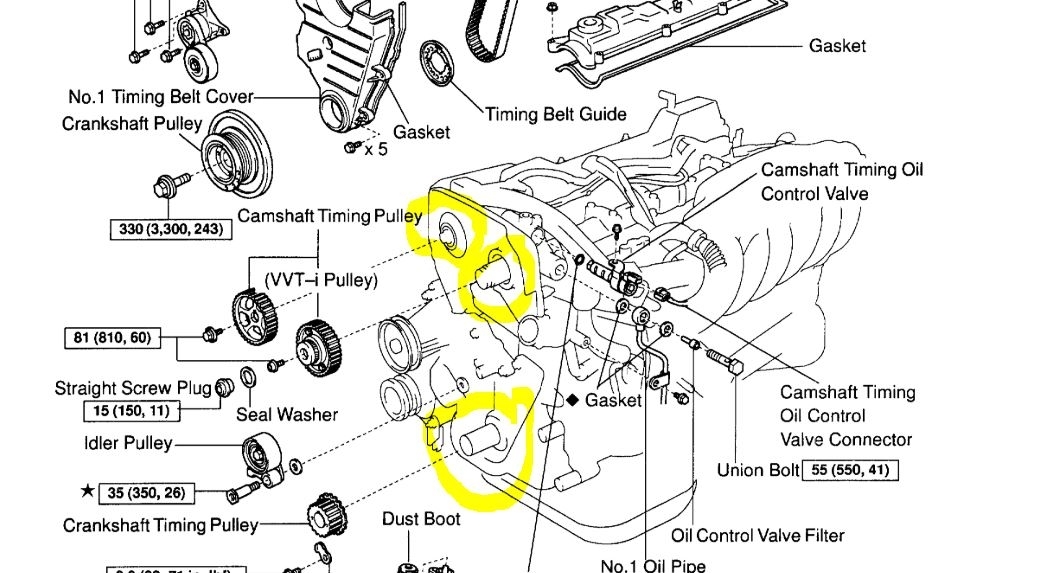
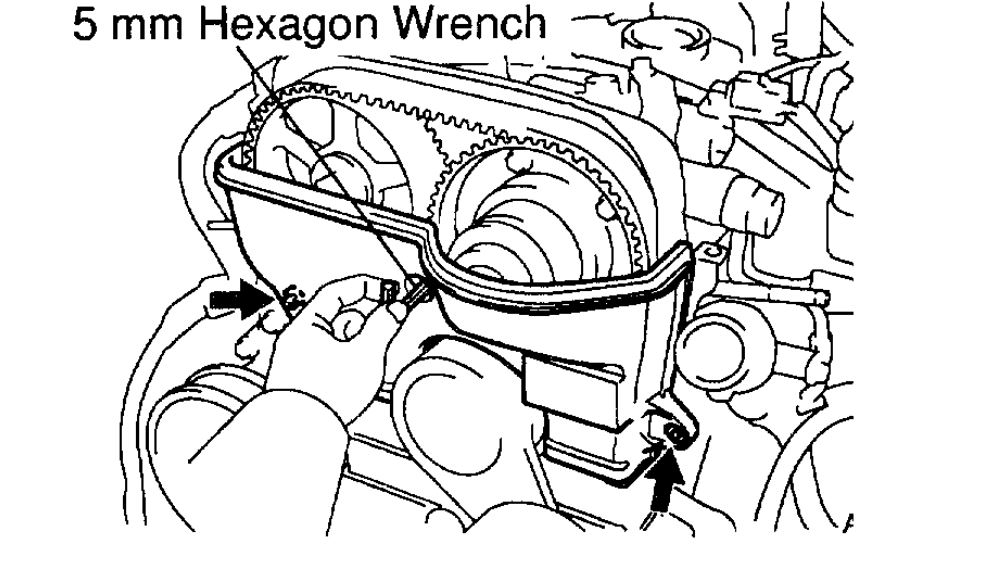
6. Remove No.3 timing belt cover
Using a 5 mm hexagon wrench, remove the 4 bolts, oil filler cap, timing belt cover and gasket
imageOpen In New TabZoom/Print
7. Remove No.2 timing belt cover.
Using a 5 mm hexagon wrench, remove the 3 bolts, timing belt cover and gasket.
imageOpen In New TabZoom/Print
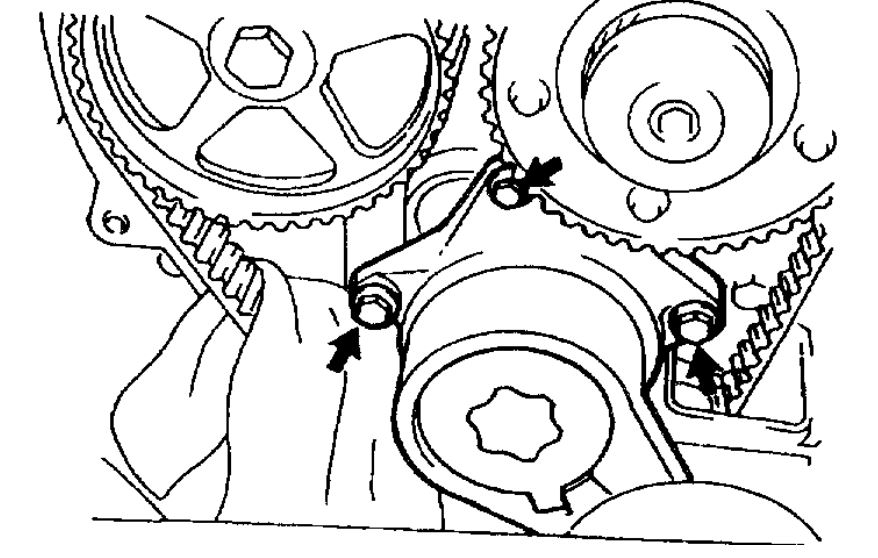
8. Remove drive belt tensioner.
Remove the 3 bolts and tensioner.
NOTICE: Be careful not to drop the bolts inside the timing belt cover.
imageOpen In New TabZoom/Print
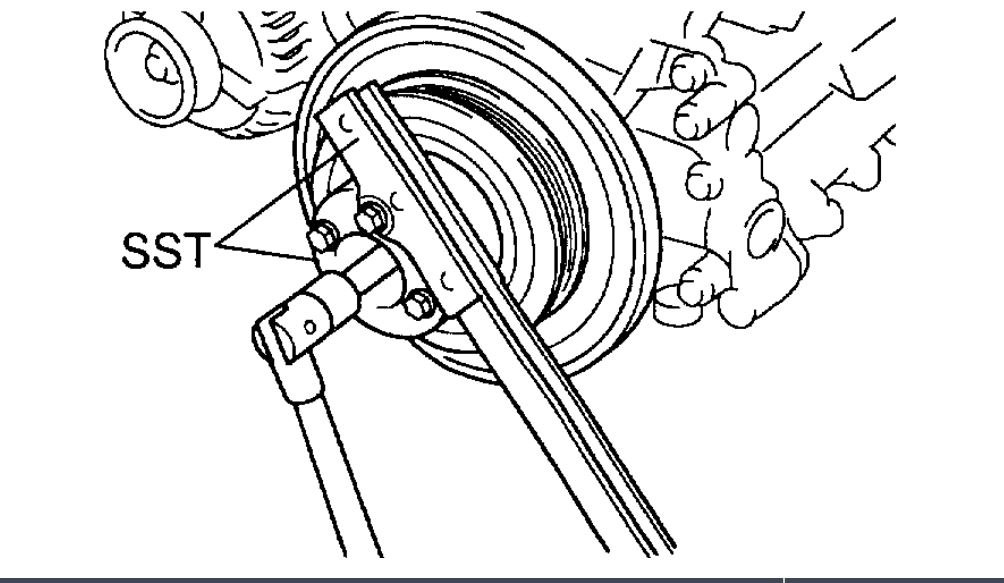
9. Loosen crankshaft pulley bolt.
Using Special Service Tool (SST) , loosen the pulley bolt.
SST 09213 - 70010, 09330 - 00021
imageOpen In New TabZoom/Print
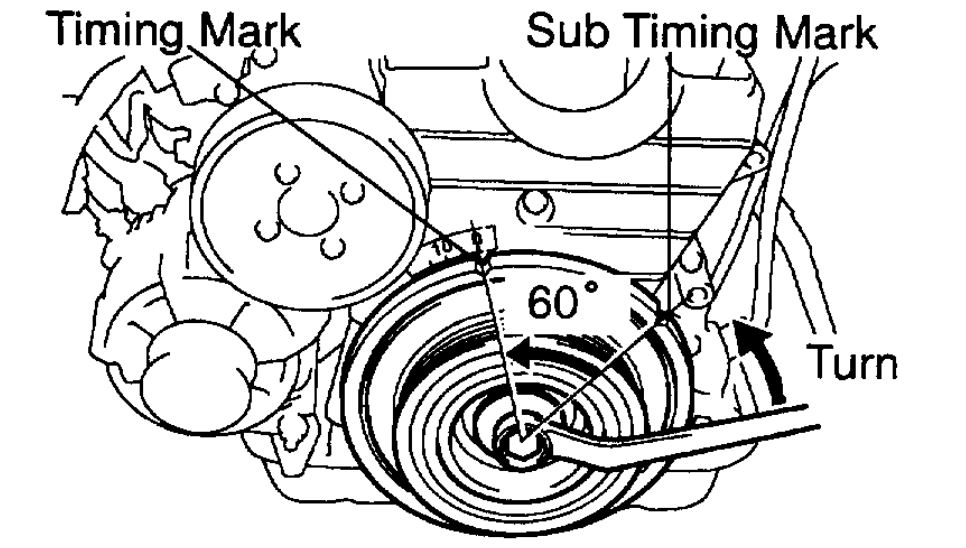
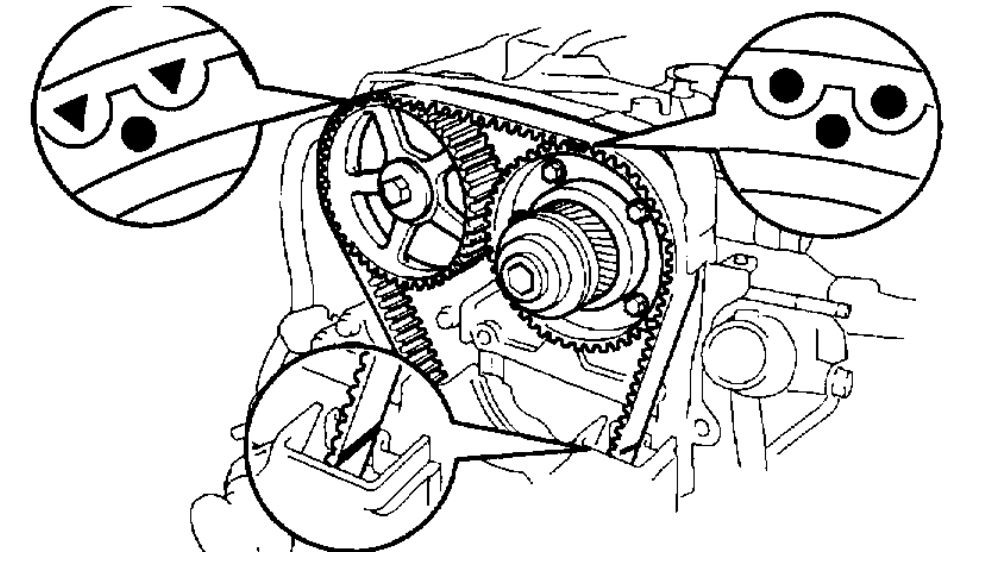
10. Set No.1 cylinder to approx. 60 / BTDC compression
Turn the crankshaft pulley, and align its groove with timid mark "0" of the No.1 timing belt cover.
NOTICE: Always turn the crankshaft clockwise.
b. Check that the timing marks (TDC mark) of the camshaft timing pulleys are aligned with the timing marks of the No.4 timing belt cover.
If not, turn the crankshaft 1 revolution (360°)
imageOpen In New TabZoom/Print
c. Turn the crankshaft pulley 60 counterclockwise to place the sub timing mark (60 mark BTDC) on the crankshaft pulley at the timing mark "0" position of the No.1 timing belt cover.
NOTICE: If the timing belt is disengaged, having the crankshaft pulley at the wrong angle can cause the piston head and valve head to come into contact with each other when you remove the camshaft timing pulleys (steps 11 to 17), thus resulting damage. So, always set the crankshaft pulley at the correct angle.
imageOpen In New TabZoom/Print
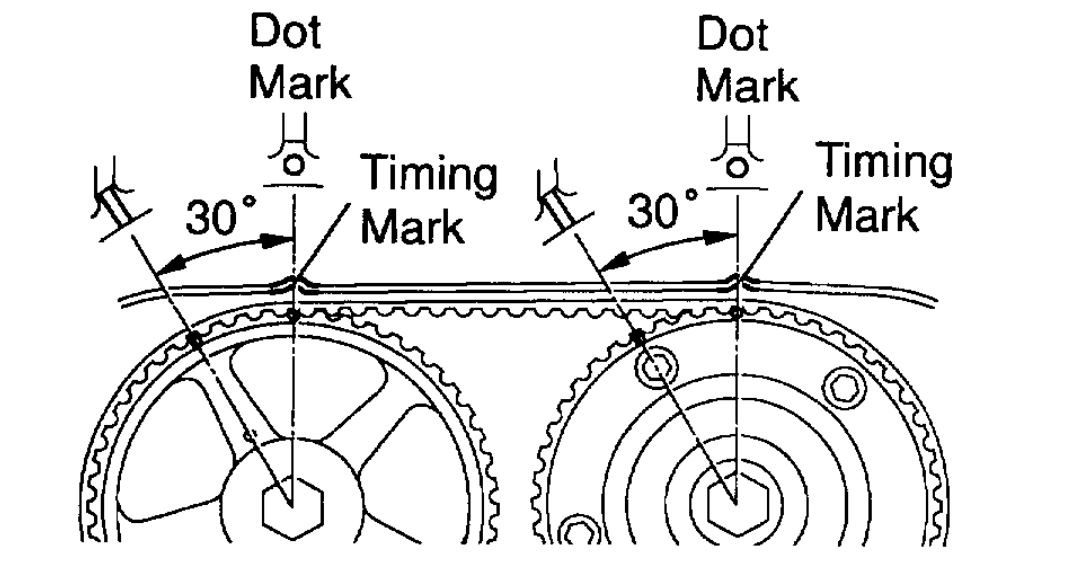
d. Check that the dot marks (60 mark BTDC) of the camshaft timing pulleys are aligned with the timing marks of the No.4 timing belt cover.
e. Remove the crankshaft pulley bolt.
NOTICE: Do not turn the crankshaft pulley.
11. Remove timing belt from camshaft timing pulleys.
imageOpen In New TabZoom/Print
HINT: (Reusing timing belt):Place match marks on the timing belt and camshaft timing pulleys as shown in the illustration.
imageOpen In New TabZoom/Print
a. Alternately loosen the 2 bolts, and remove them, the tensioner and dust boot.
b. Disconnect the timing belt from the camshaft timing pulleys.
imageOpen In New TabZoom/Print
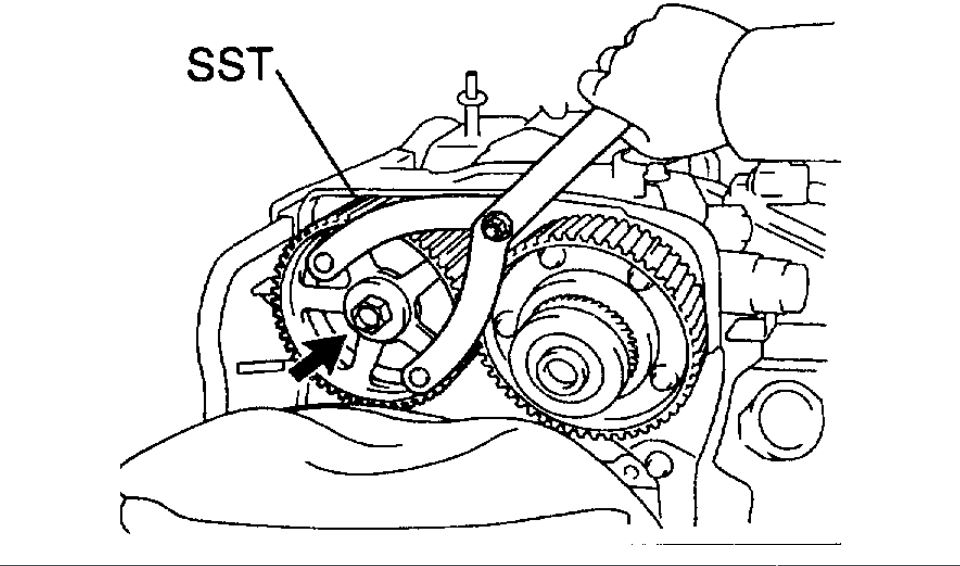
12. Remove exhaust camshaft timing pulley.
Using SST, remove the bolt and timing pulley.
SST 09960 - 10010 (09962-01000, 09963-01000)
13. Remove throttle body and intake air connector assembly.
imageOpen In New TabZoom/Print
14. Remove No.1 cylinder head cover.
a. Using a 5 mm hexagon wrench, remove the bolts, and disconnect the engine wire protector from the No.2 cylinder head cover.
b. Remove the nut, and disconnect the engine wire protector from the intake manifold.
c. Remove the 2 bolts, and disconnect the high-tension cords with the clamp from the No.2 cylinder head.
d. Remove the 6 bolts, 2 nuts, No.1 cylinder head cover and gasket.
imageOpen In New TabZoom/Print
15. Remove camshaft timing oil control valve.
16. Disconnect No.1 oil pipe.
Remove the bolt, union bolt, oil control valve filter and 2 gaskets, and disconnect the No.1 oil pipe from the No.3 camshaft bearing cap.
imageOpen In New TabZoom/Print
17. Remove VVT-i (Intake Camshaft Timing) pulley.
NOTICE:
- The 5 bolts shown in the illustration determine the backlash of the gear in the timing pulley, so do not remove them.
- If any of the 5 bolts are removed, install a new cam-shaft timing pulley assembly.
- When removing the straight screw plug, follow the prescribed procedure in order to avoid spilling oil on the timing system parts.
a. Rotate the VVT-i pulley from left to right 2 to 3 times within its range of movement (30°) and use a waste cloth to collect the oil from the camshaft timing oil control valve installation hole.
NOTICE: Approximately 20 cc (1.2 cu inch) of oil will be ejected, so take care not to spill it.
imageOpen In New TabZoom/Print
b. Holding the hexagon portion of camshaft with a wrench.
c. Using a 14 mm hexagon wrench, remove the straight screw plug and seal washer.
NOTICE: Some oil may spill, so put a waster cloth below the plug white doing the operation.
d. Using a 10 mm hexagon wrench, and remove the set bolt and VVT-i pulley.
e. Remove the wrench.
imageOpen In New TabZoom/Print
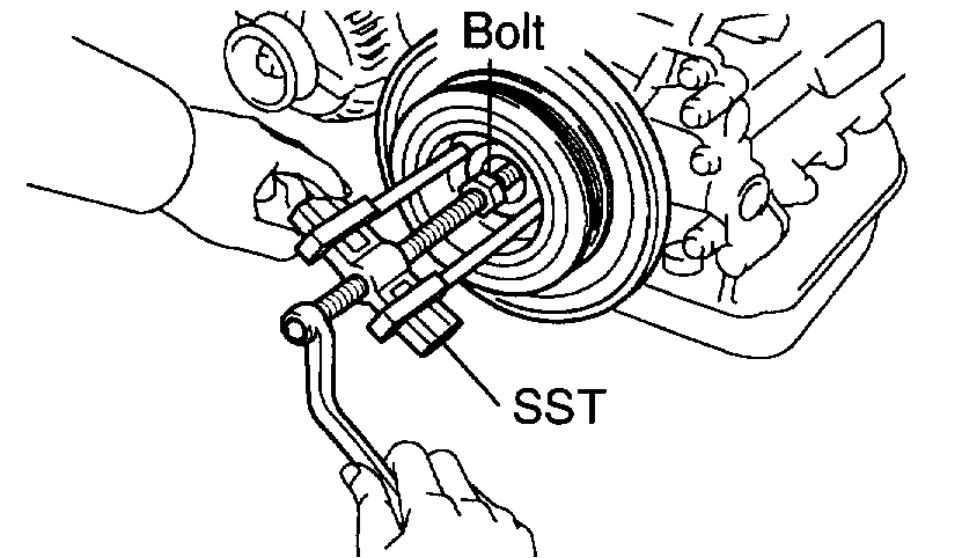
18. Remove crankshaft pulley.
Using SST and bolt (diameter: 8 mm, pitch: 1.5 mm), remove the crankshaft pulley.
SST 09950-50010 (09951 - 05010, 09552-05010,
09553-05020, 09554-05030)
Bolt: Part No. 90119-18001
NOTICE: Do not turn the crankshaft pulley.
19. Remove No.1 timing belt cover.
Remove the 5 bolts, timing belt cover and gasket.
imageOpen In New TabZoom/Print
20. Remove timing belt guide.
21. Remove timing belt.
HINT: (When reusing timing belt):
- Draw an arrow on the timing belt in the direction of engine revolution, and place matchmarks on the timing belt and crankshaft timing pulley.
imageOpen In New TabZoom/Print
22. Remove idler pulley
Using a 10 mm hexagon wrench, remove the pivot bolt, plate washer and idler pulley.
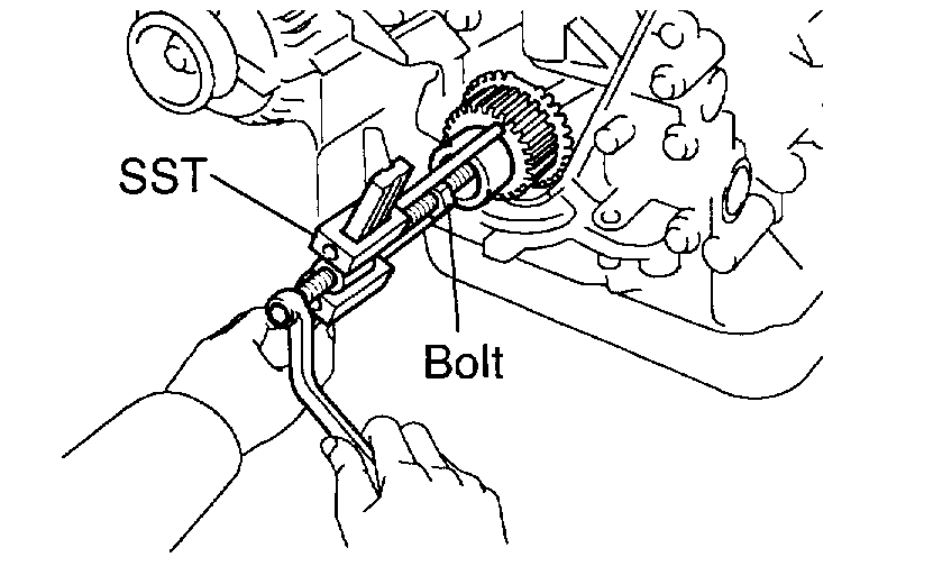
23. Remove crankshaft timing pulley.
a. Remove the bolt and timing belt plate.
imageOpen In New TabZoom/Print
b. Remove the crankshaft timing pulley.
If the pulley cannot be removed by hand, use SST and bolt (diameter: 8 mm, pitch: 1.5 mm) to remove the crankshaft timing pulley.
SST 09950-50010 (09951 - 05010, 09952-0501 O. 09953-0502O, 09954-05010)
Bolt: Part No. 90119-18001
NOTICE:
- Do not scratch the sensor part the crankshaft timing pulley.
- Do not turn the timing pulley.
Images (Click to enlarge)
Apr 21, 2019 at 2:45 PM