Brakes lock after five miles

Tiny
TRACI ANNE KNIGHT
  • MEMBER
  • 2003 HONDA ELEMENT
  • 2.4L
  • 4 CYL
  • 4WD
  • AUTOMATIC
  • 186,000 MILES
Okay, so this is my frustration. Brakes lock and I mean lock after about five miles even got the rotors orange hot the first time. I have changed the front rubber brake lines all the fluid was flush with a new master cylinder with dot 4 and yes the old fluid was probably the original (I just got this car for free from the neighbor). I have run the ABS solenoids with the scan tool at work (work for a 4x4 shop) we are stumped what’s going on. I’m pulling out my hair.
Wednesday, January 9th, 2019 AT 5:45 PM

6 Replies

Tiny
JACOBANDNICKOLAS
  • MECHANIC
  • 108,179 POSTS
Hi and thanks for using 2CarPros.

Are all the brakes locking or just front, rear, left, right? Are you certain the slides are not corroded and moving correctly? Are you certain the piston in the calipers are not hanging up?

Let me know,
Joe
Was this
answer
helpful?
Yes
No
+1
Wednesday, January 9th, 2019 AT 8:53 PM
Tiny
TRACI ANNE KNIGHT
  • MEMBER
  • 3 POSTS
Both fronts lock up, calibers seem to work fine after four to five miles of driving you can take your foot off the gas and it will brake all by itself.
Was this
answer
helpful?
Yes
No
Thursday, January 10th, 2019 AT 8:01 AM
Tiny
JACOBANDNICKOLAS
  • MECHANIC
  • 108,179 POSTS
Welcome back:

The only way this can happen is if the calipers aren't releasing. If you are certain the slide pins are good and moving properly and the caliper pistons are releasing, that tells me the problem is the actual brake pedal isn't releasing. I know that sounds hard to believe, but I have seen where the actual brake light switch has caused a slight pressure to remain on the pedal. Once you start driving, the brakes are lightly applied and begin to heat up. The hotter they get, the more fluid will expand and eventually cause what you described.

With that in mind, I want you to readjust the brake light switch. Here are the directions for doing it. The attached pictures correlate with these directions. You have to make sure the free play, as described in these directions, exists.

____________________________________________________

Brake Pedal and Brake Pedal Position Switch Adjustment
Pedal Height

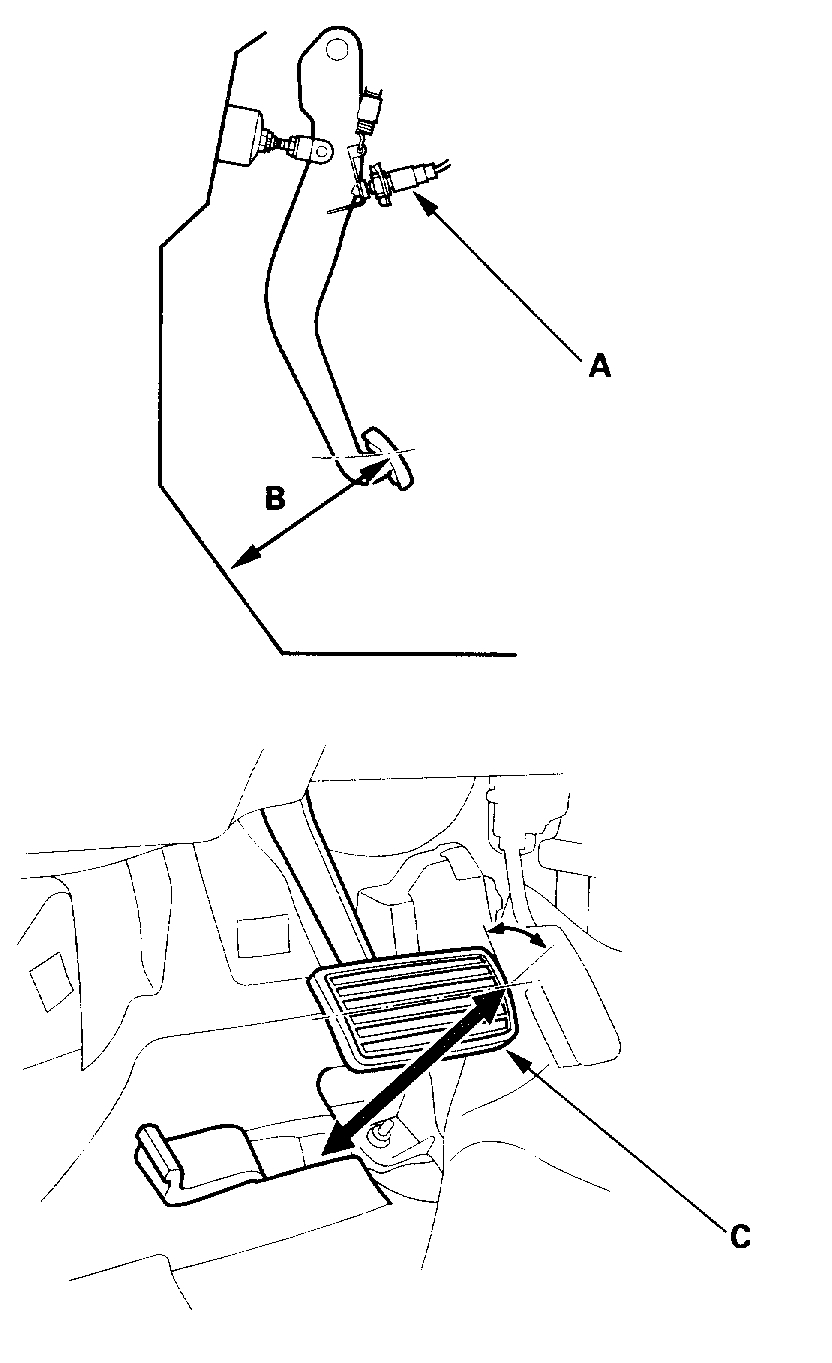
1. Turn the brake pedal position switch (A) counterclockwise, and pull it back until it is no longer touching the brake pedal.
2. Lift up the carpet. At the insulator cutout, measure the pedal height (B) from the middle of the pedal pad (C).
Standard Pedal Height (with carpet removed):
M/T: 178 mm (7 inch)
A/T: 180 mm (7 3/32 inch)

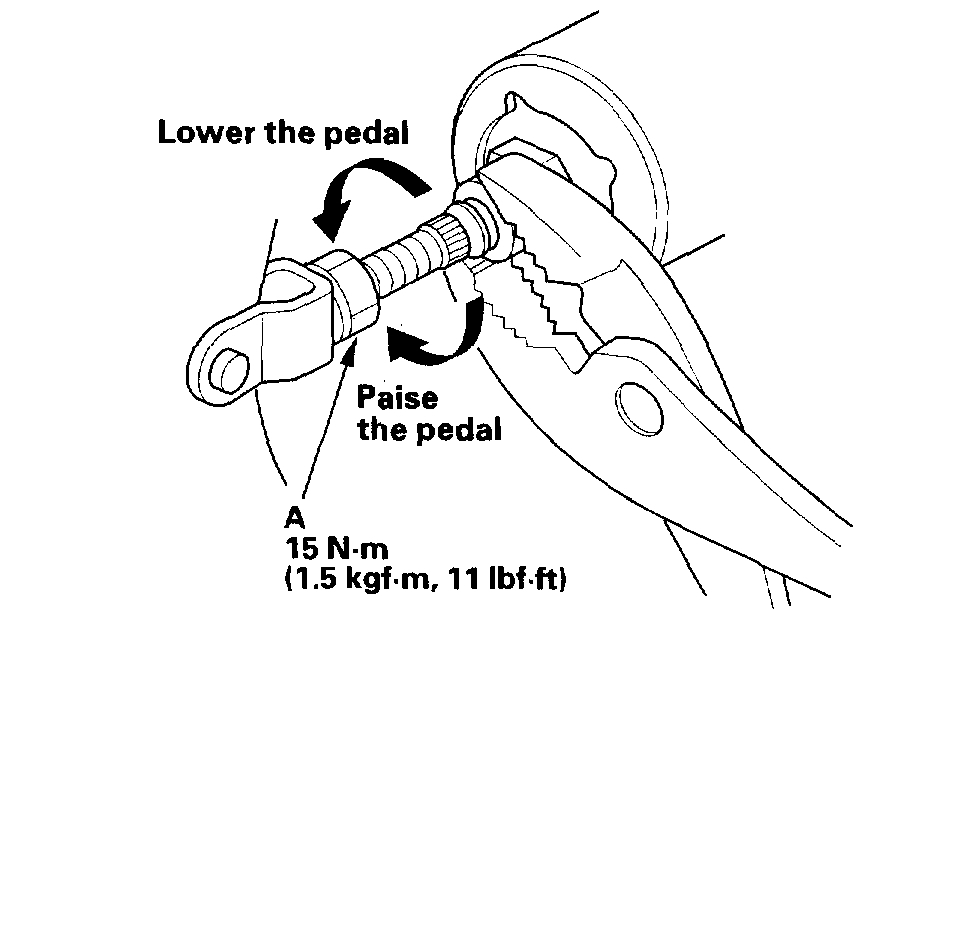
3. Loosen the pushrod locknut (A), and screw the pushrod in or out with pliers until the standard pedal height from the floor is reached. After adjustment, tighten the locknut firmly. Do not adjust the pedal height with the pushrod pressed.

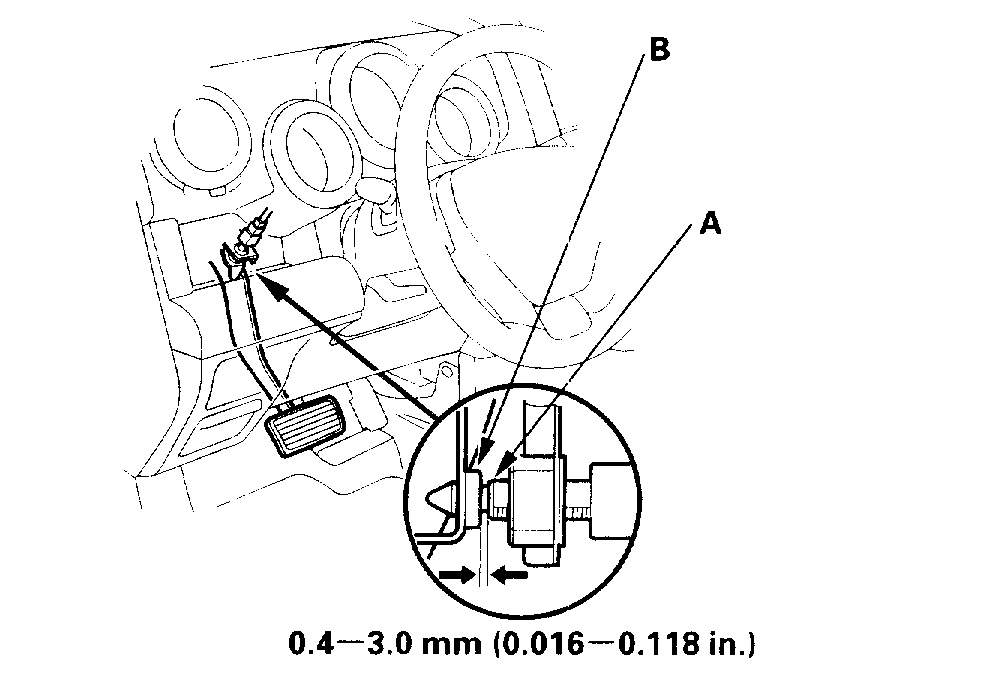
4. Push in the brake pedal position switch until its plunger is fully pressed (threaded end (A) touching the pad (B) on the pedal arm). Then, turn the switch 45° clockwise to lock it. The gap between the brake pedal position switch and the pad is automatically adjusted to 0.4 to 3.0 mm (0.016 - 0.118 inch) by locking the switch. Make sure the brake lights go off when the pedal is released.
5. Check the brake pedal free play.

Pedal Free Play

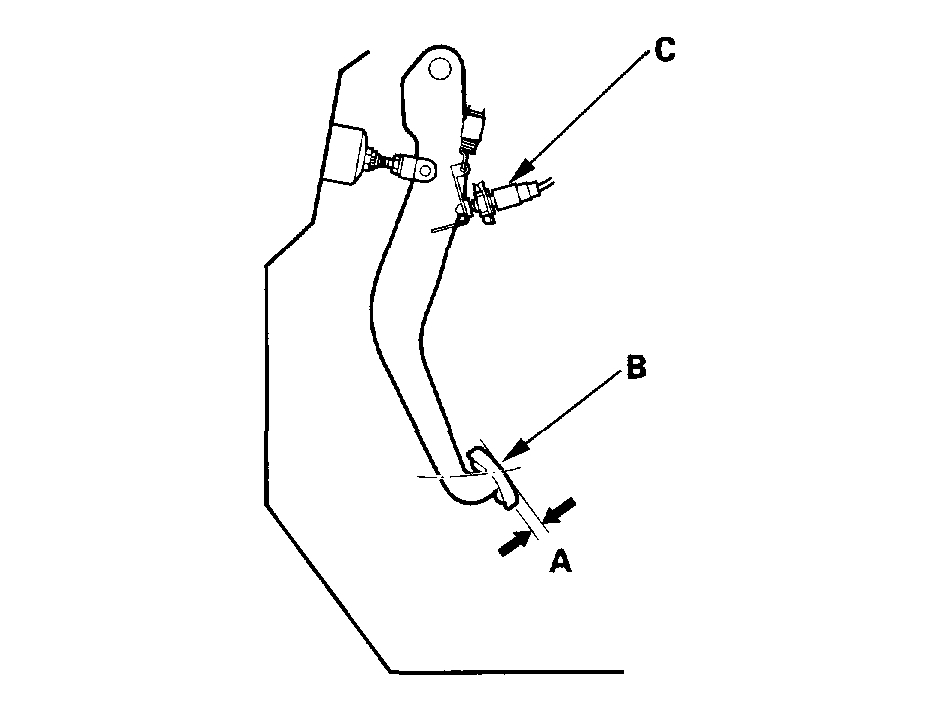
1. With the engine off, inspect the play (A) on the pedal pad (B) by pushing the pedal by hand.
Free Play: 1 - 5 mm (1/16 - 3/16 inch)
2. If the pedal free play is out of specification, adjust the brake pedal position switch (C). If the pedal free play is insufficient, it may result in brake drag.

Let me know if this helps or if you have other questions.

Joe
Was this
answer
helpful?
Yes
No
+1
Thursday, January 10th, 2019 AT 2:26 PM
Tiny
KEN L
  • MASTER CERTIFIED MECHANIC
  • 42,895 POSTS
I have to agree with Joe on this one, to confirm the issue when the brake are locked loosen the bleeder on either caliper and they both should release. Please let us know what happens. :)
Was this
answer
helpful?
Yes
No
+1
Thursday, January 10th, 2019 AT 7:35 PM
Tiny
TRACI ANNE KNIGHT
  • MEMBER
  • 3 POSTS
Joe, I cannot thank you enough. Seriously we had seven different “mechanics” look at my vehicle and not one could figure the issue out. I gave my husband your knowledgeable instructions and step by step guidelines, and low and behold my vehicle is fixed and good as ever! Drove well all day today. Seriously cannot thank you enough Joe!
Was this
answer
helpful?
Yes
No
Friday, January 11th, 2019 AT 6:42 PM
Tiny
JACOBANDNICKOLAS
  • MECHANIC
  • 108,179 POSTS
Welcome back:

You are very welcome. I'm glad it helped. Feel free to come back anytime.

Take care,

Joe
Was this
answer
helpful?
Yes
No
+1
Friday, January 11th, 2019 AT 9:11 PM

Please login or register to post a reply.

Sponsored links