Battery draw down

Tiny
1GLAZIER1
  • MEMBER
  • 2001 LINCOLN CONTINENTAL
  • 4.6L
  • V8
  • 2WD
  • AUTOMATIC
  • 110,000 MILES
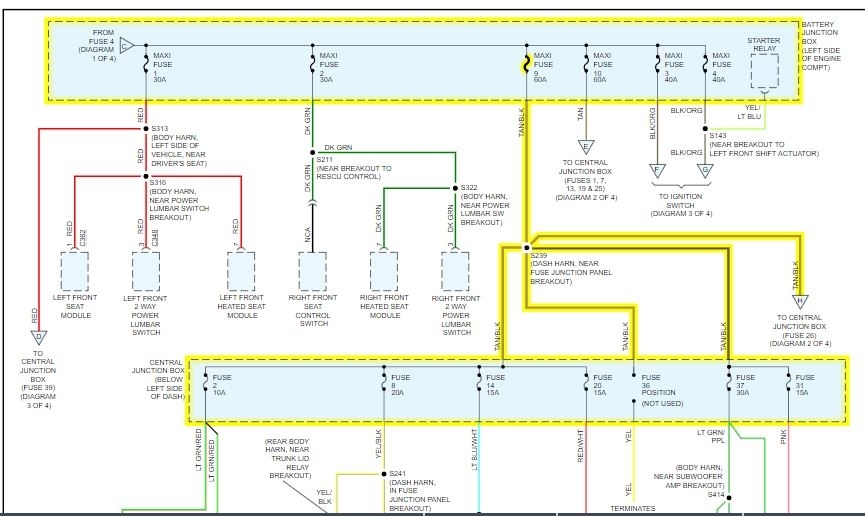
When the car is not run for a couple of days, the battery dies. I have tested, with a meter attached to the negative terminal and the removed negative lead, the fuses under the dash and under the hood, by pulling and replacing each. The only fuse that shows a big difference is the #9/60 amp fuse under the hood that is tagged for the I/P fuse panel. Is this referring to the regular under the dash fuse box or is there a separate/smaller panel hiding from me?
Note: When I first connect the tester (set on 10 amp) it shows -1.24, but quickly drops to -.2. When I pull the 60 amp fuse, it drops to.03.
Saturday, December 28th, 2019 AT 7:58 AM

3 Replies

Tiny
ASEMASTER6371
  • MECHANIC
  • 52,797 POSTS
Good morning,

Fuse 9 controls so much more. I attached a diagram for you to view. It supplies power to the inside fuse block and many other components. You are going to need to start pulling fuses in the other fuse block one by one until the current draw drops to the 50 to 75 milli amps.

Roy
Was this
answer
helpful?
Yes
No
+2
Saturday, December 28th, 2019 AT 9:02 AM
Tiny
1GLAZIER1
  • MEMBER
  • 2 POSTS
Upon checking the fuses in the under-dash box, I find that number 31 is the fuse that seems to have the problem. This fuse controls all of the interior lights and the trunk light. Is there an easier way to test other than to remove each bulb individually and check the battery overnight? Also is there a wiring diagram for the wires going to the lights after fuse 31. Thank you
Was this
answer
helpful?
Yes
No
Friday, January 10th, 2020 AT 8:56 AM
Tiny
ASEMASTER6371
  • MECHANIC
  • 52,797 POSTS
Okay, here is a guide to follow for a parasitic drain. You need to measure the current draw at the battery.

https://www.2carpros.com/articles/car-battery-dead-overnight

Fuse 31 controls the light control module. I attached a diagram of what the fuse controls.

Unplug the module and see if the draw goes away. If it does, the module is bad. If it does not then the wiring is the issue.

Roy

REMOVAL

1. Disconnect the battery ground cable.

CAUTION:
Prior to removal of module, it is necessary to upload module configuration information to the scan tool. This information needs to be downloaded into the new module once installed. See: Information Bus > Programming and Relearning
Electronic modules are sensitive to electrical charges. If exposed to these charges, damage may result.

imageOpen In New TabZoom/Print

2. Remove the instrument panel steering column cover.
Remove the screws.

imageOpen In New TabZoom/Print

3. Remove the LCM.
1 Remove the screws.
2 Carefully remove the LCM from the instrument panel and disconnect the electrical connectors.
Was this
answer
helpful?
Yes
No
+2
Friday, January 10th, 2020 AT 9:31 AM

Please login or register to post a reply.

Sponsored links