Hi and thanks for using 2CarPros.
The term booster relates to a component that provides power assist via engine vacuum. That component doesn't exist on your vehicle.
Let me know exactly what is happening so I can gain a better understanding of which components you are referring to. There is a brake actuator and a park brake actuator. If it is specifically the brake actuator, here are directions for removing and replacing it. All attached pictures correlate with these directions.
_________________________________
BRAKE CONTROL: BRAKE ACTUATOR: REMOVAL
REMOVAL
NOTE: While the battery is connected, even if the engine switch is off, the brake control system activates when the brake pedal is depressed or the door courtesy switch turns on. Therefore during servicing of the brake system components, do not operate the brake pedal and open/close the doors while the battery is connected.
1. REMOVE V-BANK COVER SUB-ASSEMBLY
2. REMOVE COWL TOP VENTILATOR LOUVER RH See: Wiper Motor > Removal and Replacement > Removal
3. REMOVE FRONT WIPER ARM LH See: Wiper Motor > Removal and Replacement > Removal
4. REMOVE FRONT WIPER ARM RH See: Wiper Motor > Removal and Replacement > Removal
5. REMOVE ENGINE ROOM SIDE COVER LH See: Engine > Removal and Replacement > Removal
6. REMOVE ENGINE ROOM SIDE COVER RH See: Engine > Removal and Replacement > Removal
7. REMOVE FRONT FENDER PROTECTOR UPPER LH See: Wiper Motor > Removal and Replacement > Removal
8. REMOVE FRONT FENDER PROTECTOR UPPER RH See: Wiper Motor > Removal and Replacement > Removal
9. REMOVE HOOD TO COWL TOP SEAL See: Wiper Motor > Removal and Replacement > Removal
10. REMOVE FRONT FENDER TO COWL SIDE SEAL LH See: Wiper Motor > Removal and Replacement > Removal
11. REMOVE FRONT FENDER TO COWL SIDE SEAL RH See: Wiper Motor > Removal and Replacement > Removal
12. REMOVE COWL TOP VENTILATOR LOUVER PROTECTOR LH See: Wiper Motor > Removal and Replacement > Removal
13. REMOVE COWL TOP VENTILATOR LOUVER SUB-ASSEMBLY See: Wiper Motor > Removal and Replacement > Removal
14. DRAIN BRAKE FLUID
(a)Drain the brake fluid in the reservoir tank near the MIN line.
NOTE: If brake fluid leaks onto any painted surface, wash or remove it completely.
15. PERFORM ACCUMULATOR PRESSURE ZERO DOWN See: Brake Bleeding > Procedures > Replacement
16. DISCONNECT CABLE FROM NEGATIVE BATTERY TERMINAL
CAUTION: Wait at least 90 seconds after disconnecting the cable from the negative (-) battery terminal to prevent airbag and seat belt pretensioner activation.
NOTE: After the engine switch is turned off, the HDD navigation system requires approximately 6 minutes to record various types of memory and settings. As a result, after turning the engine switch off, wait 6 minutes or more before disconnecting the cable from the negative (-) battery terminal.
17. REMOVE SKID CONTROL ECU See: Electronic Brake Control Module > Removal and Replacement > Removal
18. REMOVE SKID CONTROL ECU BRACKET See: Electronic Brake Control Module > Removal and Replacement > Removal
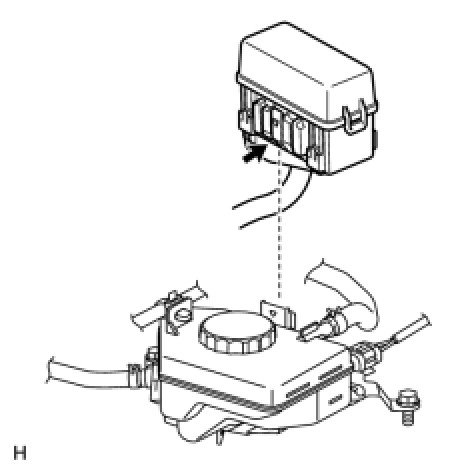
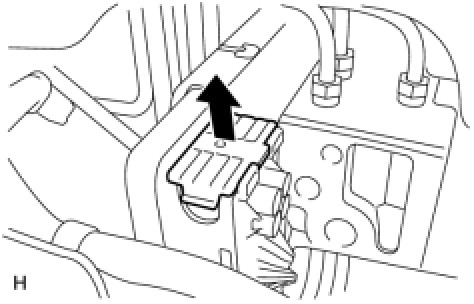
19. DISCONNECT NO. 3 RELAY BLOCK
(a)While pushing the claw of the No. 3 relay block, pull out the No. 3 relay block and disconnect it from the reservoir bracket.
NOTE: Do not allow brake fluid to contact the No. 3 relay block.
20. REMOVE BRAKE FLUID RESERVOIR
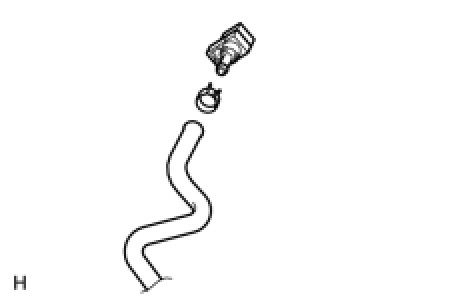
21. REMOVE NO. 1 RESERVOIR HOSE
22. REMOVE RESERVOIR BRACKET
23. REMOVE FRONT WHEEL
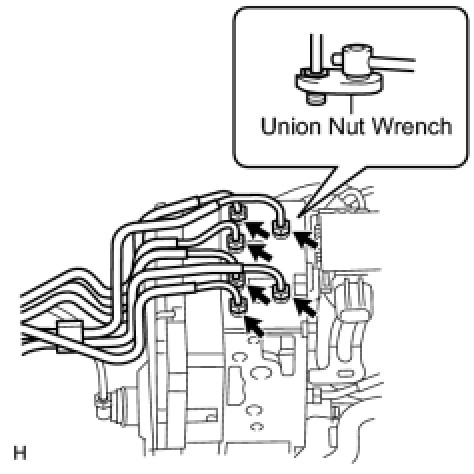
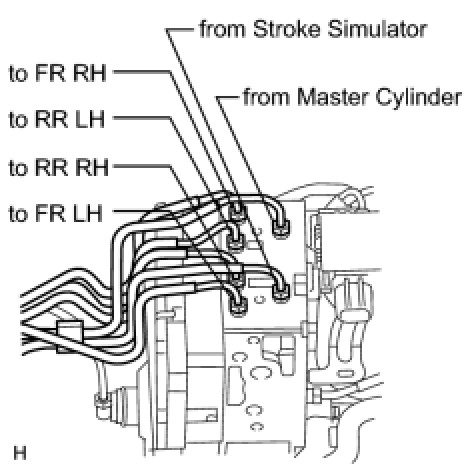
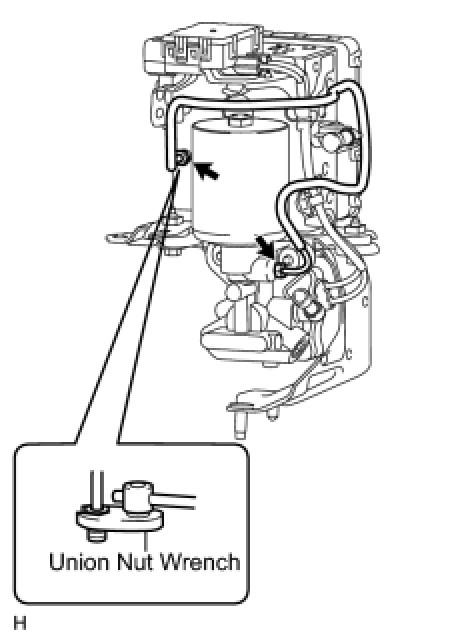
24. DISCONNECT BRAKE TUBE
(a)Using a union nut wrench, disconnect the 6 brake tubes from the actuator.
(b)Use tags or make a note to identify the reconnection locations.
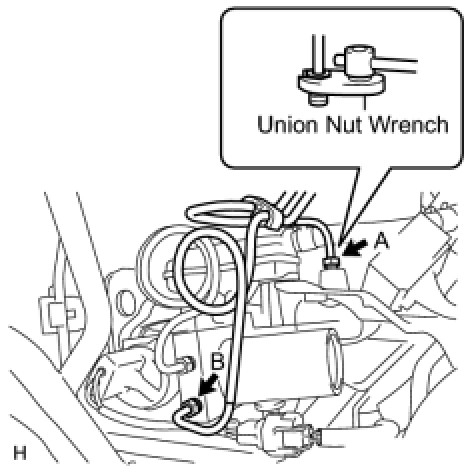
(c)Using a union nut wrench, disconnect the No. 1 (labeled A) and No. 2 (labeled B) brake actuator tubes.
NOTE: Do not damage the No. 1 and No. 2 brake actuator tubes.
25. REMOVE BRAKE ACTUATOR AND BRAKE ACCUMULATOR PUMP ASSEMBLY
(a)Release the lock lever and disconnect the brake actuator connector.
NOTE: Do not allow brake fluid to contact the connector face.
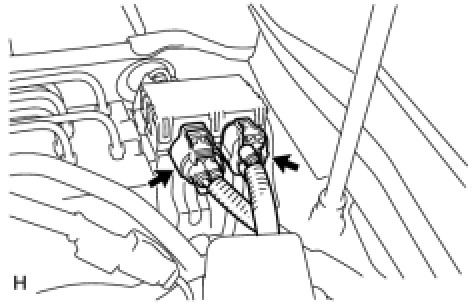
(b)Disconnect the 2 brake accumulator pump connectors.
NOTE: Do not allow brake fluid to contact the connector faces.
(c)Disconnect the No. 1 brake actuator hose from the clamp and then remove the clamp.
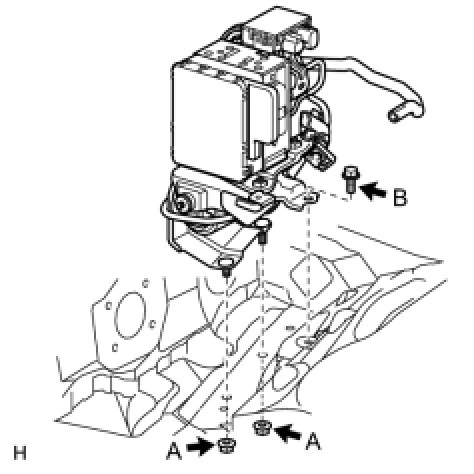
(d)Disconnect the front fender liner rear side and then remove the 2 nuts (labeled A).
(e)Remove the bolt (labeled B) and brake actuator and brake accumulator pump.
NOTICE:
- Do not damage the brake tubes.
- When removing the brake actuator and brake accumulator pump from the vehicle, do not hold the connector, harness, hose or tube parts.
- Do not drop the brake actuator and brake accumulator pump. Do not use parts that have been dropped.
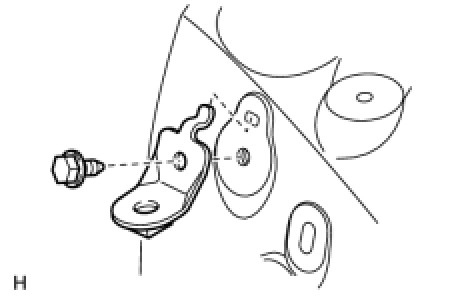
26. REMOVE NO. 5 BRAKE ACTUATOR BRACKET
(a)Remove the bolt and No. 5 brake actuator bracket.
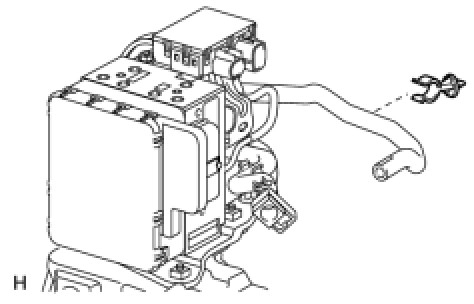
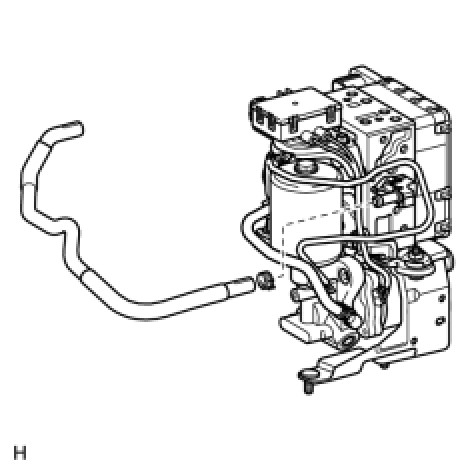
27. REMOVE NO. 1 BRAKE ACTUATOR HOSE
NOTE: When disconnecting the hose, be careful that there is no excessive weight applied to the union of the brake actuator (especially in the union rotation direction).
(a)Remove the hose clip and the No. 1 brake actuator hose.
28. REMOVE BRAKE ACTUATOR PROTECTOR
(a)Remove the protector.
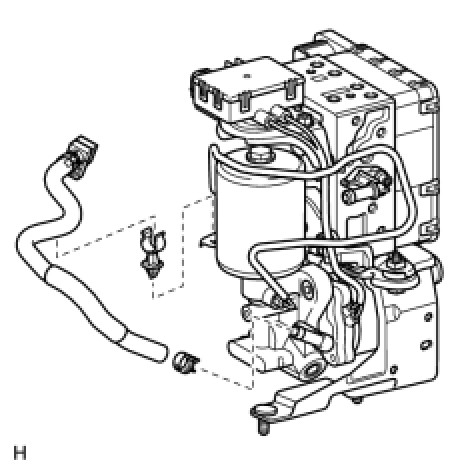
29. REMOVE NO. 2 BRAKE ACTUATOR HOSE
NOTE: When disconnecting the hose, be careful that there is no excessive weight applied to the union of the brake accumulator pump (especially in the union rotation direction).
(a)Disconnect the No. 2 brake actuator hose from the No. 3 brake actuator bracket and then remove the clamp.
(b)Remove the hose clip and No. 2 brake actuator hose.
(c)Remove the hose clip and reservoir connector.
30. REMOVE NO. 3 BRAKE ACTUATOR TUBE
NOTICE:
- Do not damage the No. 3 brake actuator tube, brake actuator and brake accumulator pump.
- When removing the No. 3 brake actuator tube, hold the tube, brake actuator and brake accumulator pump securely.
(a)Using a union nut wrench, disconnect the No. 3 brake actuator tube.
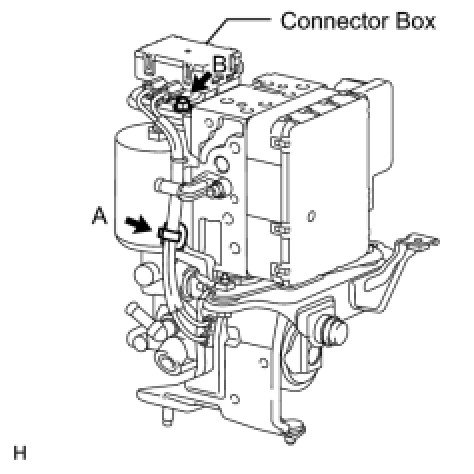
31. DISCONNECT BRAKE ACCUMULATOR PUMP CONNECTOR BOX
(a)Disconnect the brake accumulator pump connector box as follows:
(1)Detach the wiring harness clamp (labeled A).
(2)Remove the nut (labeled B) and connector box.
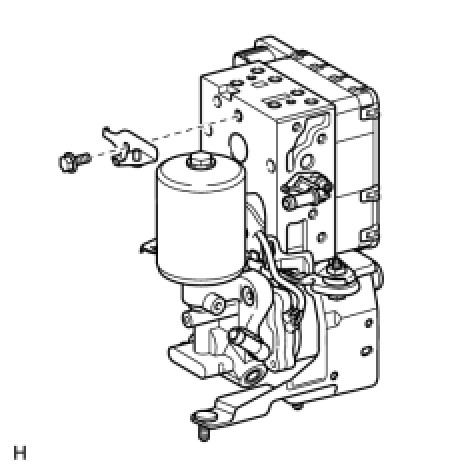
32. REMOVE NO. 4 BRAKE ACTUATOR BRACKET
(a)Remove the bolt and No. 4 brake actuator bracket.
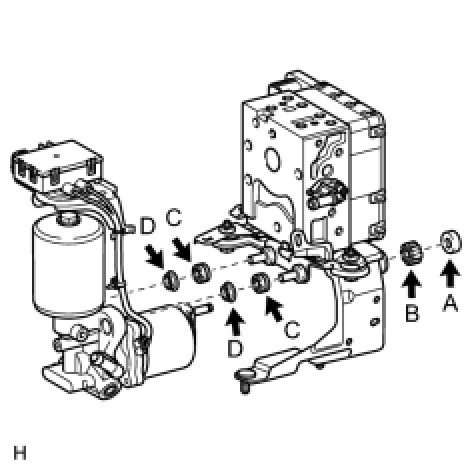
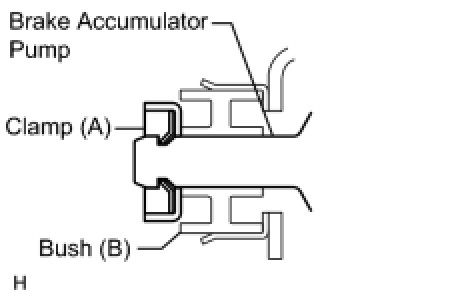
33. REMOVE BRAKE ACCUMULATOR PUMP
(a)Break and remove the brake actuator bracket clamp (labeled A), and then remove the brake accumulator pump.
(b)Remove the brake booster pump bush (labeled B) from the brake actuator bracket.
(c)Remove the brake booster pump bush (labeled C) and brake booster pump collar (labeled D) from the brake accumulator pump.
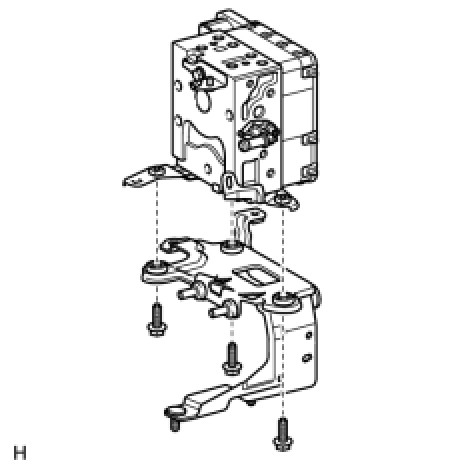
34. REMOVE BRAKE ACTUATOR
(a)Remove the 3 bolts, brake actuator bracket and brake actuator.
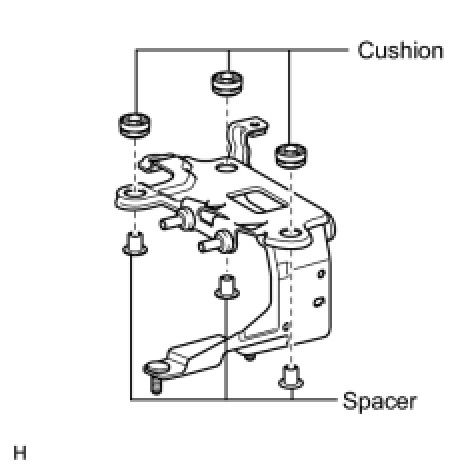
(b)Remove the 3 cushions and 3 spacers from the brake actuator bracket.
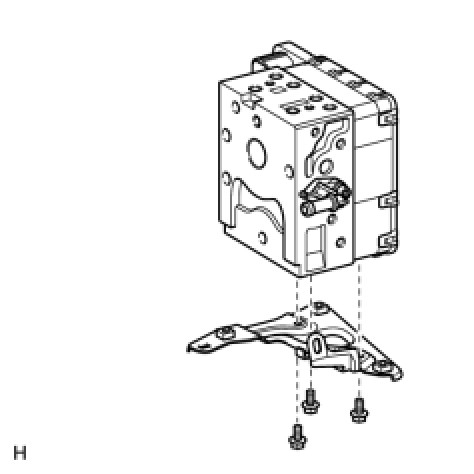
(c)Remove the 3 bolts and No. 3 brake actuator bracket from the brake actuator.
________________________________________
Let me know if this helps or if you have other questions.
Take care,
Joe
Images (Click to enlarge)
Jan 9, 2019 at 9:12 PM