Hi and thanks for using 2CarPros.com. Here are the directions you requested. The first set of direction relate to removal. The second is replacement. I have attached pictures which correlate with these directions.
3.6L
CAUTION:
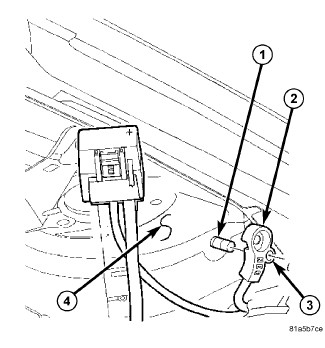
The negative battery cable remote terminal (2) must be disconnected and isolated from the remote battery post (1) prior to service of the vehicle electrical systems. The negative battery cable remote terminal can be isolated by using the supplied isolation hole (3) in the terminal casing.
Disconnect and isolate the negative battery cable (2) remote terminal from the remote battery post (1).
CAUTION:
Never force a belt over a pulley rim using a screwdriver. The synthetic fiber of the belt can be damaged.
CAUTION:
Do not let tensioner arm snap back to the freearm position, severe damage may occur to the tensioner.
Raise and support the vehicle.
Drain the cooling the system .
Remove right front wheel.
Remove the inner splash shield.
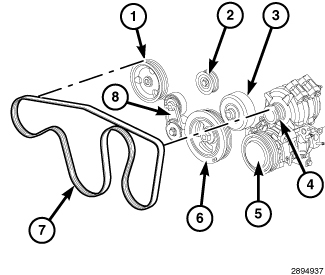
Rotate the belt tensioner (8) counterclockwise until it contacts the stop, remove the accessory drive belt (7) and then slowly rotate the tensioner into the freearm position.
Lower the vehicle.
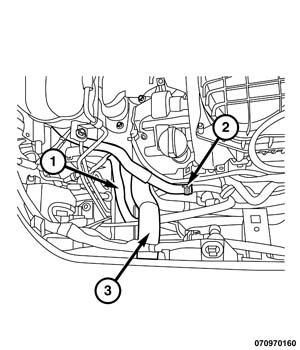
Remove the coolant supply line (2) at the heater supply line and position aside.
Remove the upper radiator hose (3) at the radiator and position aside.
Remove the wiring harness retainer (1) from the upper frame rail and position aside
Unsnap the plastic insulator cover from the B+ terminal.
Remove the B+ terminal retaining nut and remove the B+ terminal.
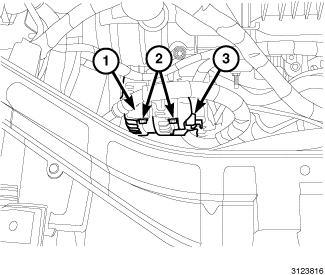
Depress the field wire electrical connector tab and remove the electrical connector (3) from the generator (1).
Remove the two upper mounting bolts (2) from generator (1).
Remove the lower mounting bolt from generator (1).
Remove generator (1) from engine mounting bracket.
REPLACEMENT DIRECTIONS:
GENERATOR - INSTALLATION
3.6L
Position the generator (1) onto the engine mounting bracket.
Install the lower mounting bolt and the two upper mounting bolts (3) to generator (1). Tighten bolts to 42 Nm (31 ft. lbs.).
Connect the field wire connector (3) to the generator.
Install B+ terminal and nut to generator mounting stud. Tighten nut to 10 Nm (88.5 in. lbs.).
Snap the plastic protective cover over the B+ terminal.
Install the wiring harness (1) retainer onto the upper frame rail.
Install the upper radiator hose (3) to the radiator.
Install the coolant supply line to the heater supply line.
Fill the cooling system.
Raise the vehicle.
Install the accessory drive belt. See: Engine, Cooling and ExhaustEngineDrive BeltService and RepairRemoval and ReplacementSerpentine Accessory Drive Belt - Installation.
Install the inner splash shield.
Install the right front wheel.
Lower the vehicle.
Connect negative battery cable, tighten nut to 4.5 Nm (40 in. lbs.).
Start the engine and verify the generator is functioning properly.
I hope this is helpful. If you have questions, let me know.
Take care and let me know how the job goes for you.
Joe
Images (Click to enlarge)
May 30, 2018 at 8:02 PM