Hi Clayton,
Here are removal and installation procedures.
Removal (2001 -02 MDX)
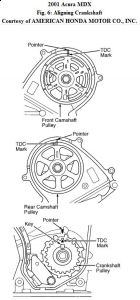
1 . Set No. 1 piston to TDC by turning crankshaft so White mark aligns with pointer. Ensure marks on front camshaft pulley and front cover are aligned.
2 . Raise vehicle and remove front wheels. Remove splash shield. Using lever tool, move auto-tensioner to relieve tension from generator belt. Remove generator belt.
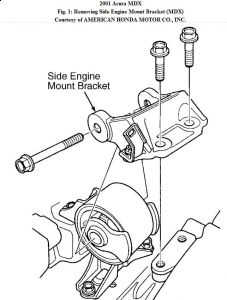
3 . Loosen power steering pump adjusting nut, lock nut and mounting bolt. Remove power steering pump belt. Support engine with jack and wood block under oil pan. Remove side engine mount bracket.
4 . Remove dipstick and tube. Discard "O" ring. Using a heavy duty 19 -mm socket and breaker
bar, remove crankshaft pulley bolt. Remove upper timing belt covers and lower timing belt
cover.
5 . Using a battery hold-down bolt, grind threaded end to a slight bevel. Hand tighten bolt into
timing belt adjuster to hold position. See Fig. 3 .
6 . Remove engine mount bracket on end of front cylinder head. Loosen idler pulley bolt about
5 - 6 turns, then remove timing belt.
Installation (New Belt)
1 . Clean timing belt pulleys, and the upper and lower covers. Ensure timing belt pulley is still set to TDC position. See Fig. 6 . Clean camshaft pulleys. Set pulleys to TDC position by aligning TDC marks on camshaft pulleys with pointers on back covers. Remove battery hold-down bolt from back cover.
2 . Remove auto-tensioner. Ensure maintenance bolt is always pointing upward. Ensure no oil
leaks or spills from auto-tensioner during handling.
CAUTION: DO NOT exceed 2200 lbs. of pressure when compressing auto - tensioner.
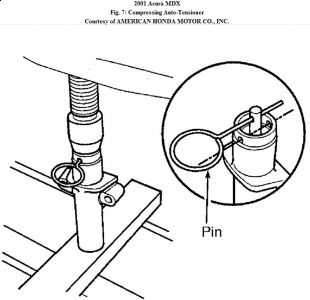
3 . Align holes on rod and auto-tensioner housing. Mount auto-tensioner in press, and slowly compress until a holding pin can be placed through housing and rod. See Fig. 7 .
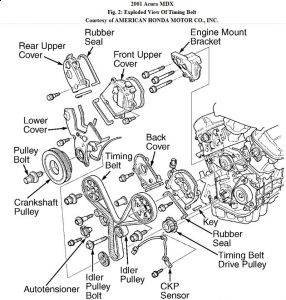
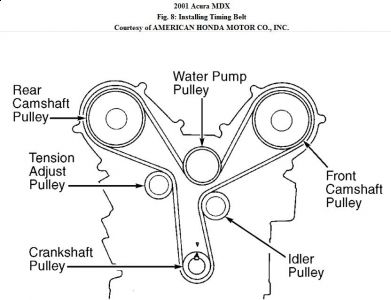
4 . Install auto-tensioner, making sure the pin stays in place. Using battery hold-down bolt, hand tighten bolt as shown to hold timing belt adjuster in position. See Fig. 3 . On 2003 - 05 models, apply liquid thread lock to idler pulley bolt, and loosely install idler pulley. On all models, install timing belt, working in counterclockwise direction, until belt is around all
pulleys in the following order: crankshaft sprocket, idler pulley, front camshaft pulley, water pump pulley, rear camshaft pulley and tensioner adjusting pulley. See Fig. 8 .
5 . Tighten idler pulley bolt to specification. Pull out set pin of auto-tensioner. Remove battery hold-down bolt from back cover. Install engine mount bracket. If applicable, install timing belt guide plate with concave side facing outward. Install upper and lower timing belt covers.
6 . Clean crankshaft pulley and bolt. Lubricate pulley bolt and washer. Install crankshaft pulley, and tighten bolt to specification while holding pulley. Rotate crankshaft pulley about 5 - 6 turns clockwise so timing belt properly sets on all pulleys.
7 . Turn crankshaft pulley to align TDC mark. Check TDC mark alignment of camshaft pulleys. If camshaft pulley marks are at TDC, go to next step. If camshaft pulley marks are not at TDC, repeat installation procedure.
8 . On 2001 -02 models, install dipstick and tube with NEW "O" ring. Install and adjust tension of power steering belt. On all models, install generator belt. Install side engine mount bracket, and tighten bolts to specification (tighten vertical mounting bolts first, then horizontal mounting bolt). To complete installation, reverse removal procedure.
9 . Reconnect negative battery cable. Reset radio and navigation system (if equipped) anti -theft
code. Reset preset radio frequencies.
Thursday, August 27th, 2009 AT 12:27 PM


