Good morning,
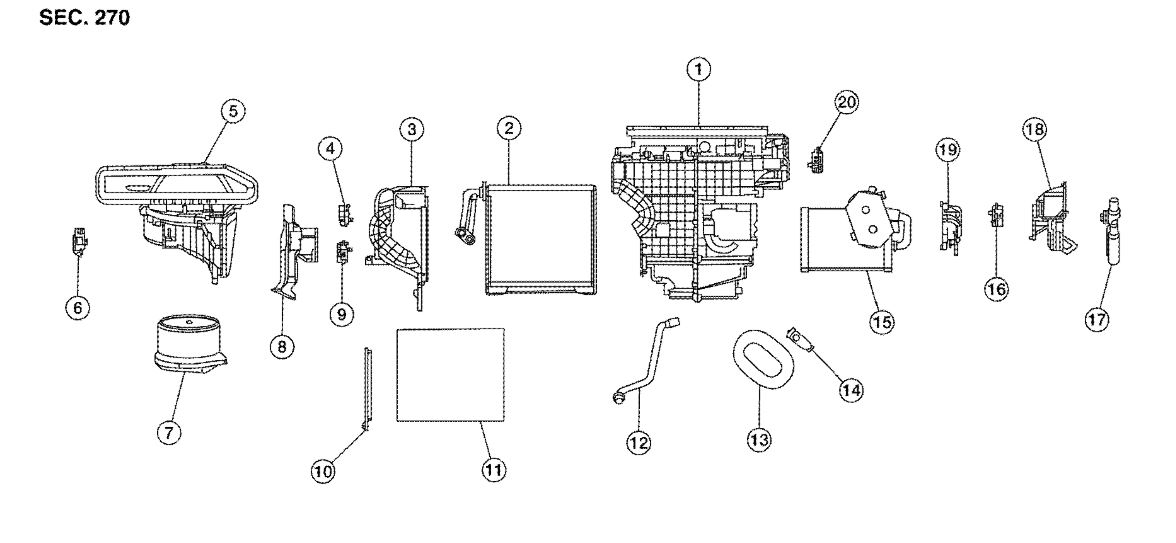
I attached the procedures and pictures for you of the blend door actuators. They are all in the same area.
Let us know if you have any other questions.
Roy
Drivers side
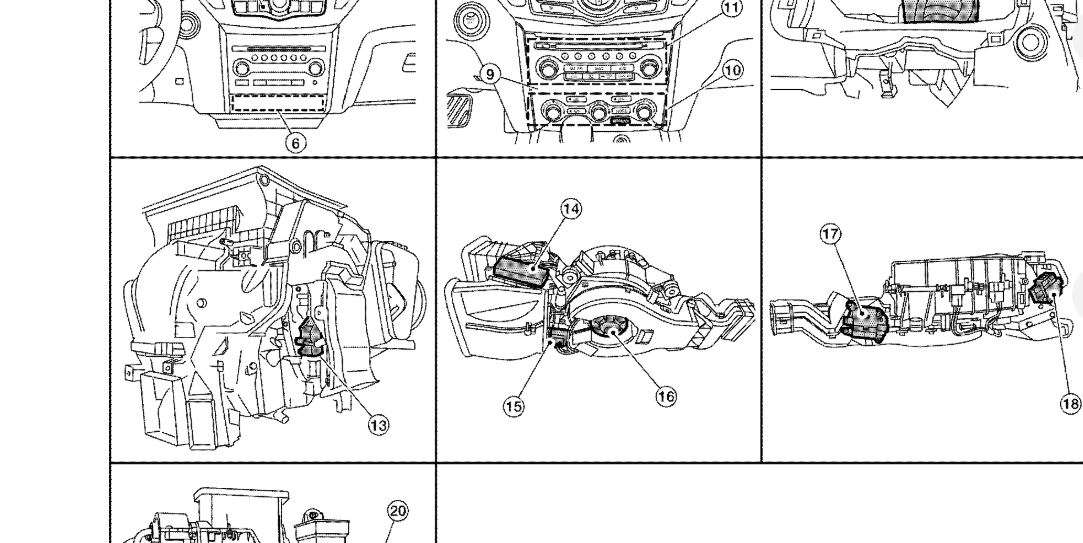
DOOR MOTOR
AIR MIX DOOR MOTOR : Removal and Installation - Air Mix Door Motor (Driver Side)
REMOVAL
1.Remove the center console side finisher (LH). Refer to "Exploded View" See: Console > Removal and Replacement > Exploded View.
2.Remove the front foot duct (LH). Refer to "HEATING AND COOLING UNIT ASSEMBLY : Exploded View Front Heating and Cooling Unit Assembly" See: Housing Assembly HVAC > Removal and Replacement > Exploded View.
3.Remove the air mix door motor (driver side) screws.
4.Disconnect the harness connector from the air mix door motor (driver side) and remove.
INSTALLATION
Installation is in the reverse order of removal.
Passenger side
DOOR MOTOR
AIR MIX DOOR MOTOR : Removal and Installation - Air Mix Door Motor (Passenger Side)
REMOVAL
1.Remove the front foot duct (RH). Refer to "HEATING AND COOLING UNIT ASSEMBLY : Exploded View Front Heating and Cooling Unit Assembly" See: Housing Assembly HVAC > Removal and Replacement > Exploded View.
2.Remove the air mix door motor (passenger side) screws.
3.Disconnect the harness connector from the air mix door motor (passenger side) and remove.
INSTALLATION
Installation is in the reverse order of removal.
Rear
DOOR MOTOR
AIR MIX DOOR MOTOR : Removal and Installation - Air Mix Door Motor (Rear)
REMOVAL
1.Remove the glove box assembly. Refer to "Removal and Installation" See: Glove Compartment > Removal and Replacement > Removal and Installation.
2.Remove the front foot duct (RH). Refer to "HEATING AND COOLING UNIT ASSEMBLY : Exploded View Front Heating and Cooling Unit Assembly" See: Housing Assembly HVAC > Removal and Replacement > Exploded View.
3.Remove the air mix door motor (rear) screws.
4.Disconnect the harness connector from the air mix door motor (rear) and remove.
INSTALLATION
Installation is in the reverse order of removal.
Images (Click to enlarge)
May 30, 2020 at 4:49 AM