A sandy crunchy noise in vents

Tiny
CRAIDER
  • MEMBER
  • 2012 NISSAN X-TRAIL
  • 2.5L
  • 4 CYL
  • 4WD
  • MANUAL
  • 72,000 MILES
Hey guys,

I recently turned my car fan on after a week or two of the car sitting outside (I was away on a break) and it has subsequently started making this horrible gritty noise from the vents.
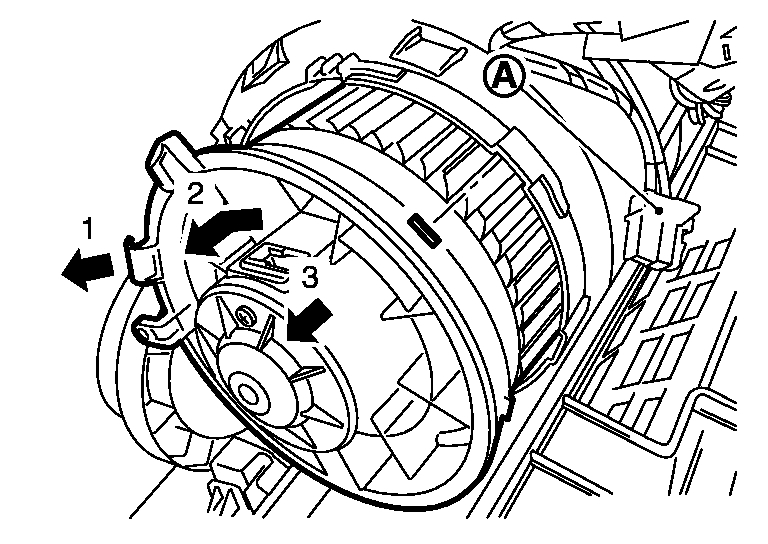
A friend who is a mechanic mentioned that sometimes the blower fan gets full of debris and rubbish over time especially if parked outside a lot.

If this could be the case, does anybody have a guide as to taking the blower fan/motor vehicle it as it is located in a different position to earlier model Nissan Xtrails?

Your help would be amazing.

Cheers,

Chris
Friday, October 25th, 2019 AT 5:15 PM

3 Replies

Tiny
JACOBANDNICKOLAS
  • MECHANIC
  • 108,320 POSTS
Welcome to 2CarPros.

Chris, the X-Trail isn't offered in the US, but it is the same as our Nissan Rogue. The directions I supply are for a Rogue. No idea if you have left or right hand drive, but the directions should be very similar.

The attached picture correlates with the directions.

____________________________

2012 Nissan-Datsun Truck Rogue 4WD L4-2.5L (QR25DE)
Removal And Installation
Vehicle Heating and Air Conditioning Blower Motor Service and Repair Removal and Replacement Blower Motor Removal And Installation
REMOVAL AND INSTALLATION
BLOWER MOTOR

Removal and Installation

REMOVAL

1. Remove instrument driver lower cover. See: Dashboard / Instrument Panel > Removal and Replacement > Exploded View.
2. Remove combination meter. See: Instrument Cluster / Carrier > Removal and Replacement > Removal And Installation.
3. Remove knee protector. See: Dashboard / Instrument Panel > Removal and Replacement > Exploded View.
4. Remove foot duct LH. See: Air Duct > Removal and Replacement > Exploded View.
5. Remove mode door motor. See: Air Door Actuator / Motor, HVAC > Removal and Replacement > Exploded View.
6. Remove brake pedal assembly and accelerator pedal. See: Brake Pedal Assy > Removal and Replacement > Exploded View.

Pic 1

7. Disconnect blower motor connector (A).
8. Press flange holding hook (1). Then turn blower motor counterclockwise (2).
9. Pull outside (3) and remove blower motor.

CAUTION:
The balance is adjusted when blower fan and blower motor are assembled, so do not replace the individual parts.

INSTALLATION

Installation is basically the reverse order of removal.

CAUTION:
Install correctly blower motor flange holding hook in A/C unit assembly.

________________________

Let me know if this helps or if you have other questions.

Take care,
Joe
Was this
answer
helpful?
Yes
No
Friday, October 25th, 2019 AT 9:21 PM
Tiny
CRAIDER
  • MEMBER
  • 2 POSTS
Thanks heaps Joe.
Will get stuck in now to sort.
Was this
answer
helpful?
Yes
No
Sunday, October 27th, 2019 AT 3:09 PM
Tiny
JACOBANDNICKOLAS
  • MECHANIC
  • 108,320 POSTS
Welcome back:

You are very welcome. Let me know if I can help or if you have other questions.

Take care,
Joe
Was this
answer
helpful?
Yes
No
Sunday, October 27th, 2019 AT 9:28 PM

Please login or register to post a reply.

Sponsored links