Good afternoon,
I attached a procedure and a picture for you to view.
Roy
REMOVAL
1. Disconnect and isolate the battery negative cable.
2. Remove the cluster bezel from the instrument panel. Refer to: Instrument Panel, Gauges and Warning Indicators, Instrument Cluster Carrier, Service and Repair, Instrument Cluster Service Procedures, Instrument Cluster Bezel Replacement,
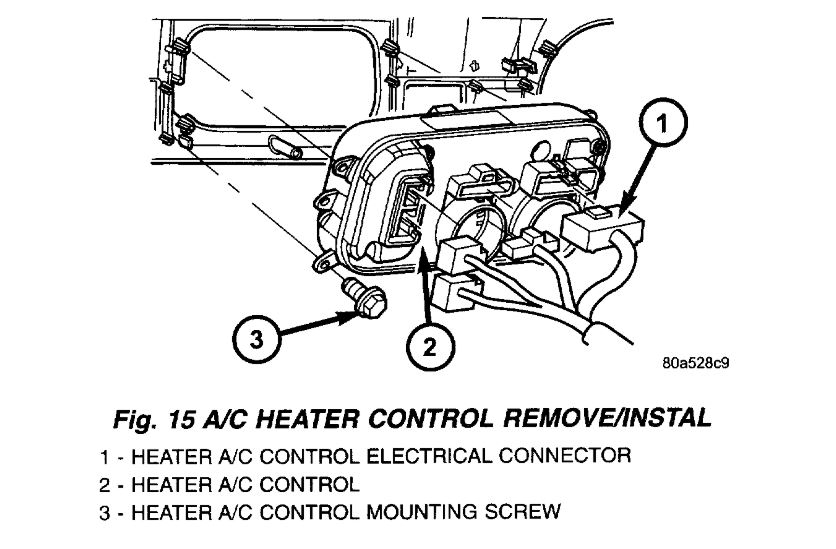
Fig. 15 A/C Heater Control Remove/Install
imageOpen In New TabZoom/Print
3. Remove the four screws that secure the heater- A/C control to the cluster bezel.
4. Unplug the wire harness connector from the back of the heater-A/C control
5. Remove the heater-A/C control from the instrument panel.
INSTALLATION
1. Plug the wire harness connector into the back of the heater-A/C control.
2. Position the heater- A/C control in the cluster bezel and secure it with four screws. Tighten the screws to 2.2 Nm (17 i3 in. Lbs.).
3. Reinstall the cluster bezel to the instrument panel. Refer to: Instrument Panel, Gauges and Warning Indicators, Instrument Cluster Carrier, Service and Repair, Instrument Cluster Service Procedures, Instrument Cluster Bezel Replacement,
4. Connect the battery negative cable.
5. Perform the A/C cool down test using the DRB III.
Bezel
1. Disconnect and isolate the battery negative cable.
2. If the vehicle is equipped with an automatic transmission, turn the ignition switch to the Unlock position, set the park brake, and place the automatic transmission gear selector lever in the Low position.
3. If the vehicle is equipped with a tilt column, set the tilt steering column in its lowest position.
4. Remove the steering column opening cover from the instrument panel.
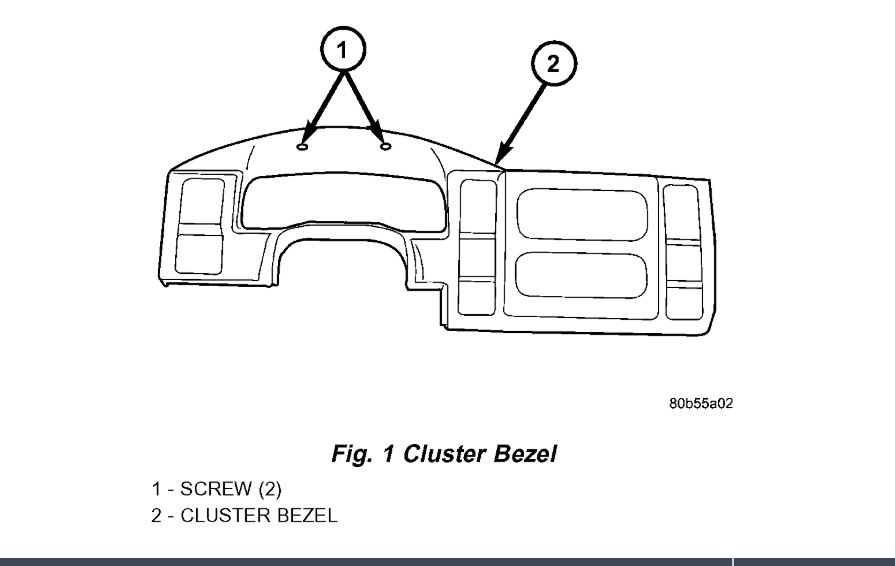
Fig. 1 Cluster Bezel
imageOpen In New TabZoom/Print
5. Remove the two screws in the hooded area above the instrument cluster that secure the cluster bezel to the instrument panel base trim (Fig. 1).
6. Using a trim stick or another suitable wide flat-bladed tool, gently pry around the perimeter of the cluster bezel to disengage each of the snap clips from their receptacles in the instrument panel base trim.
7. Pull the right side of the cluster bezel away from the instrument panel far enough to access and disconnect the instrument panel wire harness connector for the headlamp switch from the switch connector receptacle.
8. Pull the left side of the cluster bezel away from the instrument panel far enough to access and disconnect the instrument panel wire harness connectors from the receptacles for the passenger airbag on/off switch (if equipped), the rear window defogger switch (if equipped), the heater-air conditioner control, and the transfer case switch (if equipped).
9. Remove the cluster bezel from the instrument panel.
INSTALLATION
WARNING:
On vehicles equipped with airbags, disable the airbag system before attempting any steering wheel, steering column, seat belt tensioner, or instrument panel component diagnosis or service. Disconnect and isolate the battery negative (ground) cable, then wait two minutes for the airbag system capacitor to discharge before performing further diagnosis or service. This is the only sure way to disable the airbag system. Failure to take the proper precautions could result in accidental airbag deployment and possible personal injury.
Images (Click to make bigger)
Thursday, August 15th, 2019 AT 2:53 PM