Disconnect the harness. It looks like it unbolts.
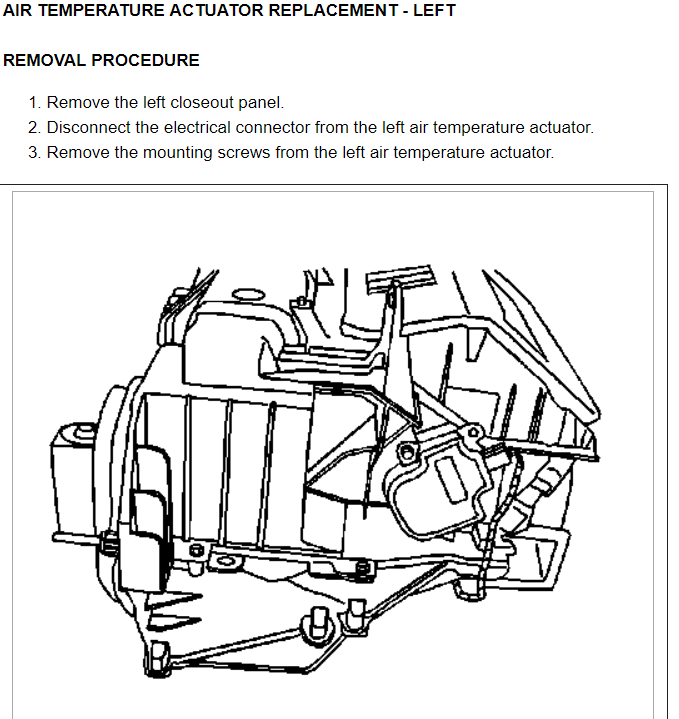
AIR TEMPERATURE DOOR REPLACEMENT - RIGHT SIDE
Removal Procedure
1. Remove the HVAC module assembly. Refer to HVAC Module Assembly Replacement.
2. Remove the screws that secure the recirculation housing to the HVAC module assembly.
Fig. 127: Identifying Recirculation Housing
Courtesy of GENERAL MOTORS CORP.
3. Remove the recirculation housing from the HVAC module assembly.
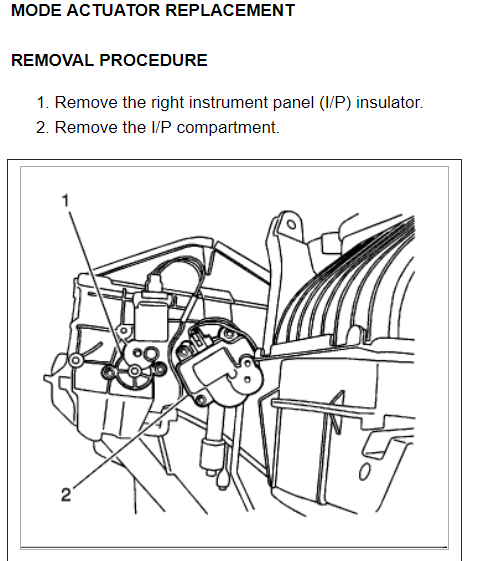
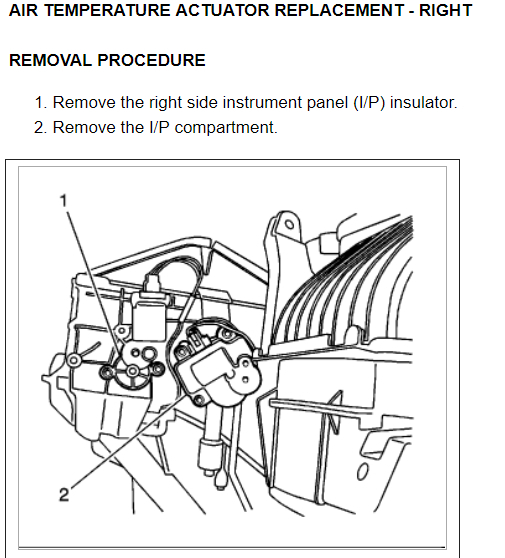
4. Remove the screws that secure the mode actuator to the HVAC module assembly.
5. Remove the mode actuator from the HVAC module assembly.
Remove the screws that secure HVAC module assembly upper case to the HVAC module
assembly lower case.
6.
Remove the heat stakes that secure the HVAC module assembly upper case to the HVAC
module lower case using a small chisel.
7.
Fig. 128: View Of Upper & Lower HVAC Module Assembly Case
Courtesy of GENERAL MOTORS CORP.
8. Separate the HVAC module assembly case (1).
Remove the screws that secure the air temperature actuator to the HVAC module assembly
upper case.
9.
10. Remove the air temperature actuator from the HVAC module assembly upper case.
Fig. 129: Removing Air Temperature Door - Right
Courtesy of GENERAL MOTORS CORP.
11. Remove the air temperature door from the HVAC module assembly upper case.
12. Remove the right air temperature door from the air temperature door assembly.
Installation Procedure
1. Install the right air temperature door to the air temperature door assembly.
Fig. 130: Removing Air Temperature Door - Right
Courtesy of GENERAL MOTORS CORP.
2. Install the air temperature door to the HVAC module assembly upper case.
3. Install the air temperature actuator to the HVAC module assembly upper case.
NOTE: Refer to Fastener Notice .
Install the screws that secure the air temperature actuator to the HVAC module assembly upper
case.
4.
HVAC SYSTEMS -2007 Buick LaCrosse CX Page 1 of 2
Tighten: Tighten the screws to 1.5 N.m (13 lb in).
From the inside of the upper case, drill the dimples adjacent to the heat stakes using a 5.5 mm
(7/32 in) drill bit.
5.
Fig. 131: View Of Upper & Lower HVAC Module Assembly Case
Courtesy of GENERAL MOTORS CORP.
6. Align and attach the upper and lower HVAC module assembly case.
Install the removed screws that secure the HVAC module assembly upper case to the HVAC
module assembly lower case to their original position.
7.
Tighten: Tighten the screws to 1.5 N.m (13 lb in).
Install new screws that will secure the HVAC module assembly upper case to the HVAC
module assembly lower case in the locations adjacent to the heat stakes.
8.
Tighten: Tighten the screws to 1.5 N.m (13 lb in).
9. Install the mode actuator.
10. Install the screws that secure the mode actuator to the HVAC module assembly.
Tighten: Tighten the screws to 1.5 N.m (13 lb in).
Fig. 132: Identifying Recirculation Housing
Courtesy of GENERAL MOTORS CORP.
11. Install the recirculation housing to the HVAC module assembly.
12. Install the screws that secure the recirculation housing to the HVAC module assembly.
Tighten: Tighten the screws to 1.5 N.m (13 lb in).
13. Install the HVAC module assembly. Refer to HVAC Module Assembly Replacement.
© 2008 Mitchell Repair Information Co., LLC.
HVAC SYSTEMS -2007 Buick LaCrosse CX Page 2 of 2
Removal Procedure
1. Remove the HVAC module assembly. Refer to HVAC Module Assembly Replacement.
2. Remove the screws that secure the recirculation housing to the HVAC module assembly.
Fig. 133: Identifying Recirculation Housing
Courtesy of GENERAL MOTORS CORP.
3. Remove the recirculation housing from the HVAC module assembly.
4. Remove the screws that secure the mode actuator to the HVAC module assembly.
5. Remove the mode actuator from the HVAC module assembly.
Remove the screws that secure HVAC module assembly upper case to the HVAC module
assembly lower case.
6.
Remove the heat stakes that secure the HVAC module assembly upper case to the HVAC
module lower case using a small chisel.
7.
Fig. 134: View Of Upper & Lower HVAC Module Assembly Case
Courtesy of GENERAL MOTORS CORP.
8. Separate the HVAC module assembly case (1).
Remove the screws that secure the air temperature actuator to the HVAC module assembly
upper case.
9.
10. Remove the air temperature actuator from the HVAC module assembly upper case.
Fig. 135: Removing Air Temperature Door - Right
Courtesy of GENERAL MOTORS CORP.
11. Remove the air temperature door from the HVAC module assembly upper case.
12. Remove the left air temperature door from the air temperature door assembly.
© 2008 Mitchell Repair Information Co., LLC.
HVAC SYSTEMS -2007 Buick LaCrosse CX Page 1 of 1
Dec 21, 2011 at 2:09 AM