Good afternoon,
I attached the procedure for replacing the rear shocks below for you. There is also a guide for you as well.
https://www.2carpros.com/articles/replace-shock-absorber
Roy
Shock Absorber and Spring Assembly-2WD
Removal
CAUTION: Suspension fasteners are critical parts because they affect performance of vital components and systems and their failure can result in major service expense. A new part with the same part number, or an equivalent part, must be installed if installation is necessary. Do not use a new part of lesser quality or substitute design. Torque values must be used as specified during reassembly to make sure of correct retention of these parts.
imageOpen In New TabZoom/Print
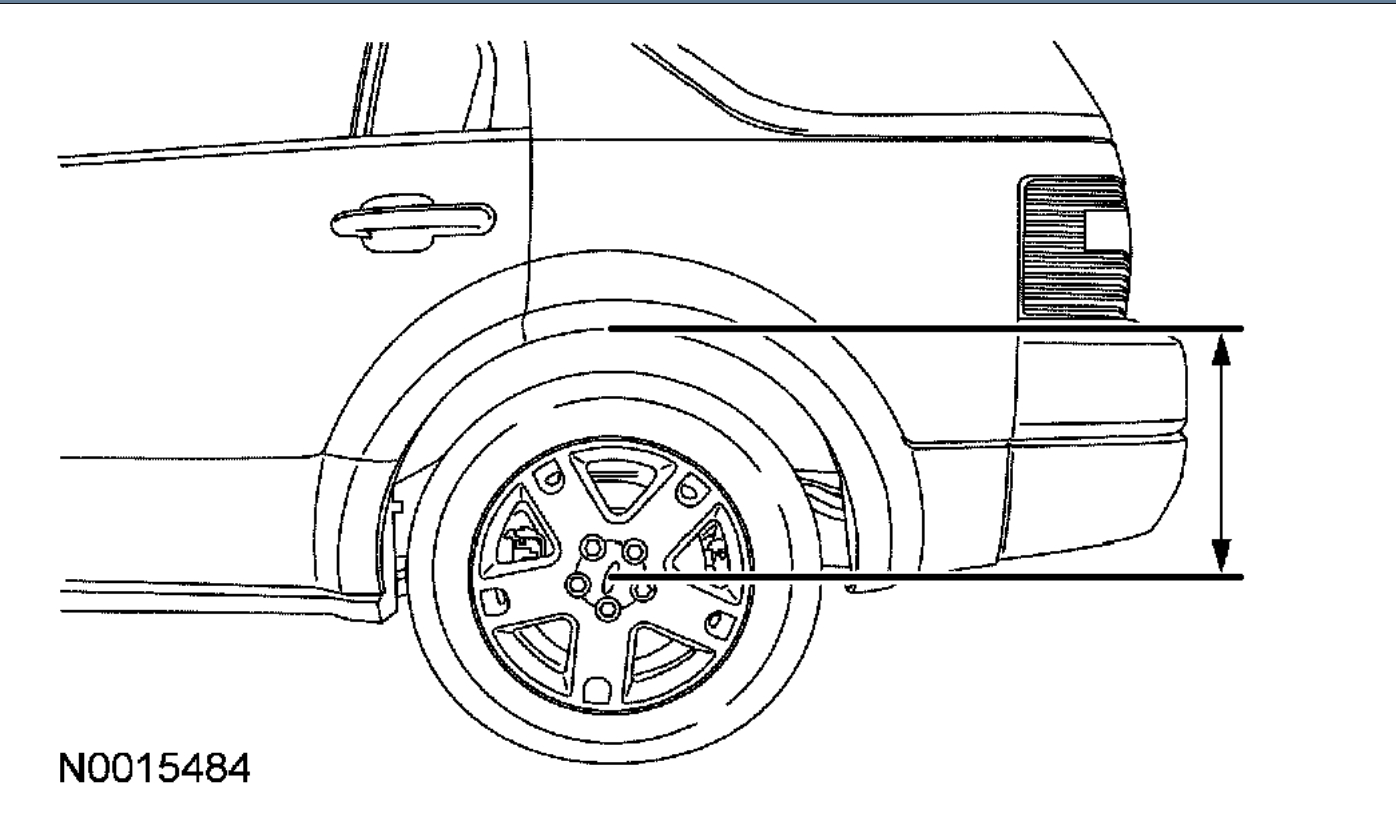
1. Measure the distance from the center of the hub to the lip of the fender with the vehicle in a level, static ground position (curb height).
2. Remove the interior trim to access the upper shock absorber nut.
3. Remove and discard the upper shock absorber nut.
4. Remove the wheel and tire assembly.
5. CAUTION: When removing the rear brake caliper, never allow it to hang from the brake caliper flexible hose. Provide a suitable support.
Remove the rear brake caliper guide-pin bolts and position the brake caliper aside.
^ To install, tighten to 31 Nm (23 ft. lbs.).
6. Raise the vehicle on the hoist to access the suspension.
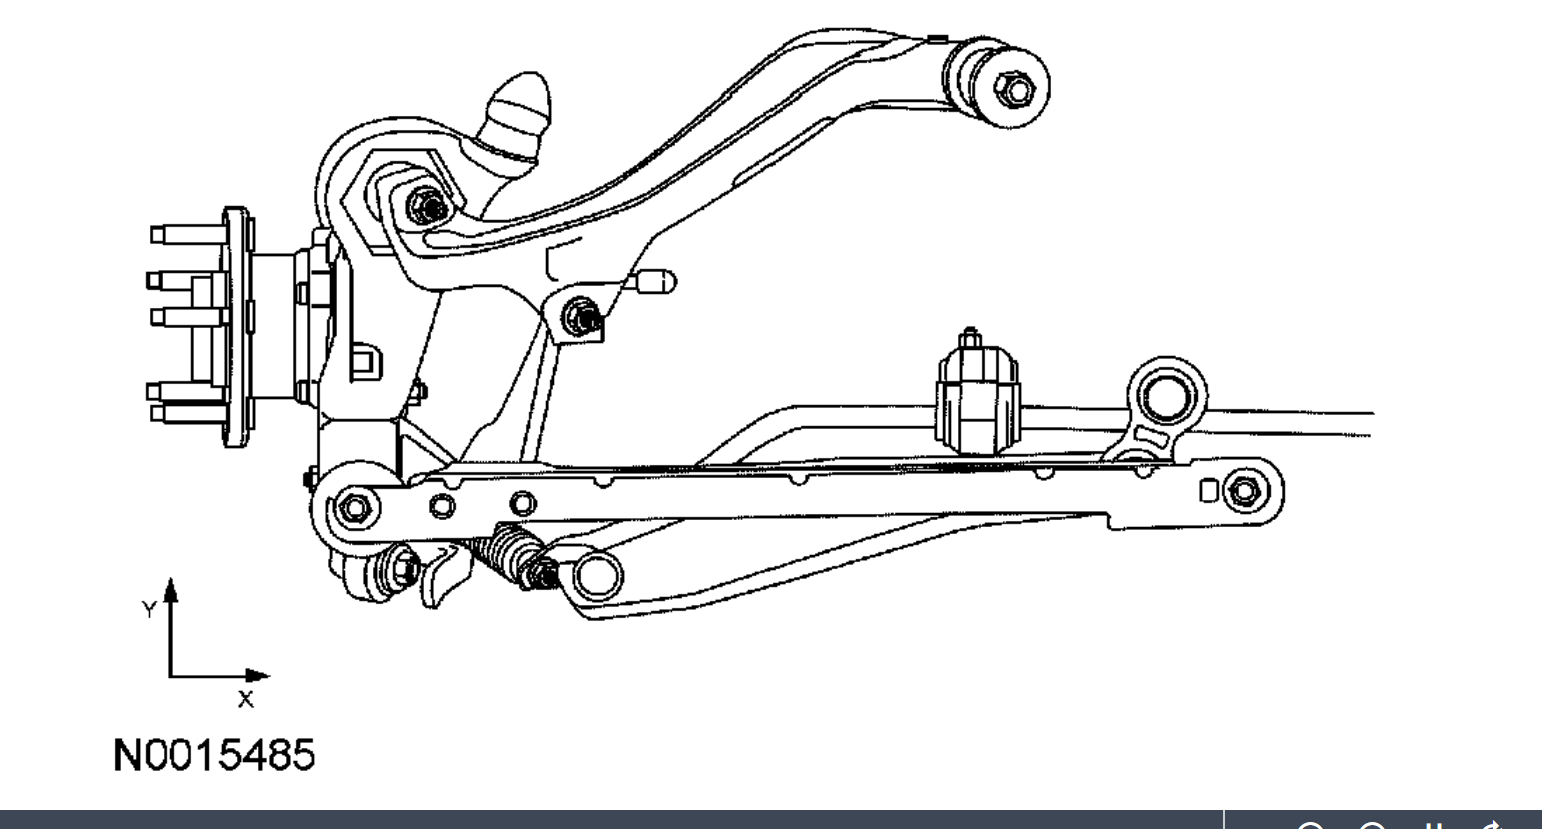
7. Position a V-topped transmission jack under the wheel knuckle at the trailing arm and wheel knuckle attachment point.
imageOpen In New TabZoom/Print
8. Raise the wheel knuckle until the toe-link is parallel to the ground.
9. Remove and discard the trailing arm-to-knuckle bolt.
10. Lower the transmission jack.
11. Remove and discard the trailing arm-to-subframe bolt.
12. Position the V-topped transmission jack under the lower shock absorber mount, then raise it enough to compress the shock absorber and spring.
13. Remove the lower arm-to-knuckle bolt.
14. Loosen the lower arm-to-subframe bolt.
15. Lower and remove the transmission jack.
16. Remove and discard the lower shock absorber and spring assembly-to-lower arm bolt.
17. While holding the shock absorber and spring assembly, swing the lower arm down to access and remove the shock absorber and spring.
Installation
1. Tape the spring to the upper rubber spring seat.
2. Position the spring and upper rubber seat on the shock absorber.
3. Install a new lower arm-to-knuckle bolt in the lower arm. Do not attach the lower arm to the knuckle at this time.
4. Position the transmission jack under the lower arm.
5. Install the shock absorber and spring assembly into alignment with the upper spring mount.
6. Swing the lower arm into position under the shock absorber and spring assembly.
7. Remove transmission jack.
8. Partially lower the vehicle on the hoist.
9. Position a floor jack under the lower arm at the lowest point.
10. Slowly raise the lower arm with the floor jack until the top of the shock absorber makes contact with the inside surface of the upper shock absorber mount.
11. While an assistant guides the shock absorber and spring assembly, continue to raise the lower arm with the floor jack until the shock absorber seats into the upper shock absorber mount.
12. Install a new shock absorber nut.
^ Tighten to 83 Nm (61 ft. lbs.).
13. Install the interior trim.
14. Remove the floor jack.
15. Raise the vehicle.
16. Position a V-topped transmission jack under the wheel knuckle at the trailing arm and wheel knuckle attachment point.
17. Remove the lower shock absorber-to-knuckle bolt, then insert the shock absorber and spring into the lower arm. Install the bolt.
18. Loosen the lower arm-to-subframe bolt.
19. Raise the transmission jack until the center of the wheel hub is at the correct curb height (measured in Step 1 of the Removal procedure).
20. Tighten the lower arm-to-subframe bolt to 125 Nm (92 ft. lbs.).
21. Tighten the lower arm-to-knuckle bolt to 110 Nm (81 ft. lbs.).
22. Position the trailing arm to the wheel knuckle and loosely install the bolt.
23. Position the transmission jack under the lower arm.
24. Raise the transmission jack until the trailing arm and subframe bushing are aligned.
25. Install a new trailing arm-to-subframe bolt.
^ Tighten to 110 Nm (81 ft. lbs.).
26. Tighten the trailing arm-to-knuckle bolt to 105 Nm (77 ft. lbs.).
27. Partially lower the vehicle.
28. Install the brake caliper and guide pin bolts.
^ Tighten to 31 Nm (23 ft. lbs.).
Images (Click to enlarge)
Mar 14, 2021 at 11:34 AM