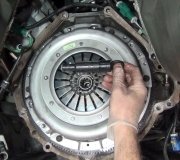
2004 Chevrolet Aveo Dropping transmission.

Tiny
WTF323
  • MEMBER
  • 2004 CHEVROLET AVEO
  • 100,000 MILES
I need help with my sons car. The clutch has gone out and so far I've remove the axles and starter. Could you please help me with what ever else needs to be removed before it is dropped. I also have disconnected the battery 1st and a couple of sensors.
Saturday, October 19th, 2013 AT 2:36 PM

5 Replies

Tiny
TY ANDERSON
  • MECHANIC
  • 684 POSTS
This transmission is removed from below the vehicle (per service manual). Do you have the means to raise the vehicle high enough to remove the transmission from below the vehicle? Answer my questions and I can provide instructions to remove the transmission. Ty
Was this
answer
helpful?
Yes
No
+10
Saturday, October 19th, 2013 AT 2:56 PM
Tiny
WTF323
  • MEMBER
  • 3 POSTS
I have it on jack stands now. It's probably 2 feet up in the front now, enough room to get the floor jack under to lower it.
Was this
answer
helpful?
Yes
No
+1
Saturday, October 19th, 2013 AT 3:47 PM
Tiny
TY ANDERSON
  • MECHANIC
  • 684 POSTS
Here is the service manual step by step instructions to remove the manual transmission.
First you'll need to support the engine so it will not drop when removing the trans.
1 remove the battery and battery tray 2 remove the shift linkage from trans
3 Remove both drive axle shafts 4 Disconnect the back up lamp switch electrical connector and speedometer speed electrical sensor connector 5Remove the clutch release cylinder retaining bolts and the clutch release cylinder 6 Remove damping block connection and nut & bolt 7 remove the 3 rear mounting bracket bolts 8 Remove the rear mounting bracket from the transaxle 9 remove the 2 rear damping block retaining bolts 10 remove the rear damping block from the front cross member 11 remove the 2 cage retaining bolts 12 remove the 3 transaxle upper mounting bracket bolts 13 remove the upper mounting bracket and cage 14 Remove the 3 transaxle upper retaining bolts 15 Supports the transaxle with a transaxle support jack 16 Remove the 7 transaxle lower retaining bolts 17 remove the transaxle 18 Slide the transaxle sideways away from the engine block 19 Lower the transaxle.
Installation is the reverse of the above. Get back to me when removing and installing the clutch assembly for inspection, installing ect.
Reply back if you have any more questions or pictures. TY
Was this
answer
helpful?
Yes
No
+9
Tuesday, October 22nd, 2013 AT 9:46 AM
Tiny
WTF323
  • MEMBER
  • 3 POSTS
Thank you Ty! I have not forgotten about you lol. But I do have one more question. Is there a torque spec for the pressure plate when reinstalling. We are having to do this a little at a time because of work our schedules conflict so it's one day at a time. Thank you in advance.
Was this
answer
helpful?
Yes
No
+2
Sunday, November 3rd, 2013 AT 5:53 PM
Tiny
TY ANDERSON
  • MECHANIC
  • 684 POSTS
Yes, there is a torque specification. But first I hope your replacing the whole clutch assembly except the flywheel. It's best to have the flywheel resurfaced at this point but if its not too bad you could reinstall the new clutch assembly without. Run you finger nail across the friction surface and if any of the groove(s) cause you fingernail to snag it would be a good idea to have the flywheel resurfaced. Also, the input shaft pilot bushing/bearing of the transmission (that's located on the flywheel, dead center) it is a good preventive measure to replace this bushing/bearing. Most clutch kit will include this with the kit, as well as, a throw out bearing.

Clutch plate Installation procedure
Coat the spline on the clutch dish with a multipurpose grease (thin coat you don't want any of this to get on the clutch)
Install the spline tool into the clutch spline and line up pressure plate. Install all the pressure plate bolts by hand and torque to 11lb ft if you have a hydraulic clutch type or 13lb ft if you have the cable clutch type (let me know if you have the cable type clutch because you'll probably need to adjust it after reinstalling the transmission). Tighten all the pressure plate bolts in a star pattern doing this evenly compress the finger springs on the pressure plate. For example, tighten pressure plate bolts in star pattern to 5lb ft first then tighten again in a star pattern to the final torque. Doing this while the alignment clutch spine tool is installed will tighten the pressure plate evenly and makes reinstalling the transmission much easier.
Hope this answered your question and good luck
Was this
answer
helpful?
Yes
No
+2
Tuesday, November 5th, 2013 AT 9:18 PM

Please login or register to post a reply.

Sponsored links