Removal
Disconnect negative battery cable. Drain cooling system. On Corolla, remove windshield washer fluid reservoir. On Celica, remove upper front fender apron seal and upper radiator support seal. On MR2, remove rear suspension upper brace and engine under covers. Rotate accessory drive belt tensioner clockwise (viewed from timing chain end of engine) to release tension from accessory drive belt. Remove accessory drive belt. Remove mounting bolts and generator.
Using spanner wrench in holes on front of power steering pump pulley, hold power steering pump pulley while removing power steering pump pulley nut. Remove power steering pump pulley from power steering pump. Remove bolts/nuts and power steering pump. Secure power steering pump aside.
Raise and support vehicle. Remove passenger's side front wheel and lower engine cover. Support oil pan with floor jack and wooden block. Remove right (timing chain side) engine mount insulator-to-engine mount bracket bolts/nuts. Remove right (timing chain side) engine mount insulator-to-body bolts.
Remove ignition coils from spark plugs. Disconnect spark plug wires from spark plugs. Disconnect necessary hoses and engine wiring cover for removal of valve cover. Remove valve cover bolts/nuts, seal washers, cable bracket, valve cover and gasket.
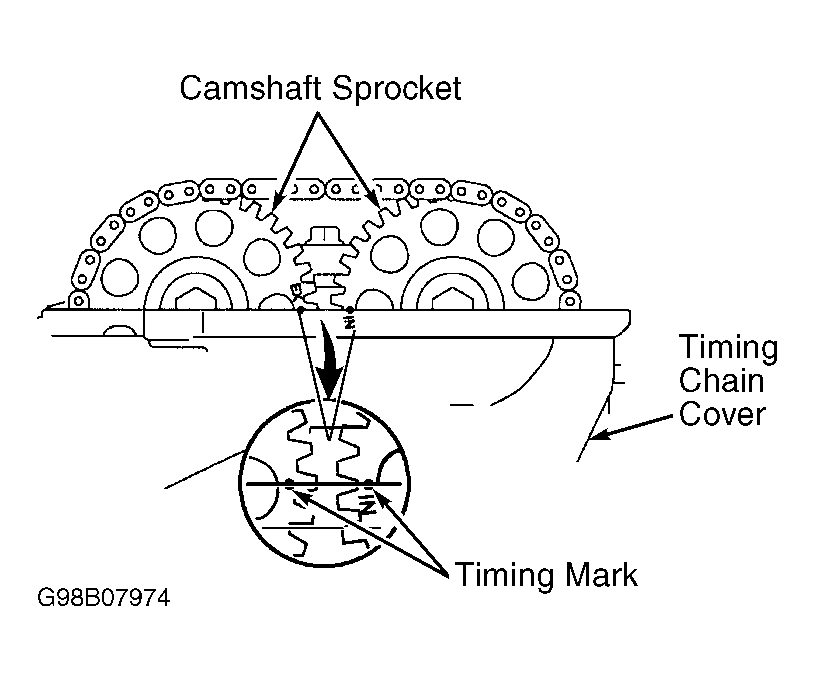
Rotate crankshaft clockwise (viewed from timing chain end of engine) until crankshaft pulley timing mark (groove) aligns with "0" mark on timing chain cover and cylinder No. 1 is at TDC on compression stroke. Cylinder No. 1 is the front cylinder at timing chain end of engine.
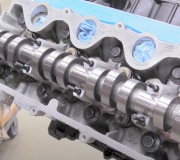
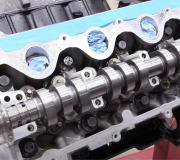
Ensure timing marks on camshaft sprockets are aligned and positioned in a straight line at top surface on timing chain cover. See Fig. 2. If timing marks are not as specified, rotate crankshaft clockwise one full revolution (360 degrees) and realign crankshaft pulley timing mark (groove) with "0" mark on timing chain cover and then recheck timing mark alignment.
Using Pulley Holder (SST 09213-70010) and Handle (SST 09330-00021), hold crankshaft pulley. Remove crankshaft pulley bolt. Using puller, remove crankshaft pulley.
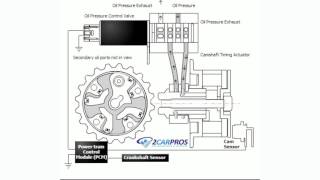
Remove bolts and crankshaft position sensor. See Fig. 5. Remove bolts/nuts and accessory drive belt tensioner. Remove bolts and right (timing chain side) engine mount bracket from front of cylinder block.
Remove bolt and timing chain tensioner from side of timing chain cover. Note location of water pump bolts for installation reference. Remove bolts, water pump and "O" ring. See Fig. 5
Remove bolts/nuts, stud bolt and timing chain cover. Timing chain cover may be removed by prying between cylinder head and timing chain cover at the area just above water pump opening on timing chain cover.
Remove crank angle sensor plate, bolt and timing chain tensioner slipper. See Fig. 5.
Remove crankshaft sprocket with timing chain. If crankshaft sprocket cannot be removed by hand, place shop towels against front of cylinder block, just behind crankshaft sprocket. Using screwdrivers, pry crankshaft sprocket with timing chain from crankshaft. Remove bolts and timing chain vibration damper. See Fig. 5.
CAUTION:Use care not to damage valve lifter or cylinder head when removing camshaft sprocket.
If necessary to remove camshaft sprockets, hold camshaft by placing wrench at hexagonal area near center of camshaft. DO NOT damage cylinder head or valve lifter. Remove bolt and camshaft sprocket from camshaft. If necessary to remove crankshaft front seal, use hammer and drift to remove seal from timing chain cover.
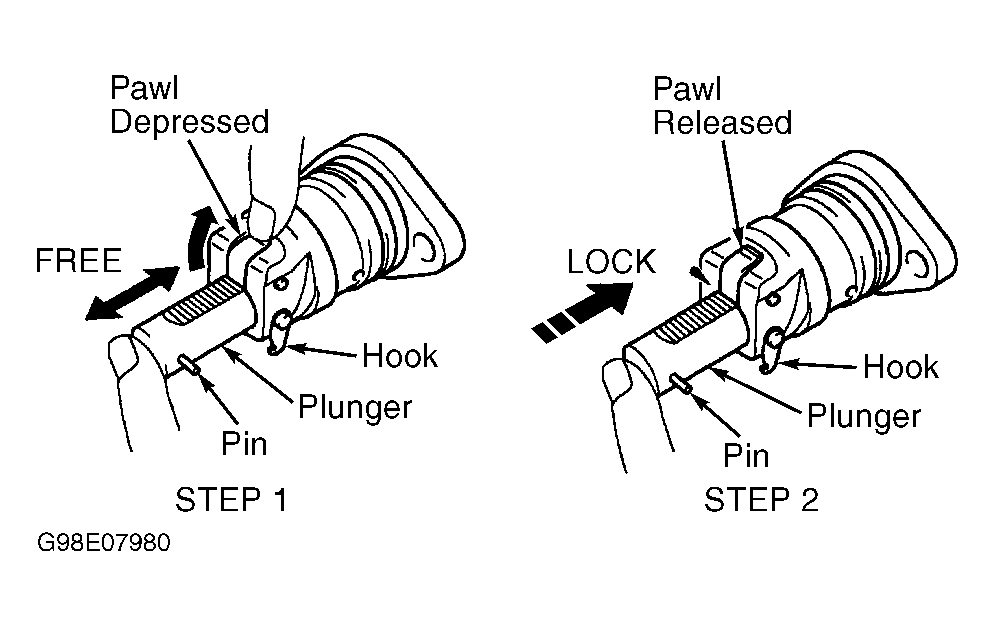
Ensure plunger on timing chain tensioner moves freely when pawl is pushed downward. Perform STEP 1 in illustration. See Fig. 25. Release pawl. Ensure plunger locks and will not move. Perform STEP 2 in illustration. See Fig. 25. Replace timing chain tensioner if defective. Check that oil jet on front of oil pump body is not restricted. See Fig. 43.
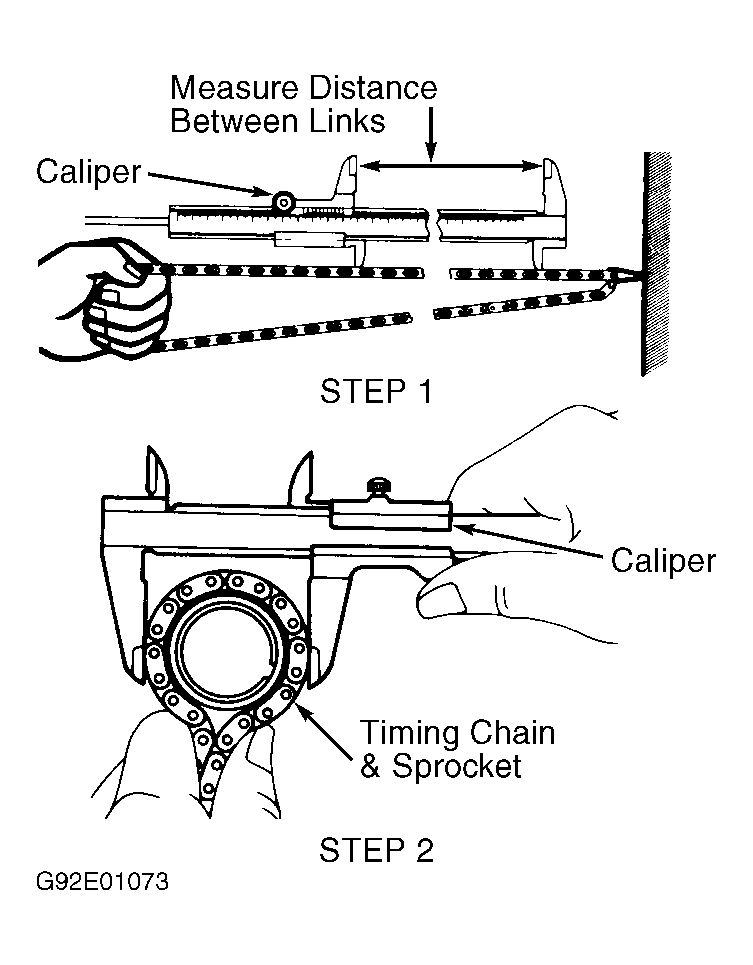
Fig. 24: Measuring Timing Chain & Sprockets
Courtesy of TOYOTA MOTOR SALES, U.S.A, INC.
Fig. 25: Checking & Positioning Timing Chain Tensioner
Courtesy of TOYOTA MOTOR SALES, U.S.A, INC.
Installation
Use hammer and Seal Installer (SST 09309-37010) to install crankshaft front seal in timing chain cover (if removed). Install seal until seal surface is even with timing chain cover. Apply grease to lip of oil seal.
If installing camshaft sprocket, align groove in camshaft sprocket with pin in camshaft. Install camshaft sprocket on camshaft. Install and tighten camshaft sprocket bolt to specification. See TORQUE SPECIFICATIONS.
Rotate camshafts by using hexagonal area on camshaft so timing marks on camshaft sprockets are aligned. See Fig. 2. Temporarily install crankshaft pulley bolt in crankshaft.
Using crankshaft pulley bolt, rotate crankshaft clockwise so key in crankshaft is positioned at 12 o'clock. Remove crankshaft pulley bolt. Install timing chain vibration damper. Tighten bolt to specification. See TORQUE SPECIFICATIONS table.
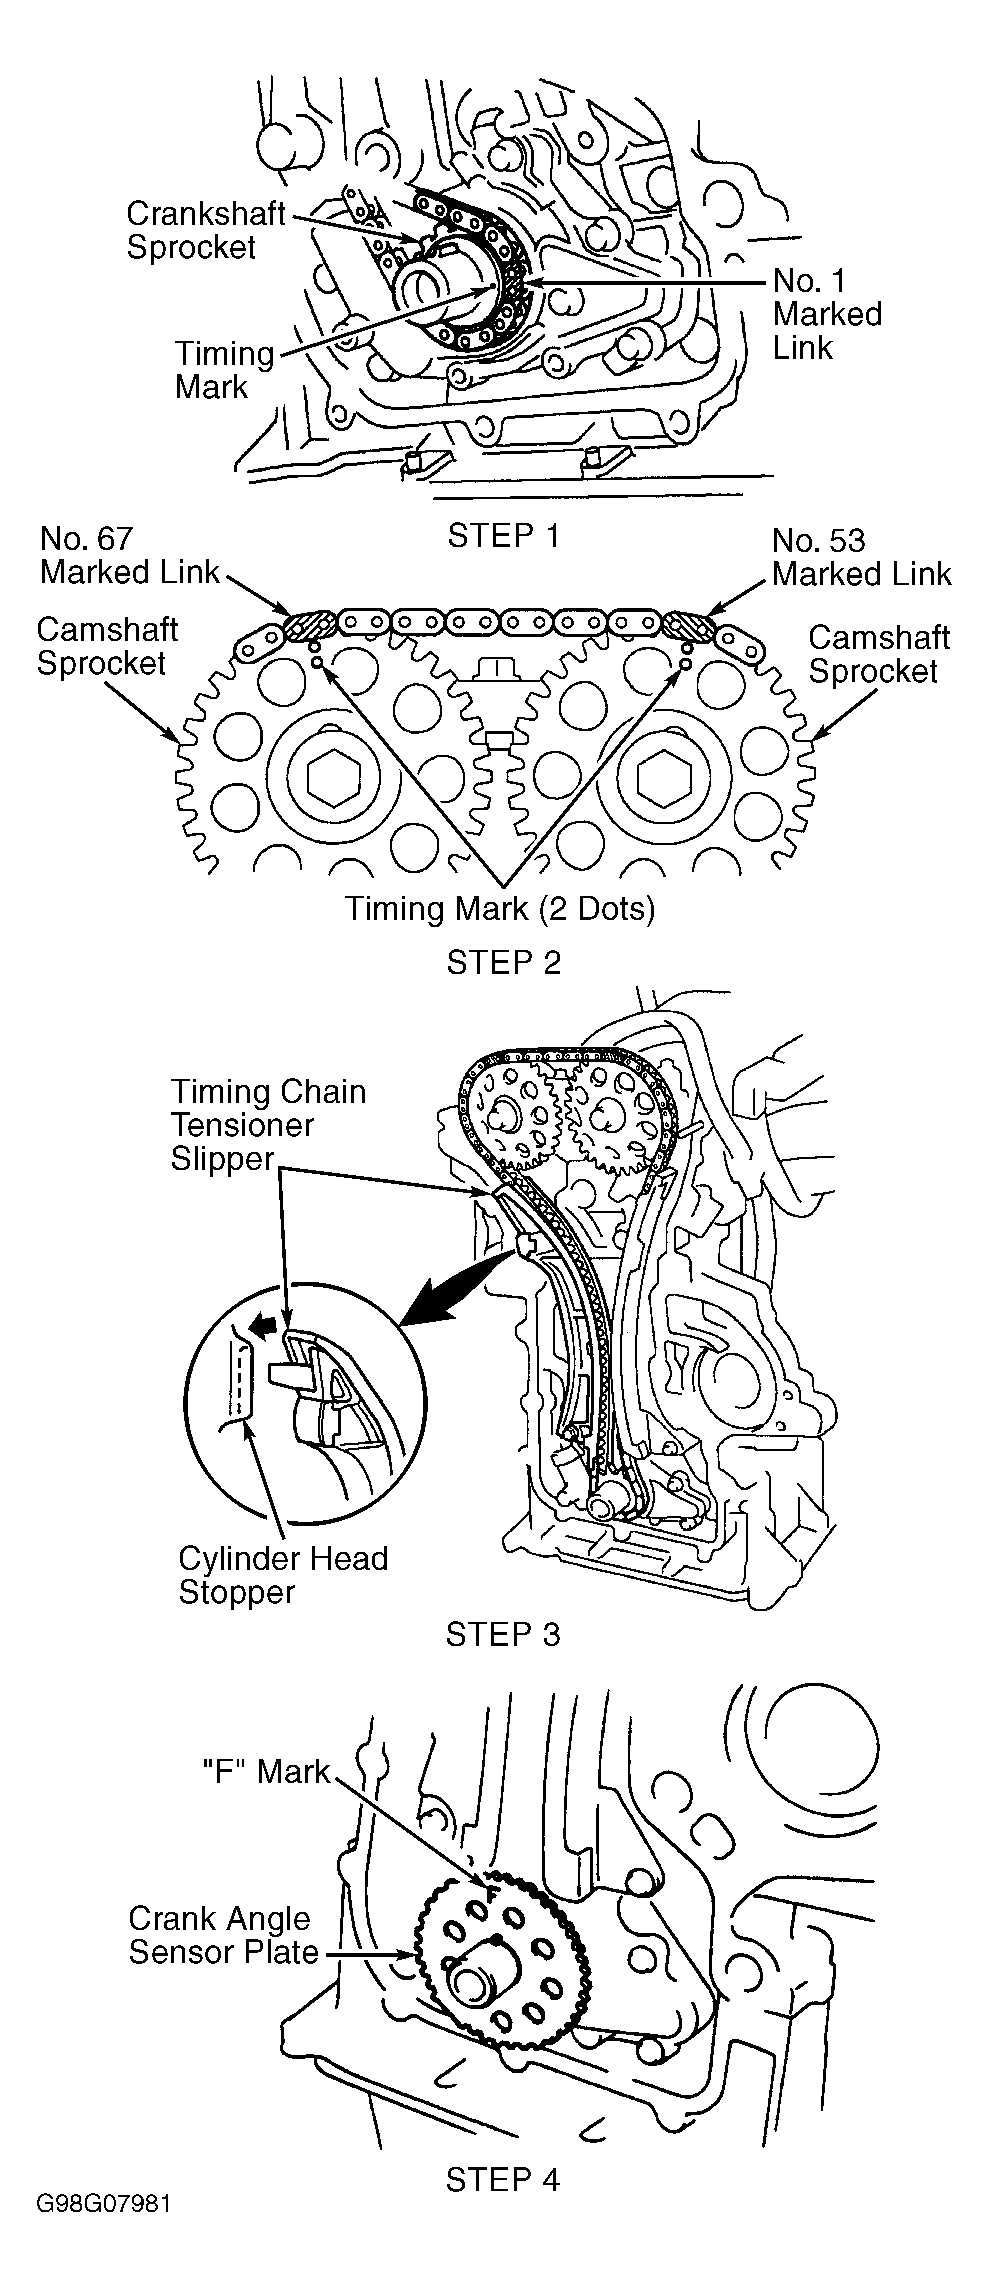
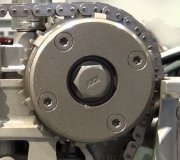
Install timing chain on crankshaft sprocket so No. 1 marked link on timing chain aligns with timing mark on crankshaft sprocket. Perform STEP 1 in illustration. See Fig. 26. Ensure timing mark on crankshaft sprocket is pointing toward front of engine. It may be necessary to use hammer and Seal/Sprocket Installer (SST 09223-22010) to tap crankshaft sprocket onto crankshaft.
Install timing chain on camshaft so No. 53 and 67 marked links align with timing marks with the 2 dots on camshaft sprockets. Perform STEP 2 in illustration. See Fig. 26. Ensure tension exists on timing chain between crankshaft sprocket and camshaft sprocket on intake camshaft.
Install timing chain tensioner slipper between intake camshaft sprocket and crankshaft sprocket so that slipper engages with cylinder head stopper. Perform STEP 3 in illustration. See Fig. 26. DO NOT rotate crankshaft when installing timing chain tensioner slipper. Install and tighten timing chain tensioner slipper bolt to specification See TORQUE SPECIFICATIONS.
Install crank angle sensor plate on crankshaft so that "F" mark is facing toward timing chain end of engine. Perform STEP 4 in illustration. See Fig. 26.
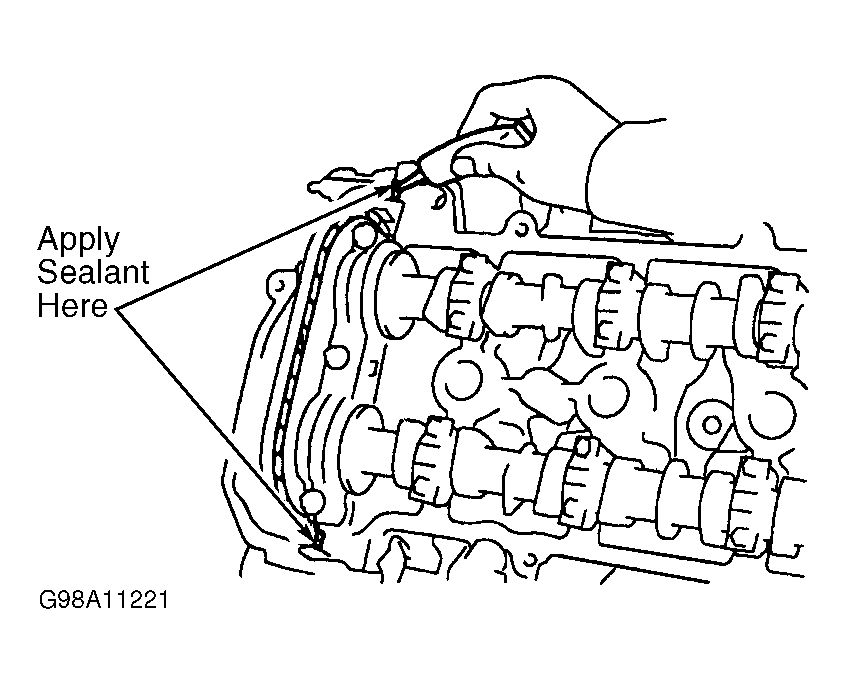
Ensure sealing surfaces on rear of timing chain cover and front of cylinder block and cylinder head are clean. Apply sealant on rear of timing chain cover and front of cylinder block and cylinder head at specified areas. See Fig. 27.
Fig. 26: Installing Timing Chain, Timing Chain Tensioner Slipper & Crank Angle Sensor Plate
Courtesy of TOYOTA MOTOR SALES, U.S.A, INC.
Fig. 27: Applying Sealant On Timing Chain Cover, Cylinder Block & Cylinder Head
Courtesy of TOYOTA MOTOR SALES, U.S.A, INC.
CAUTION:When installing timing chain cover, use care not to allow timing chain and timing chain tensioner slipper to contact sealant surfaces on timing chain cover. After installing timing chain cover and water pump, the accessory drive belt tensioner and right (timing chain side) engine mount bracket must be installed within 15 minutes.
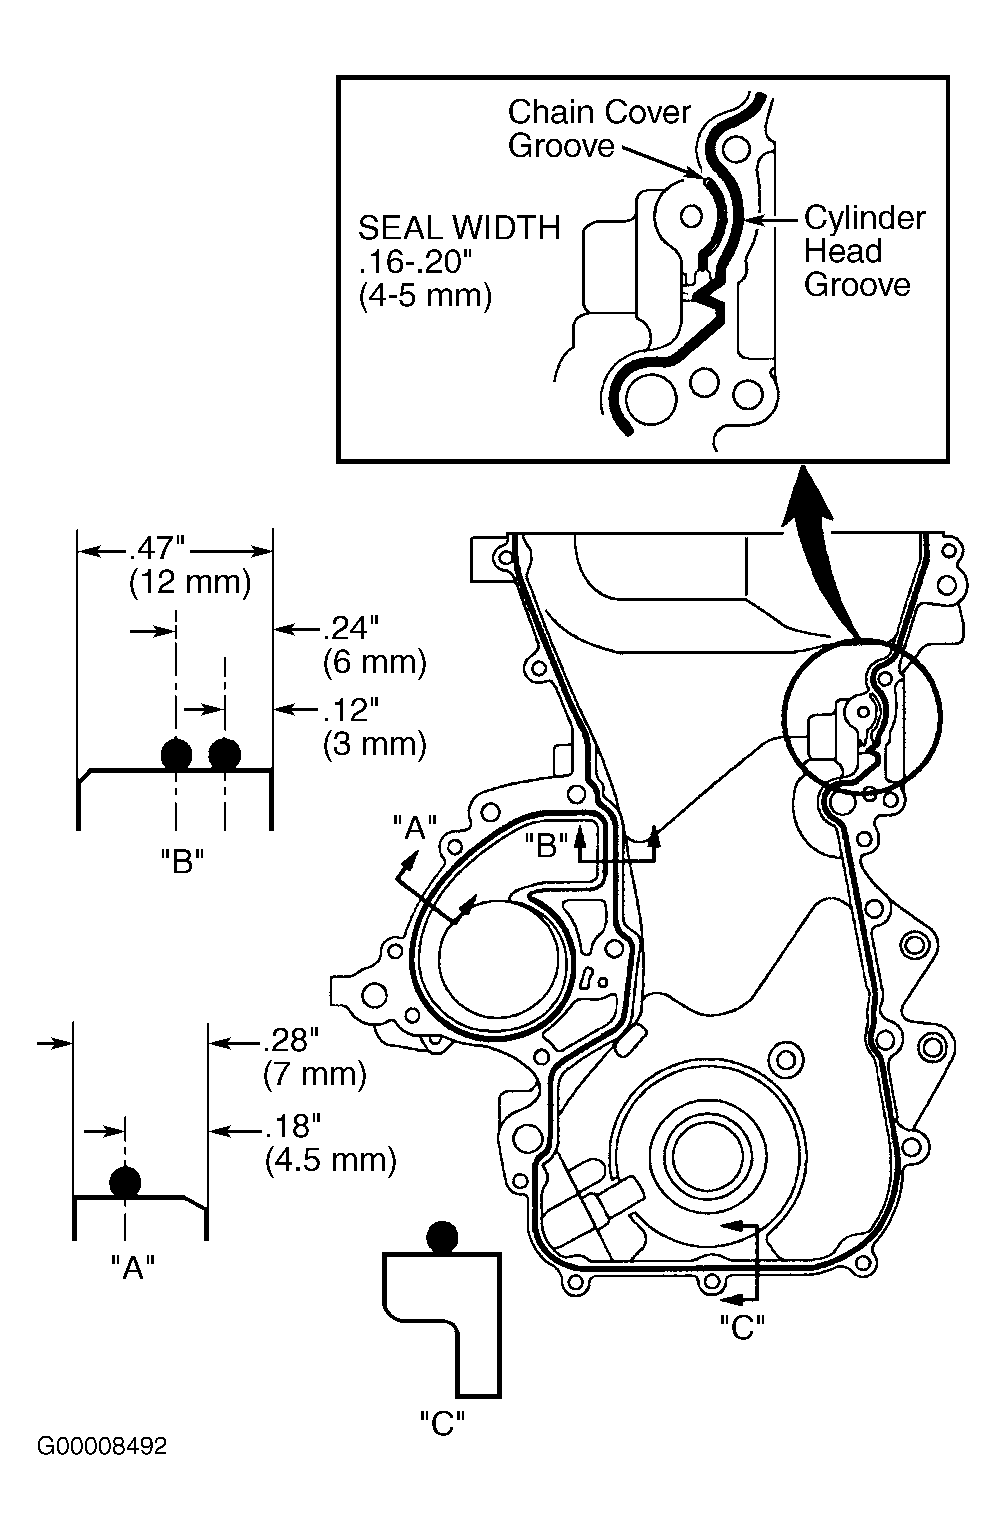
Install NEW "O" ring on water pump. Install timing chain cover, water pump and bolts/nuts. Ensure proper length bolts and stud bolt are installed in proper area when installing timing chain cover and water pump. See Fig. 28. Tighten bolts/nuts and stud bolt to specification. See TORQUE SPECIFICATIONS.
Fig. 28: Identifying Timing Chain Cover & Water Pump Bolt Location & Length
Courtesy of TOYOTA MOTOR SALES, U.S.A, INC.
Install right (timing chain side) engine mount bracket. Apply thread sealant to center of the threads on bolts for right (timing chain side) engine mount bracket. DO NOT apply sealant on the last 3 threads of these bolts. Install and tighten bolts to specification. See TORQUE SPECIFICATIONS.
Install accessory drive belt tensioner. Tighten bolts/nuts to specification. See TORQUE SPECIFICATIONS. Using wrench, rotate accessory drive belt tensioner 3 times the full length of its travel.
Install crankshaft position sensor. Tighten bolt to specification. See TORQUE SPECIFICATIONS. Align crankshaft pulley key groove with key in crankshaft. Install crankshaft pulley. Install and tighten crankshaft pulley bolt to specification while holding crankshaft pulley with pulley holder. See TORQUE SPECIFICATIONS.
Depress pawl on timing chain tensioner downward while pushing the plunger fully inward and then engage the hook with the pin on the plunger to hold the plunger in the retracted position. Perform STEP 1 in illustration. See Fig. 25.
Install timing chain tensioner by hand until "O" ring on timing cEnsure plunger on timing chain tensioner moves freely when pawl is pushed downward. Perform STEP 1 in illustration. See Fig. 25. Release pawl. Ensure plunger locks and will not move. Perform STEP 2 in illustration. See Fig. 25. Replace timing chain tensioner if defective. Check that oil jet on front of oil pump body is not restricted. See Fig. 43.
Fig. 24: Measuring Timing Chain & Sprockets
Courtesy of TOYOTA MOTOR SALES, U.S.A, INC.
Fig. 25: Checking & Positioning Timing Chain Tensioner
Courtesy of TOYOTA MOTOR SALES, U.S.A, INC.
Installation
Use hammer and Seal Installer (SST 09309-37010) to install crankshaft front seal in timing chain cover (if removed). Install seal until seal surface is even with timing chain cover. Apply grease to lip of oil seal.
If installing camshaft sprocket, align groove in camshaft sprocket with pin in camshaft. Install camshaft sprocket on camshaft. Install and tighten camshaft sprocket bolt to specification. See TORQUE SPECIFICATIONS.
Rotate camshafts by using hexagonal area on camshaft so timing marks on camshaft sprockets are aligned. See Fig. 2. Temporarily install crankshaft pulley bolt in crankshaft.
Using crankshaft pulley bolt, rotate crankshaft clockwise so key in crankshaft is positioned at 12 o'clock. Remove crankshaft pulley bolt. Install timing chain vibration damper. Tighten bolt to specification. See TORQUE SPECIFICATIONS table.
Install timing chain on crankshaft sprocket so No. 1 marked link on timing chain aligns with timing mark on crankshaft sprocket. Perform STEP 1 in illustration. See Fig. 26. Ensure timing mark on crankshaft sprocket is pointing toward front of engine. It may be necessary to use hammer and Seal/Sprocket Installer (SST 09223-22010) to tap crankshaft sprocket onto crankshaft.
Install timing chain on camshaft so No. 53 and 67 marked links align with timing marks with the 2 dots on camshaft sprockets. Perform STEP 2 in illustration. See Fig. 26. Ensure tension exists on timing chain between crankshaft sprocket and camshaft sprocket on intake camshaft.
Install timing chain tensioner slipper between intake camshaft sprocket and crankshaft sprocket so that slipper engages with cylinder head stopper. Perform STEP 3 in illustration. See Fig. 26. DO NOT rotate crankshaft when installing timing chain tensioner slipper. Install and tighten timing chain tensioner slipper bolt to specification See TORQUE SPECIFICATIONS.
Install crank angle sensor plate on crankshaft so that "F" mark is facing toward timing chain end of engine. Perform STEP 4 in illustration. See Fig. 26.
Ensure sealing surfaces on rear of timing chain cover and front of cylinder block and cylinder head are clean. Apply sealant on rear of timing chain cover and front of cylinder block and cylinder head at specified areas. See Fig. 27.
Fig. 26: Installing Timing Chain, Timing Chain Tensioner Slipper & Crank Angle Sensor Plate
Courtesy of TOYOTA MOTOR SALES, U.S.A, INC.
Fig. 27: Applying Sealant On Timing Chain Cover, Cylinder Block & Cylinder Head
Courtesy of TOYOTA MOTOR SALES, U.S.A, INC.
CAUTION:When installing timing chain cover, use care not to allow timing chain and timing chain tensioner slipper to contact sealant surfaces on timing chain cover. After installing timing chain cover and water pump, the accessory drive belt tensioner and right (timing chain side) engine mount bracket must be installed within 15 minutes.
Install NEW "O" ring on water pump. Install timing chain cover, water pump and bolts/nuts. Ensure proper length bolts and stud bolt are installed in proper area when installing timing chain cover and water pump. See Fig. 28. Tighten bolts/nuts and stud bolt to specification. See TORQUE SPECIFICATIONS.
Fig. 28: Identifying Timing Chain Cover & Water Pump Bolt Location & Length
Courtesy of TOYOTA MOTOR SALES, U.S.A, INC.
Install right (timing chain side) engine mount bracket. Apply thread sealant to center of the threads on bolts for right (timing chain side) engine mount bracket. DO NOT apply sealant on the last 3 threads of these bolts. Install and tighten bolts to specification. See TORQUE SPECIFICATIONS.
Install accessory drive belt tensioner. Tighten bolts/nuts to specification. See TORQUE SPECIFICATIONS. Using wrench, rotate accessory drive belt tensioner 3 times the full length of its travel.
Install crankshaft position sensor. Tighten bolt to specification. See TORQUE SPECIFICATIONS. Align crankshaft pulley key groove with key in crankshaft. Install crankshaft pulley. Install and tighten crankshaft pulley bolt to specification while holding crankshaft pulley with pulley holder. See TORQUE SPECIFICATIONS.
Depress pawl on timing chain tensioner downward while pushing the plunger fully inward and then engage the hook with the pin on the plunger to hold the plunger in the retracted position. Perform STEP 1 in illustration. See Fig. 25.
Install timing chain tensioner by hand until "O" ring on timing chain cover and cylinder No. 1 is at TDC on compression stroke. Cylinder No. 1 is the front cylinder at timing chain end of engine.
Ensure timing marks on camshaft sprockets are aligned and positioned in a straight line at top surface on timing chain cover. See Fig. 2. If timing marks are not as specified, rotate crankshaft clockwise one full revolution (360 degrees) and realign crankshaft pulley timing mark (groove) with "0" mark on timing chain cover and then recheck timing mark alignment. If timing marks are still not aligned, timing chain is incorrectly installed.
Before installing valve cover and gasket, apply sealant at specified areas on cylinder head. See Fig. 8. Install gasket, valve cover, seal washers, bolts and nuts. Tighten valve cover bolts/nuts to specification in sequence. See Fig. 9. See TORQUE SPECIFICATIONS. To install remaining components, reverse removal procedure. Tighten bolts/nuts to specification. See TORQUE SPECIFICATIONS. Fill cooling system.
Images (Click to make bigger)
Wednesday, December 8th, 2010 AT 2:12 AM