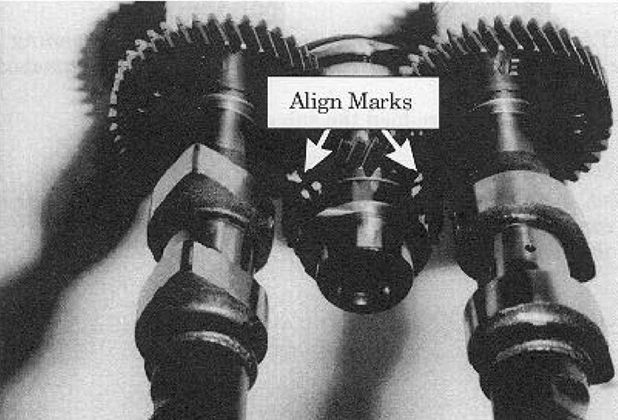
Check this technical bulletin first.
3.5L V6 DOHC (6VE1)/3.2L V6 DOHC (6VD1) ENGINES TIMING BELT INSTALLATION
TECHNICAL SERVICE BULLETIN
Reference Number(s): IB00-S005, Date of Issue: FEBRUARY, 2000
ISUZU: See Affected Vehicles
AFFECTED VEHICLES:See Affected Vehicles
Related Ref Number(s): IB00-S005
ARTICLE BEGINNING
AFFECTED VEHICLES
The following models equipped with "Direct Attack" DOHC 3.2L/3.5L V6 engine:
� 1998-2000 Rodeo (UE)/Amigo (UA)
� 1998-2000 Trooper (UX)
� 1999-2000 VehiCROSS (VX)
SERVICE INFORMATION
This information bulletin outlines the proper steps to index the camshafts with the crankshaft. In
the event that camshaft timing has been disrupted, due to timing belt breakage or
camshafts/crankshaft being rotated without a timing belt, this is important prior to timing belt
installation. Due to the gear-ratio used by each camshaft pulley to drive the camshafts, engine
timing cannot be indexed conventionally.
Refer to this information as an addendum to the appropriate Workshop Manual.
SERVICE PROCEDURE
IMPORTANT: In the following procedures, the references to 9 or 12 o'clock
positions are based on deck plane of the cylinder deck-to-cylinder
head mating surface (as viewed from the front of the engine), and
NOT relative to the shop floor.
In the event that camshaft timing has been disrupted, due to timing belt breakage or
camshafts/crankshaft being rotated without a timing belt, please proceed to Step 2.
Otherwise, continue with Step 22 for timing belt servicing procedures (after removal of front
timing belt covers as outlined in the appropriate Workshop Manual).
1.
After cylinder head servicing as outlined in the appropriate Workshop Manual, proceed to
the following steps.
2.
3. Lubricate and install the idler gear.
4. Inspect the idler gear retaining cover for wear.
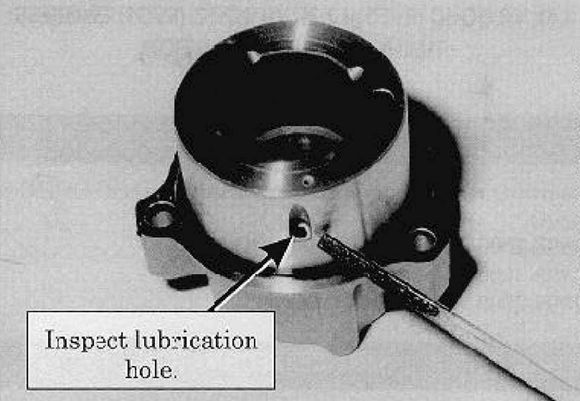
NOTE: There is a 0.039 lubrication hole drilled into the idler gear
retaining cover. Always inspect this hole for obstruction.
Fig. 1: Identifying Idler Gear Retaining Cover Lubrication Hole
3.5L V6 DOHC (6VE1)/3.2L V6 DOHC (6VD1) ENGINES TIMING BELT INSTALLA. Page 1 of 5
1/30/2011
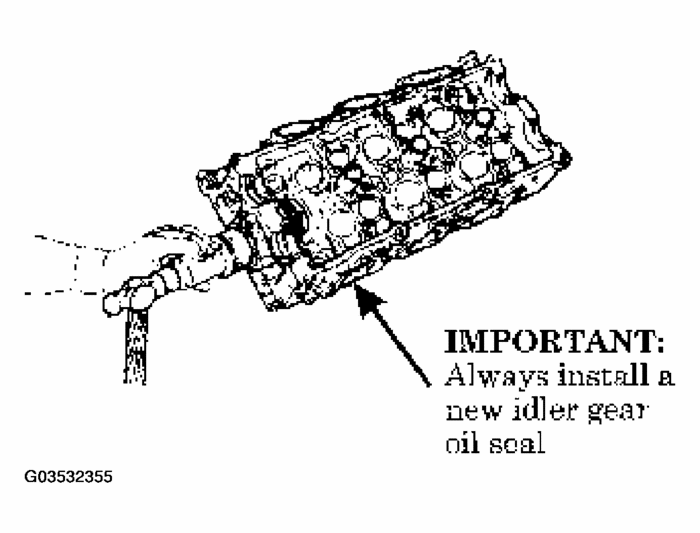
Fig. 2: Installing Idler Gear Oil Seal Using Special Tool J-42985
IMPORTANT: Do not use a liquid gasket material on the idler retaining cover.
Always replace the retaining cover with a new O-ring. Be sure
to lubricate the O-ring prior to installation.
Install the idler cover and torque (10 N.M, 8 lb ft) 5. The 6 mm bolts (Refer to Fig. 1 ).
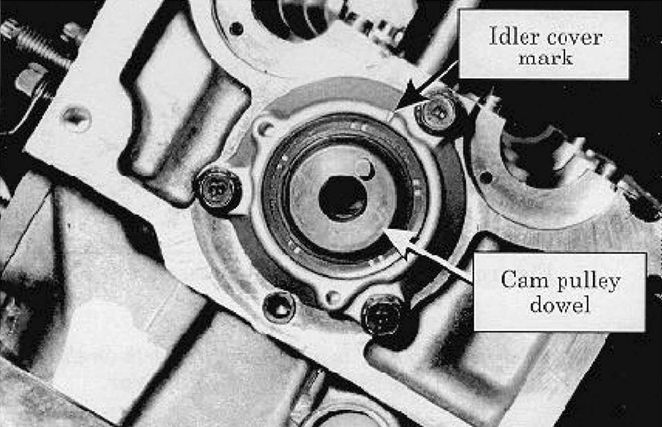
6. Align the right bank idler shaft alignment marks.
Fig. 3: Aligning Right Bank Idler Shaft
IMPORTANT: Align the idler gear dowel pin to its corresponding mark on the
idler gear retaining cover before installing the camshafts.
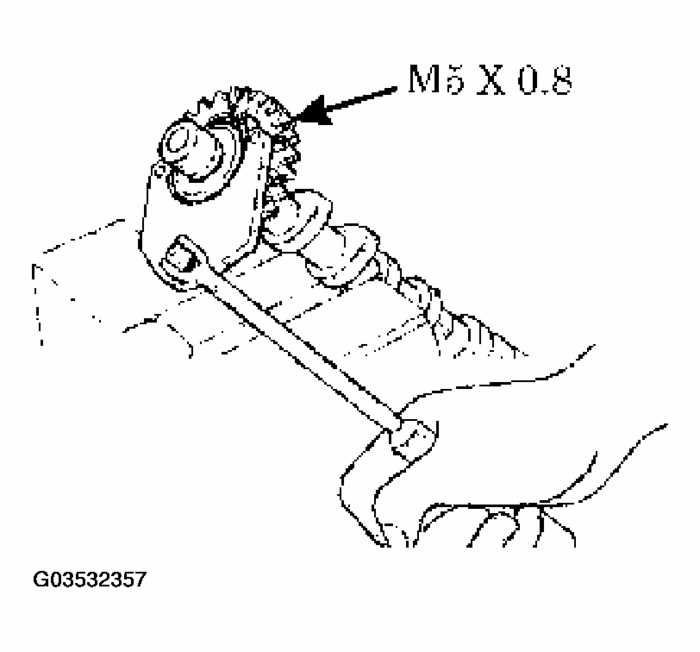
7. Use special J-tool to pre-load the sub gear assembly.
NOTE: Use special J-tool J-42686. Once the sub-gear has been preloaded,
install the 5 mm bolt supplied with the tool and insert it
into the camshaft from the back of the camshaft gear assembly.
Tighten the bolt to lock the sub-gear in place.
Fig. 4: Pre-Loading Sub Gear Assembly
IMPORTANT: When the sub/gear is pre-loaded, the teeth on the sub gear
should be aligned with the teeth on the camshaft gear.
8. Install the odd bank camshaft(s) into the cylinder head.
NOTE: Before installing the camshafts, pre-lube the cam lobes using a
suitable molybdenum assembly grease.
Fig. 5: Aligning Timing Marks
Fig. 6: Aligning Timing Marks
IMPORTANT: The single dot on the camshaft gears must be aligned with
their corresponding marks on the idler gear. Also, do not
remove the 5mm bolt holding the sub-gear, until the camshaft
journal caps are installed and the bolts are torqued.
9. Install the camshaft journal retaining caps and torque (10 N.M, 8 lb ft).
IMPORTANT: The camshaft journal caps are numbered to prevent mismatching.
However, pay close attention When installing the
caps on the odd bank cylinders, because the cap arrows will
face the front of the cylinder head.
Place a small amount of RTV sealer on the head surface where the cap contacts the head
surface.
10.
3.5L V6 DOHC (6VE1)/3.2L V6 DOHC (6VD1) ENGINES TIMING BELT INSTALLA. Page 2 of 5
1/30/2011
Fig. 7: Placing Small Amount Of RTV
Repeat 11. Steps 3-5 for even bank cylinders.
12. Align the left bank idler shaft marks (Refer to Fig. 3 ).
13. Pre-load the sub-gear assemblies (Refer to Fig. 4 ).
Install the even bank camshafts and pre-lube the cam lobes using a suitable molybdenum
assembly grease (Refer to Fig. 5 ).
14.
15. Install the camshaft journal retaining caps and torque (10 N.M, 8 lb ft).
IMPORTANT: The camshaft journal caps are numbered to prevent mismatching.
However, pay close attention when installing the
caps on the even bank cylinders, because the cap arrows will
face the rear of the cylinder head.
Place a small amount of RTV sealer on the head surface where the cap contacts the head
surface (Refer to Fig. 7 ).
16.
17. Install the cylinder heads.
IMPORTANT: When replacing the cylinder head gaskets, be sure to use the
correct gasket for each bank.
Torque (64 N.M, 47 lb ft) the cylinder head bolts with oil applied to the threads using the
following procedure.
18.
Fig. 8: Identifying Cylinder Head Bolts Torque Sequence
19. Install odd bank cam pulley and even bank cam pulley (Torque: 98 N.M, 72 lb ft).
NOTE: Skip this step if the pulley has not been removed.
20. Install both head covers and tighten bolts (Torque: 9 N.M, 7 lb ft).
NOTE: Use only a couple of bolts to register the cover.
Rotate the crankshaft until the mark on the crankshaft sprocket aligns with the mark on the
oil pump cover. This will position the #2 piston at TDC. (Fig. 9 )
21.
Fig. 9: Aligning Crankshaft Sprocket To Mark On Oil Pump Cover
Time the camshafts on the odd numbered bank cylinders (passenger side), by rotating the
odd bank camshaft sprocket until it springs to the 12 o'clock position. (Fig. 10 )
22.
NOTE: It may require up to 9 revolutions.
Fig. 10: Aligning Head Cover Mark With Cam Sprocket Mark
IMPORTANT: Due to the loss of the reference timing, you will have to rotate
this camshaft sprocket until the timing mark on the camshaft
sprocket "springs" into the 12 o'clock position. This may
3.5L V6 DOHC (6VE1)/3.2L V6 DOHC (6VD1) ENGINES TIMING BELT INSTALLA. Page 3 of 5
1/30/2011
require up to 9 revolutions. If the camshaft does not spring to
the 12 o'clock position, camshaft timing will be incorrect.
Time the camshafts on the even numbered bank cylinders (driver side), using the two step
process.
23.
Rotate the even bank camshaft sprocket clock-wise until the cam sprocket "springs" to
the 9 o'clock position. (Fig. 11 )
a.
Fig. 11: Rotating Cam Sprocket To 9 o'clock Sprung Position
Rotate the even bank camshaft sprocket an additional 90 degrees (clockwise) to the 12
o'clock position and align the camshaft sprocket mark with the mark embossed on the
cylinder head cover. (Fig. 12 )
b.
Fig. 12: Positioning Cam Sprocket To 12 o'clock
IMPORTANT: Step b is necessary to achieve the correct camshaft
timing for the odd bank of cylinders. Failure to perform
this last step will result in incorrect valve timing.
NOTE: Install the timing belt following the procedures outlined in
following steps. Make sure that timing marks are not
disturbed during this operation. After installing the timing
belt, make sure that all the timing marks are in their
proper position. It is very easy to mis-install the belt and
be off a tooth, which could cause driveability problems.
With the timing marks in their proper position, position the timing belt with marks, noting
the direction of rotation.
24.
NOTE: On the timing belt, there are series of green arrows indicating
the direction of rotation. There are also two solid white lines
and one dotted white line. Install the belt with the solid lines
perpendicular to the marks on the camshaft sprocket. (Fig. 13
and 14)
Fig. 13: Aligning Timing Marks With Belt On Odd Bank Side (Left)
Fig. 14: Aligning Timing Marks With Belt On Even Bank Side (Right)
Secure the belt to the camshaft sprockets using binder clamps. This will keep the belt in the
proper tooth of the sprocket and will assist in holding the belt in place. (Fig. 15 & 16)
25.
Fig. 15: Securing Odd Bank Cam Sprocket With Binder Clamp In Place (Left)
Fig. 16: Securing Even Bank Cam Sprocket With Binder Clamp In Place (Right)
Align the dotted-white line of the timing belt with the white timing mark of the crank
sprocket (180° from TDC timing notch). Slip the belt into place and install the belt tensioner
(remove retaining pin afterwards). (Fig. 17 )
26.
3.5L V6 DOHC (6VE1)/3.2L V6 DOHC (6VD1) ENGINES TIMING BELT INSTALLA. Page 4 of 5
1/30/2011
Fig. 17: Aligning Dotted-White Line Of Timing Belt With White Timing Mark Of
Crank Sprocket
After installing timing belt make sure that all the timing marks are still in their proper
position and have not been disturbed during the tensioning of the belt. (Fig. 18 )
27.
Fig. 18: Confirming Position Of Timing Marks
IMPORTANT: If you have resistance while rotating the engine by hand, do
not continue. The valves may be contacting the pistons due to
incorrect valve timing. Recheck the camshafts and crankshafts
sprockets to be sure they are correctly aligned with their
marks. Serious engine damage could occur if the belt is
improperly installed.
28. Remove the binding clips.
Rotate crankshaft pulley a minimum of 2 complete turns (clockwise) and inspect if the
timing marks have returned to the same position (#2 Piston on TDC). If it has returned to the
same position then continue to Step 31. If there is resistance, please refer to the
IMPORTANT note stated above.
29.
Proceed to the remaining reassembly procedure as outlined in the appropriate Workshop
Manual.
Images (Click to make bigger)
Sunday, January 30th, 2011 AT 9:49 AM
