TIMING BELT REPLACEMENT - 1.5L - 3E -1994 Toyota Tercel
Page 1 of 2
REMOVAL & INSTALLATION
CAUTION: This application is an interference engine. Do not rotate camshaft or
crankshaft when timing belt is removed, or engine damage may occur.
TIMING BELT
Removal
CAUTION: On models equipped with air bag, DO NOT start work until after 90 seconds from time ignition switch is turned to LOCK position and
negative battery cable is disconnected.
1.
Disconnect negative battery cable. Raise and support vehicle. Remove right side engine under cover (splash) shield. Lower vehicle. Remove accessory drive belts.
Disconnect accelerator cable. On A/T models, disconnect throttle cable. On all models, disconnect PCV hoses. On 1987-91 models, remove air cleaner assembly.
On all models, remove bolt, ground strap and vacuum transmitting valves with bracket on right engine mount. This is mount on timing belt end of engine.
Using floor jack, support weight of engine from below. Remove right engine mount from timing belt end of engine. Remove valve cover. Remove spark plugs.
Set No. 1 cylinder at TDC on compression stroke. Turn crankshaft pulley, and align groove on crankshaft with "0" mark on timing belt cover. Ensure rocker arms on No. 1 cylinder are loose. If
not, turn crankshaft pulley one complete revolution.
On 1991-94 models with A/C and/or power steering, remove accessory drive pulley from crankshaft pulley. See Fig. 1.
Using Holder (09213-14010) or equivalent, hold crankshaft pulley. Loosen crankshaft pulley center bolt. Remove holder. Remove crankshaft pulley bolt. Use gear puller, remove crankshaft
pulley.
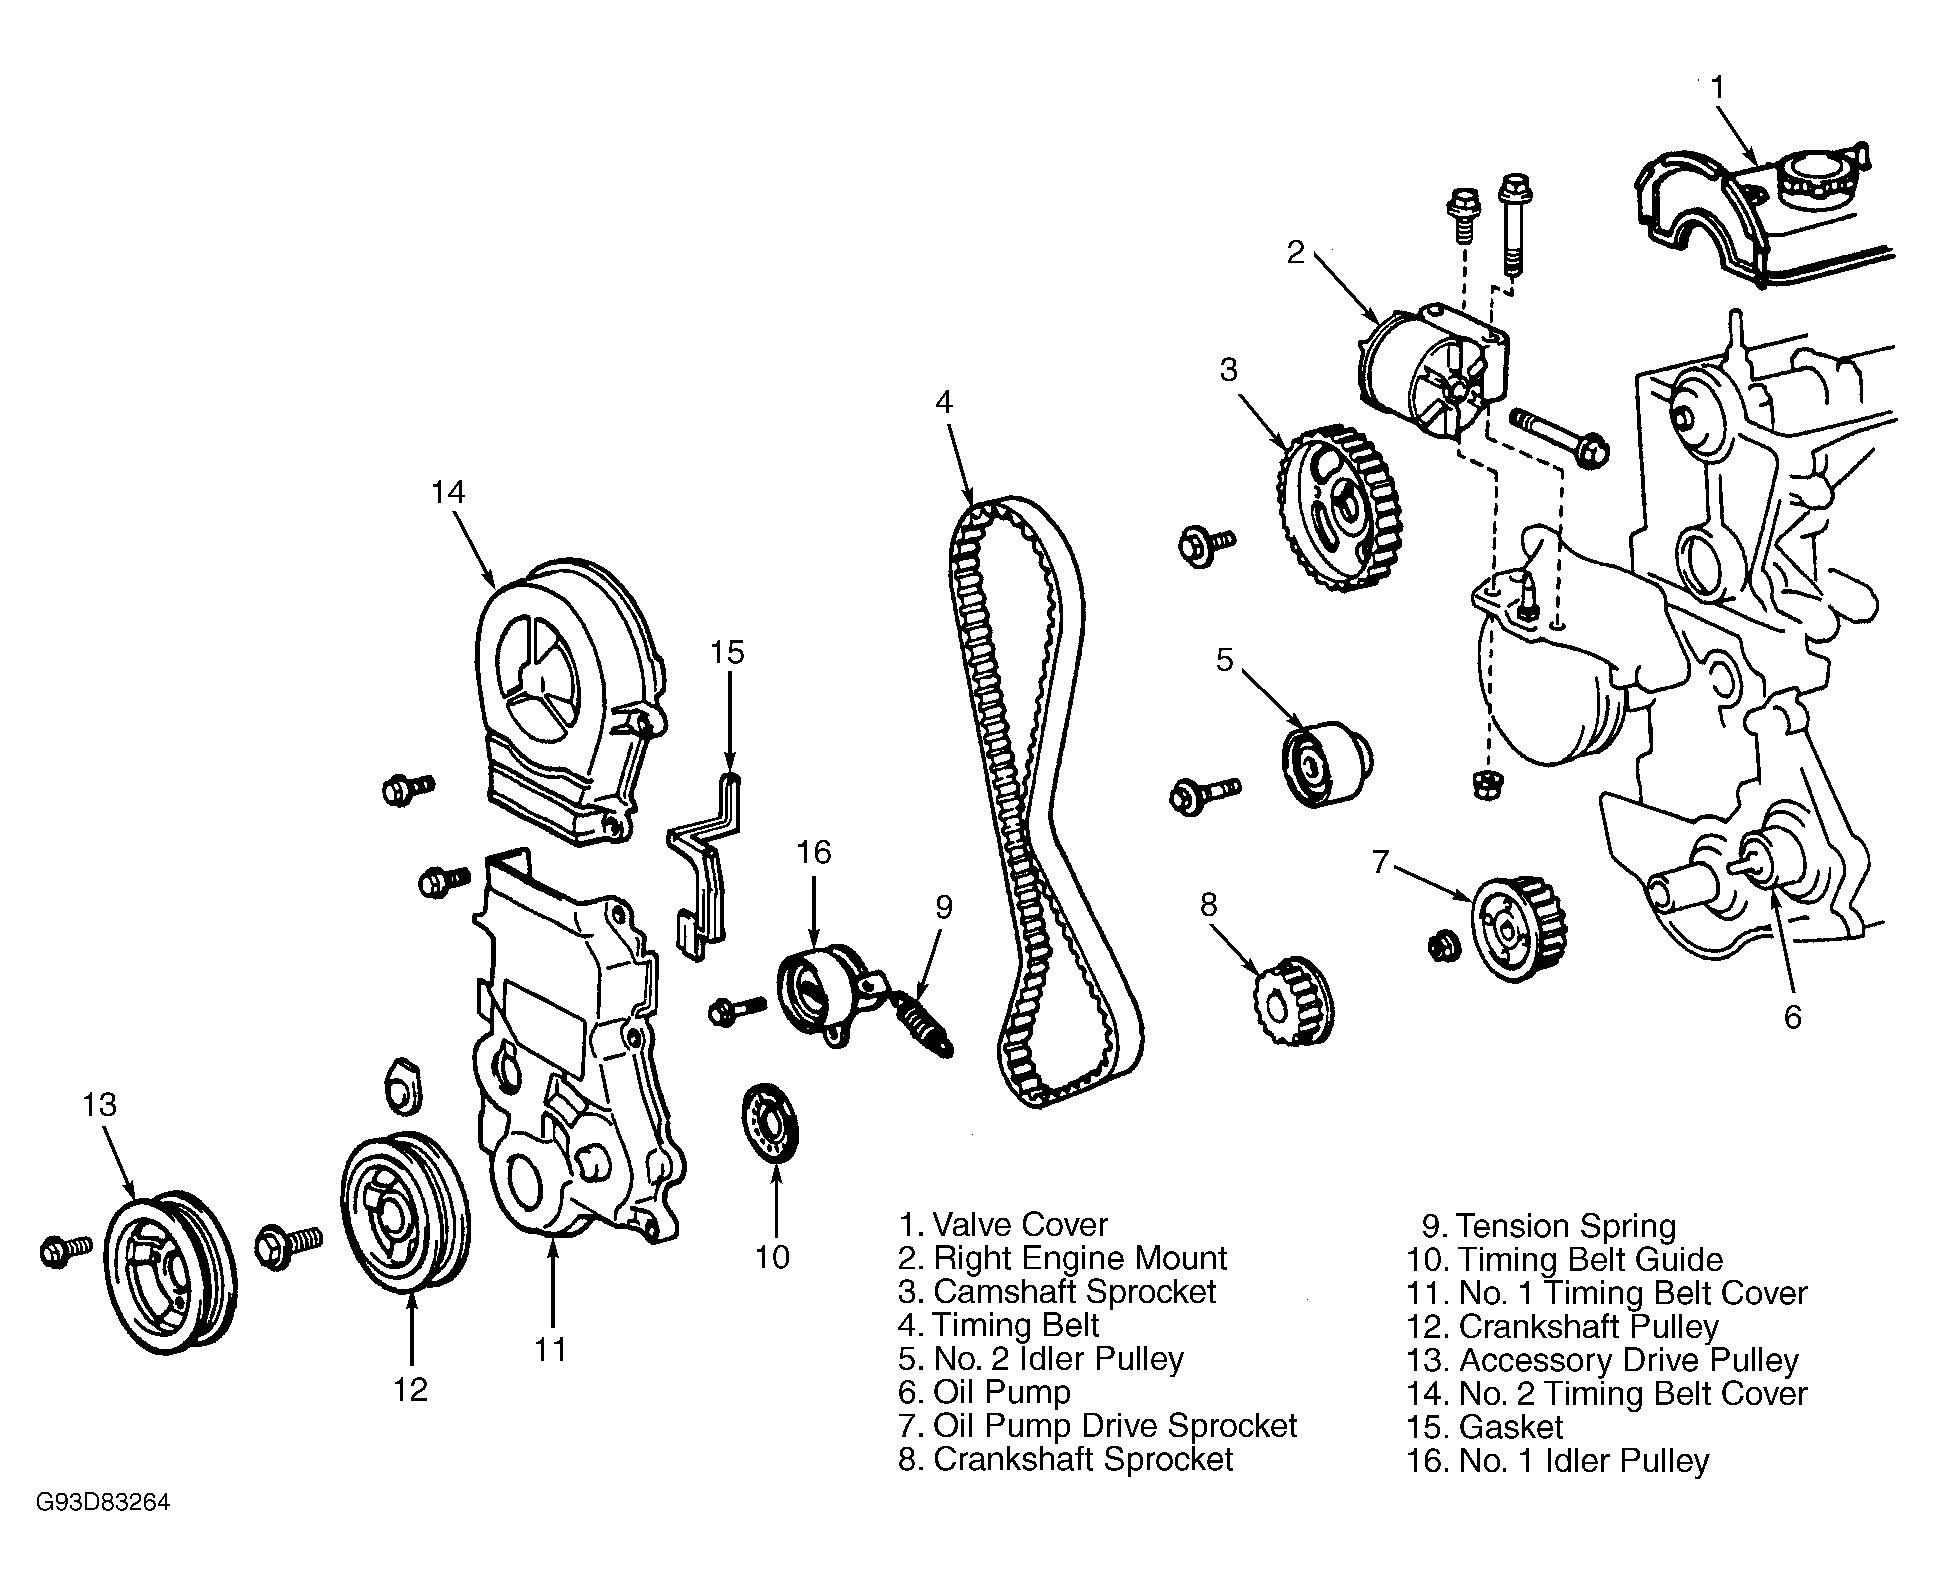
Remove timing belt cover. Noting installed position for reassembly reference, remove timing belt guide. See Fig. 1.
If reusing old timing belt, place arrow on belt to indicate direction of rotation. Place mating marks on belt and crankshaft sprocket, and on camshaft sprocket.
Remove timing belt tension spring. See Fig. 1
left as far as it will go. See Fig. 1. Tighten bolt. Remove timing belt.
2.
3.
4.
5.
6.
7.
8.
9.
. Loosen No. 1 idler pulley bolt and push pulley to
10.
Fig. 1: Exploded View Of Timing Belt & Components (1991-94 Shown; 1987-90 Use One-Piece Crankshaft Pulley)
Courtesy of TOYOTA MOTOR SALES, U.S.A, INC.
Inspection
1.
Inspect timing belt for damaged teeth, cracking and oil contamination. Ensure No. 1 and No. 2 idler pulleys rotate freely. Inspect all sprockets for damage. Replace damaged components.
1/3/2012
TIMING BELT REPLACEMENT - 1.5L - 3E -1994 Toyota Tercel
Page 2 of 2
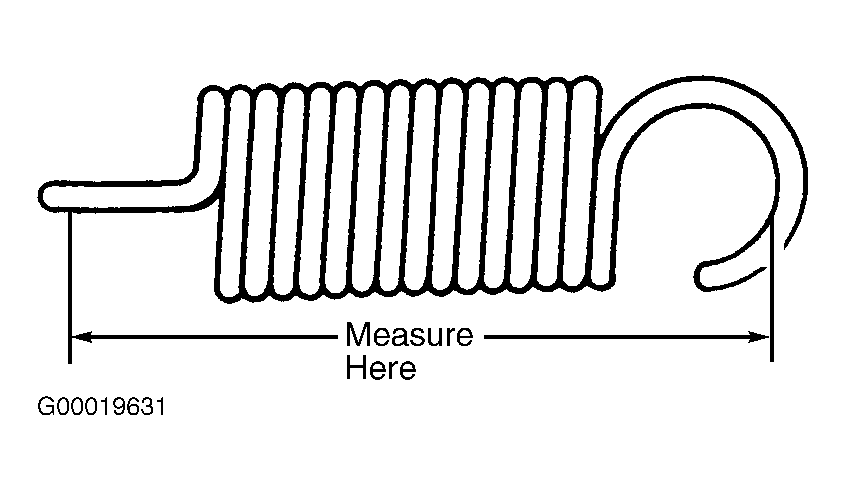
Measure free length of tension spring. See Fig.
1.528" (38.8 mm) on 1987-89 engines. On 1990-94 engines, free length should be 1.512" (38.4 mm). Replace tension spring if free length is not as specified.
Measure tension spring at specified installed length. For 1987-89 engines, spring tension should
be 18.3 lbs. At 2.157" (8.3 kg at 54.8 mm). For 1990-94 engines, spring tension should be 11.3 lbs. At 2.028" (5.11 kg at 51.5 mm). Replace spring if tension is not as specified.
2
2.
. Tension spring free length should be
3.
Fig. 2: Measuring Tensioner Spring Free Length Courtesy of TOYOTA MOTOR SALES, U.S.A, INC.
Installation
NOTE:
Before installing timing belt, remove any oil or water from camshaft
sprocket, crankshaft sprocket and idler pulleys.
1.
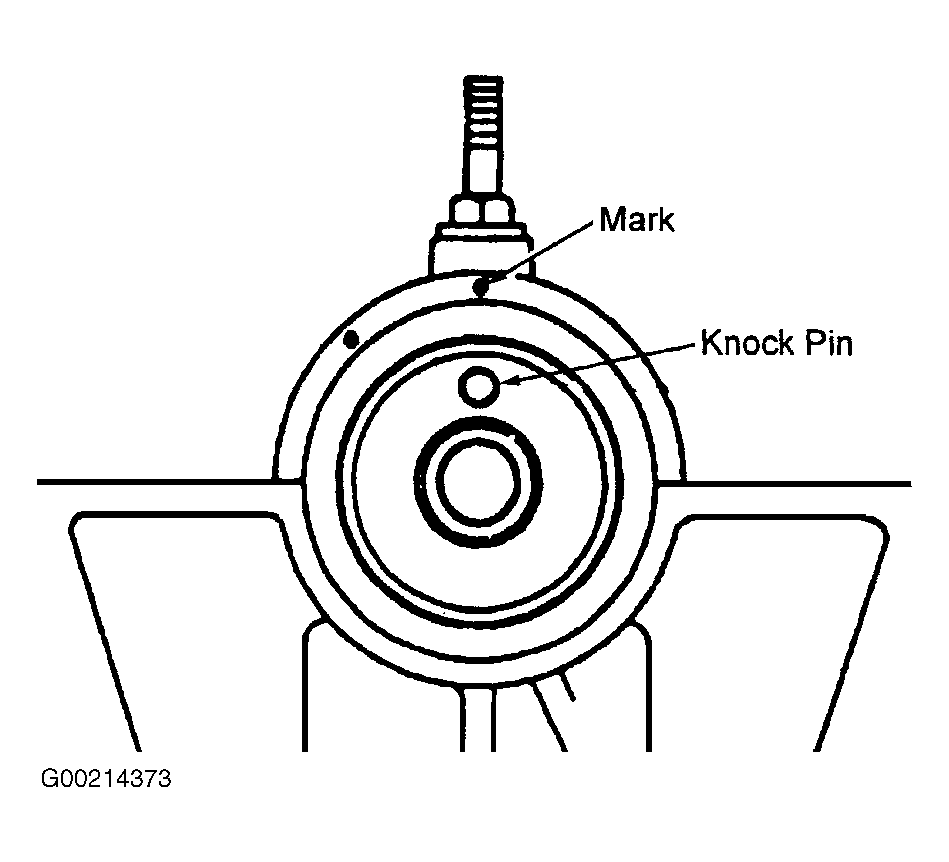
If camshaft sprocket was removed, align knock pin with No. 1 camshaft bearing cap mark. See Fig. 3. Install camshaft sprocket with "3E" mark facing up. See Fig. 4. Tighten camshaft
sprocket bolt to specification. See TORQUE SPECIFICATIONS.
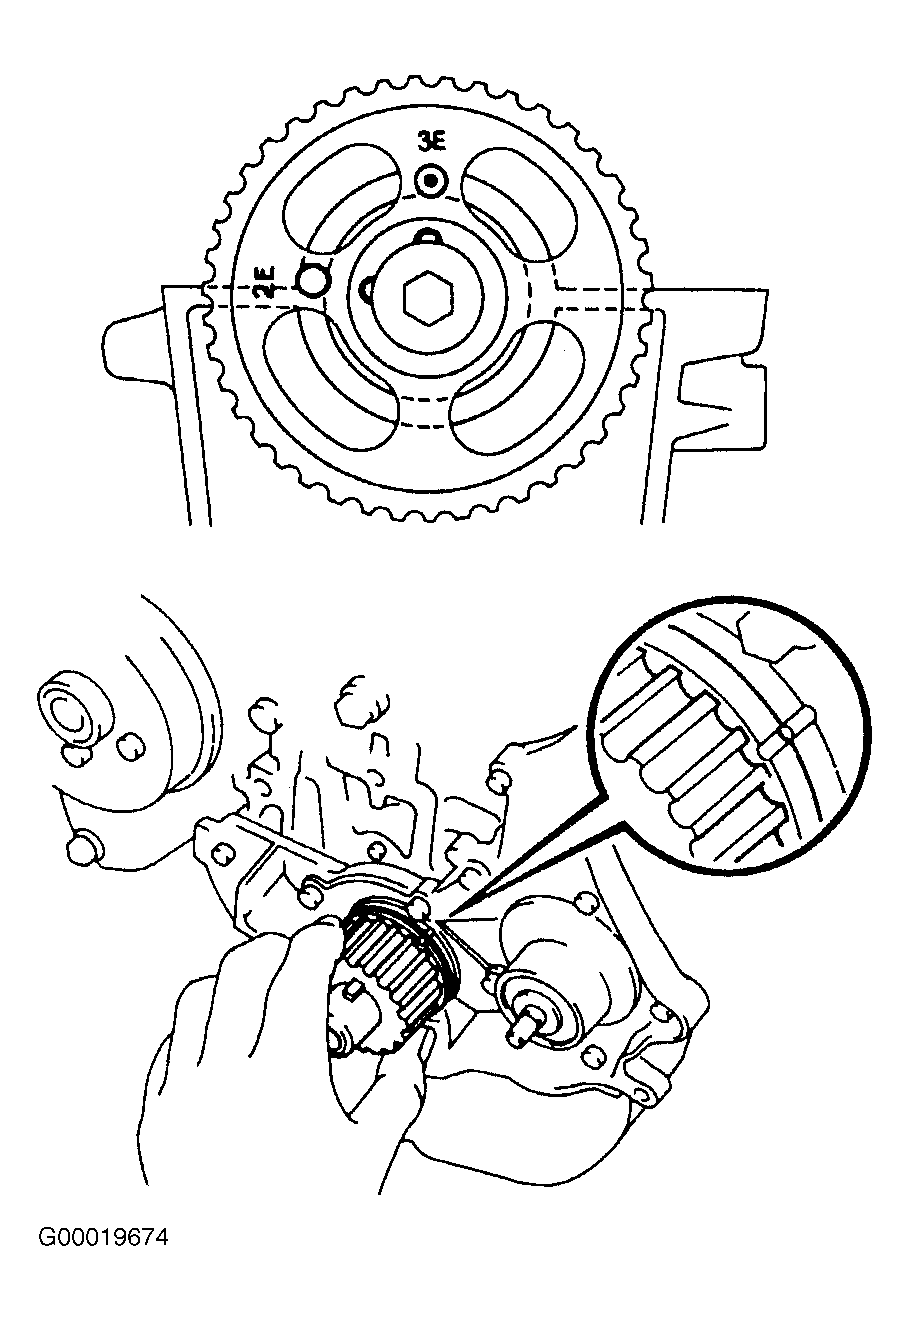
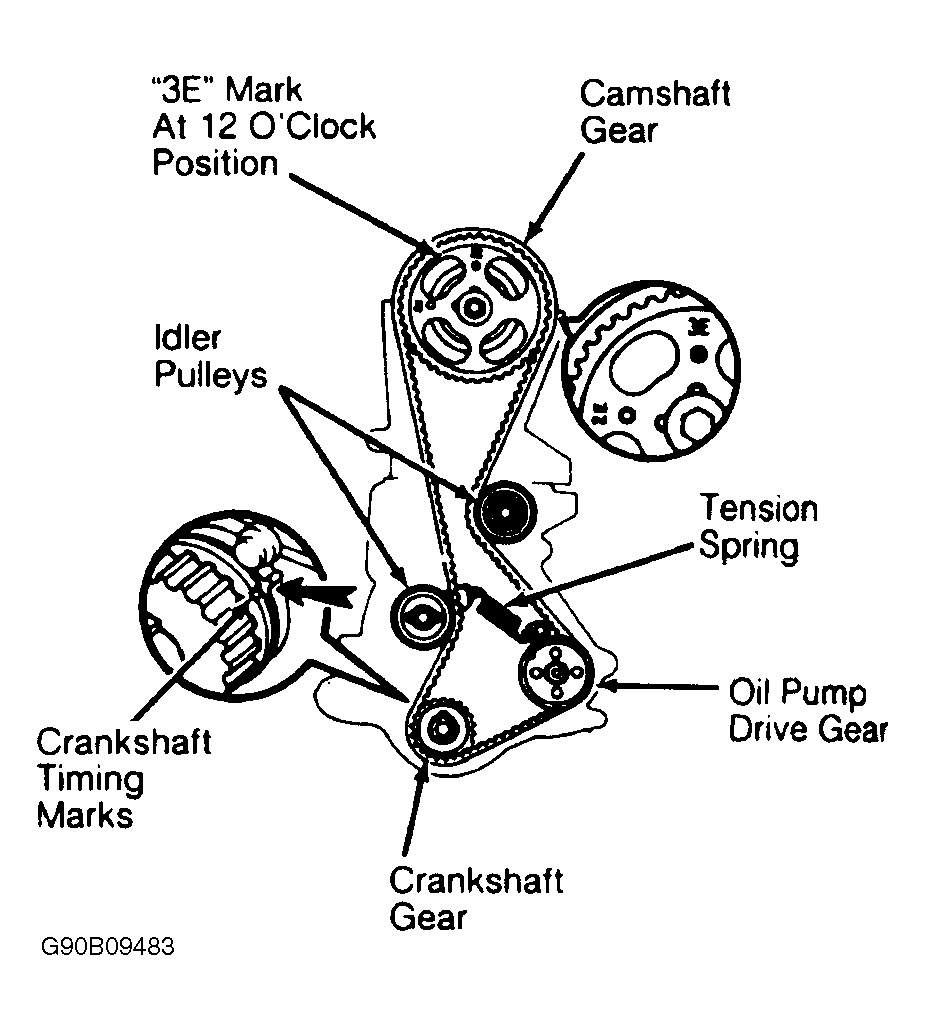
2. Align crankshaft sprocket timing mark with mark on oil pump housing. See Fig. 4. If removed, install No. 1 idler pulley. Move No. 1 idler pulley as far left as it will go, and temporarily tighten
bolt.
Install No. 2 idler pulley (if removed). Install timing belt on engine. See Fig. 5
belt, ensure all mating marks are aligned and belt is installed in original direction of rotation.
Loosen No. 1 idler pulley bolt, and install pulley tension spring. Temporarily install crankshaft pulley bolt. Turn crankshaft CLOCKWISE 2 revolutions from TDC to TDC. Realign camshaft
and crankshaft sprocket timing marks. If timing marks do not align, remove and reinstall timing belt.
If timing marks do align, tighten No. 1 idler pulley bolt to specification. See TORQUE SPECIFICATIONS. Install timing belt guide. Install timing belt covers.
Install crankshaft pulley. Holding crankshaft pulley stationary, tighten crankshaft pulley bolt to specification. On 1991-94 models, install accessory drive pulley.
On all models, install spark plugs. Install valve cover. Install right engine mount to engine and body. Install vacuum switching valves and engine ground strap to engine mount (if equipped).
Connect negative battery cable. To complete installation, reverse removal procedure. Adjust drive belts to proper tension.
3.
. If reusing old
4.
5.
6.
7.
8.
Fig. 3: Aligning Camshaft Knock Pin With Bearing Cap Courtesy of TOYOTA MOTOR SALES, U.S.A, INC.
Fig. 4: Aligning Crankshaft & Camshaft Timing Marks Courtesy of TOYOTA MOTOR SALES, U.S.A, INC.
Fig. 5: Routing Timing Belt
Courtesy of TOYOTA MOTOR SALES, U.S.A, INC.
Images (Click to make bigger)
Wednesday, January 4th, 2012 AT 5:26 AM