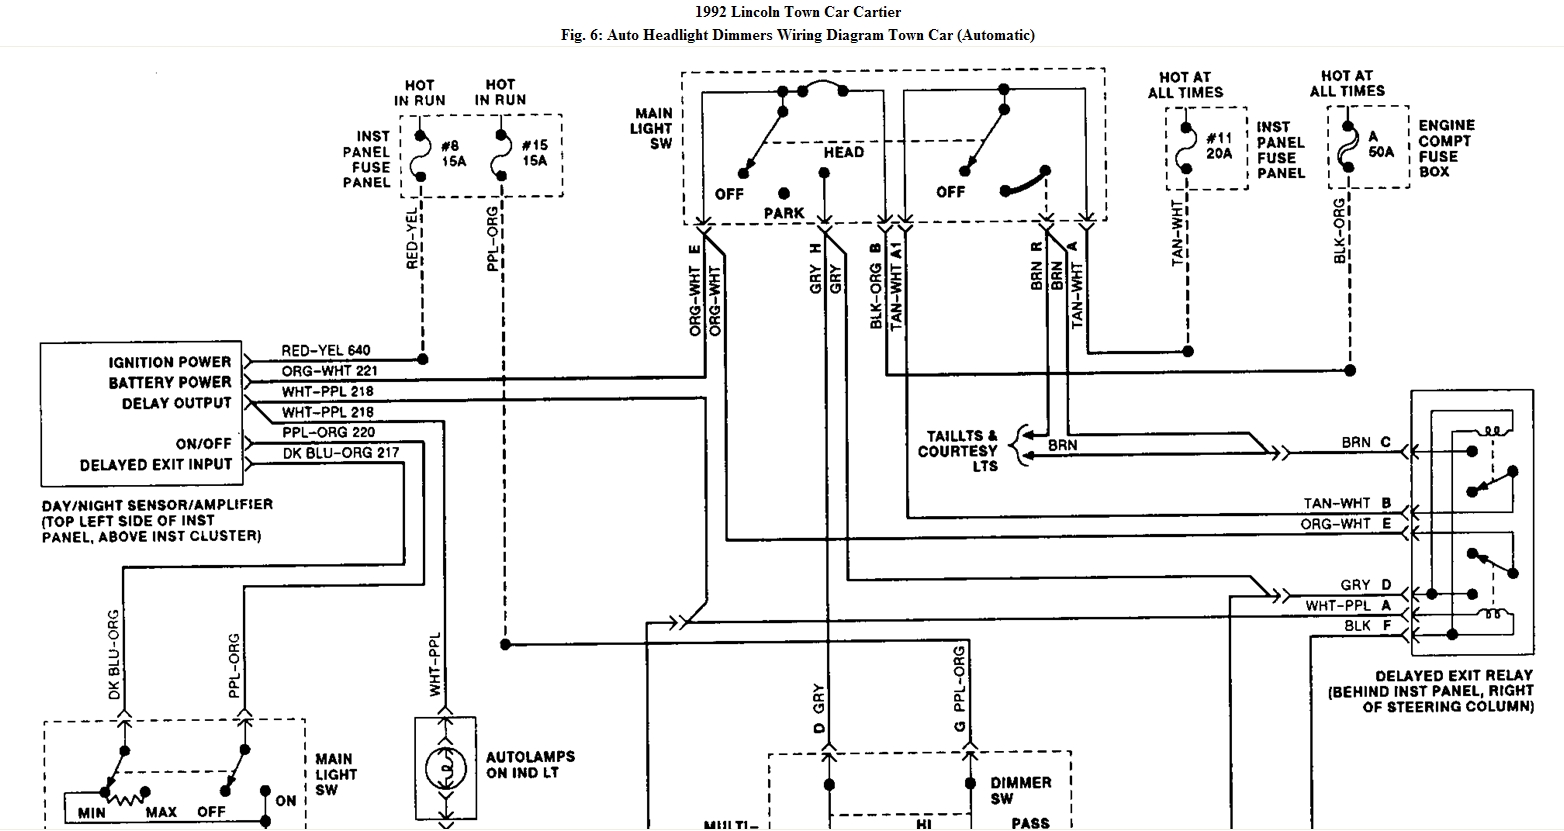
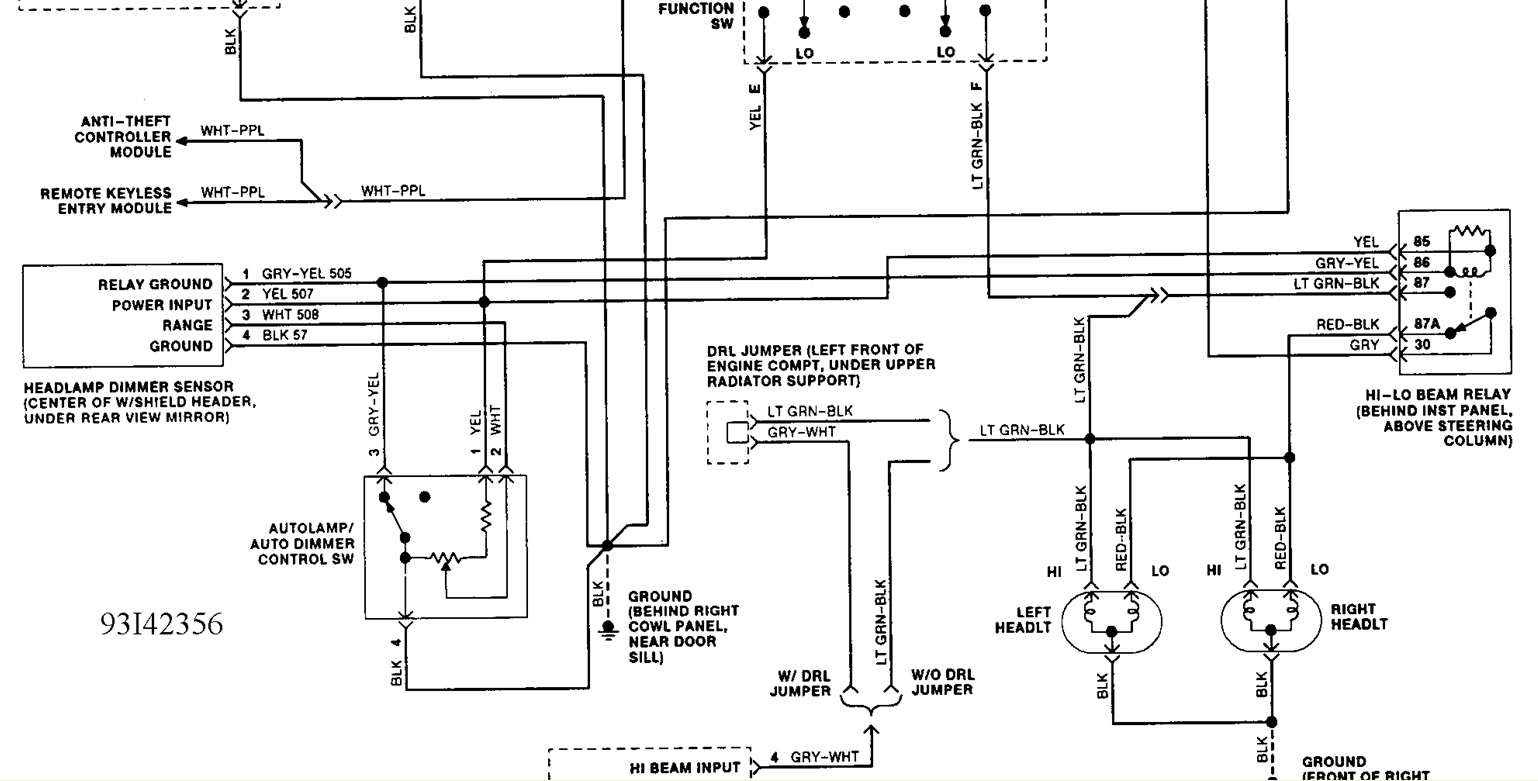
AUTOMATIC HEADLIGHT DIMMER SYSTEM TEST
1. Set headlight switch to ON position. Set dimmer switch to high beam position. Set dimmer
sensitivity to maximum. Locate sensor at center of windshield header, behind rearview mirror.
Using a paper clip, push self-test button through hole in top right of sensor.
2. Headlights should switch to low beam and back to high beam position within 5 seconds. If
headlights do not switch, check circuit No. 508 (White wire between dimmer sensor and
control switch) for short to ground.
3. If headlights do not return to low beam, replace sensor. If system still does not operate,
continue testing.
4. Start engine, and operate it at fast idle. Set dimmer sensitivity to approximate midpoint of its
travel. Headlights should remain in low beam in both positions of dimmer switch when sensor
is exposed to sufficient light. If headlights do not function as specified, go to step 5). If
headlights function as specified, go to step 9).
5. If headlights remain in high beam, remove high-low beam relay. High-low beam relay is
located behind center of instrument panel on Continental and Mark VII and above steering
column on Town Car. Connect test light between Gray/Yellow wire at relay connector and
battery voltage. If test light does not glow at each position of dimmer switch, replace relay.
6. If test light glows at each position of dimmer switch, unplug dimmer switch connector. If test
light continues to glow, check for short in circuit No. 505 (Gray/Yellow wire). If wire is okay,
replace dimmer switch. Reconnect relay.
7. Disconnect sensor-amplifier cable at in-line connector. Connect DVOM between ground and
White wire (circuit No. 508) at sensor. With dimmer range control **** fully clockwise and
headlights on, meter should indicate approximately battery voltage.
8. Rotate dimmer range control **** fully counterclockwise. DVOM should indicate zero volts.
Rotate **** between both positions. A smooth, continuous voltage change should occur.
Replace dimmer range control if it does not operate as described in steps 7) and 8).
9. With headlights on, sensor exposed to sufficient light and dimmer switch in automatic position,
disconnect sensor-amplifier cable at in-line connector. If headlights return to low beam, replace
sensor-amplifier. If headlights remain on high beam, replace dimmer switch.
10. Activate flash-to-pass system by momentarily placing dimmer switch halfway between low
beam and automatic positions. Headlights should switch to high beam. If headlights switch to
high beam, proceed to step 11). If headlights do not switch to high beam, check for loose
connection at high-low beam relay, dimmer switch connector and at in-line connector between
sensor-amplifier cable and wiring harness.
11. Disconnect Red wire (circuit No. 527) from dimmer switch connector, and ground it to vehicle
body. If headlights switch to high beam, replace dimmer switch. If headlights do not switch to
high beam, reconnect Red wire, and check continuity of circuit through harness to dimmer
range control and sensor-amplifier.
12. Set dimmer switch to automatic position. Cover sensor-amplifier lens using a black cloth. If
headlights switch to high beam, remove cloth, and go to step 14). If headlights do not switch to
high beam, disconnect sensor-amplifier at in-line connector.
13. Ground Gray/Yellow wire (circuit No. 505) on male connector at dimmer range control. If
headlights switch to high beam, replace sensor-amplifier. If headlights do not switch to high
beam, replace dimmer switch.
14. Set dimmer switch to automatic low beam. Rotate dimmer range control **** fully
counterclockwise. If headlights do not switch to high beam, check dimmer range control for
poor connection to ground. If headlights switch to high beam, unit is functioning properly.
Check sensitivity and aiming.
REMOVAL & INSTALLATION
DIMMER SWITCH
Removal & Installation
Dimmer switch is part of multifunction switch on steering column. Disconnect negative battery cable.
Remove steering column trim shroud. Remove connectors and screws. Remove switch. To install,
reverse removal procedure.
HIGH-LOW BEAM RELAYS
Removal & Installation
High-low beam relay is located on relay panel behind center of instrument panel on Continental and
Mark VII and above steering column on Town Car. Disconnect battery ground cable. Unplug relay
from connector. To install, reverse removal procedure.
SENSOR-AMPLIFIER
Removal & Installation
Unplug connector at rear of unit. Remove mounting screw. Remove unit from mirror support.
Reverse removal procedure to install. Ensure mirror support is tight.
CAUTION: When battery is disconnected, vehicle computer and memory
systems may lose memory data. Driveability problems may exist
until computer systems have completed a relearn cycle. See
COMPUTER RELEARN PROCEDURES article in the GENERAL
INFORMATION section before disconnecting battery.
Images (Click to make bigger)
Tuesday, February 22nd, 2011 AT 12:51 AM