Engine is 2

Tiny
CWE909
  • MEMBER
  • 1982 CHRYSLER K-CAR
  • 108,000 MILES
Engine is 2.2 how to replace reliant timing belt
Tuesday, October 11th, 2011 AT 10:30 AM

2 Replies

Tiny
ASEMASTER6371
  • MECHANIC
  • 52,797 POSTS
Disconnect the battery ground cable, then raise and support the vehicle with jackstands.
Remove the right-hand inner splash shield.
Loosen the crankshaft pulley and water pump pulley retaining bolts.
Remove the accessory drive belts, then the crankshaft and water pump pulleys.

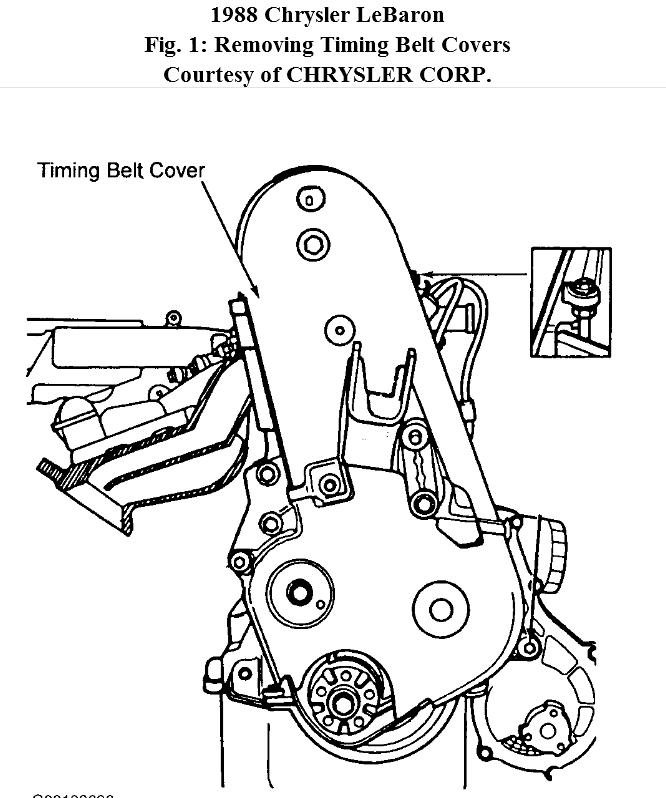
Fig. 13 Timing belt cover removal.
Remove the nuts securing the timing belt cover to the cylinder head and the cylinder block, then the timing belt cover halves.
Support the engine with a suitable jack, then remove the right-hand engine mount bolt and raise the engine slightly.

Cam Belt Routing
Loosen the timing belt tensioner, then remove the timing belt.

TIMING BELT INSTALLATION

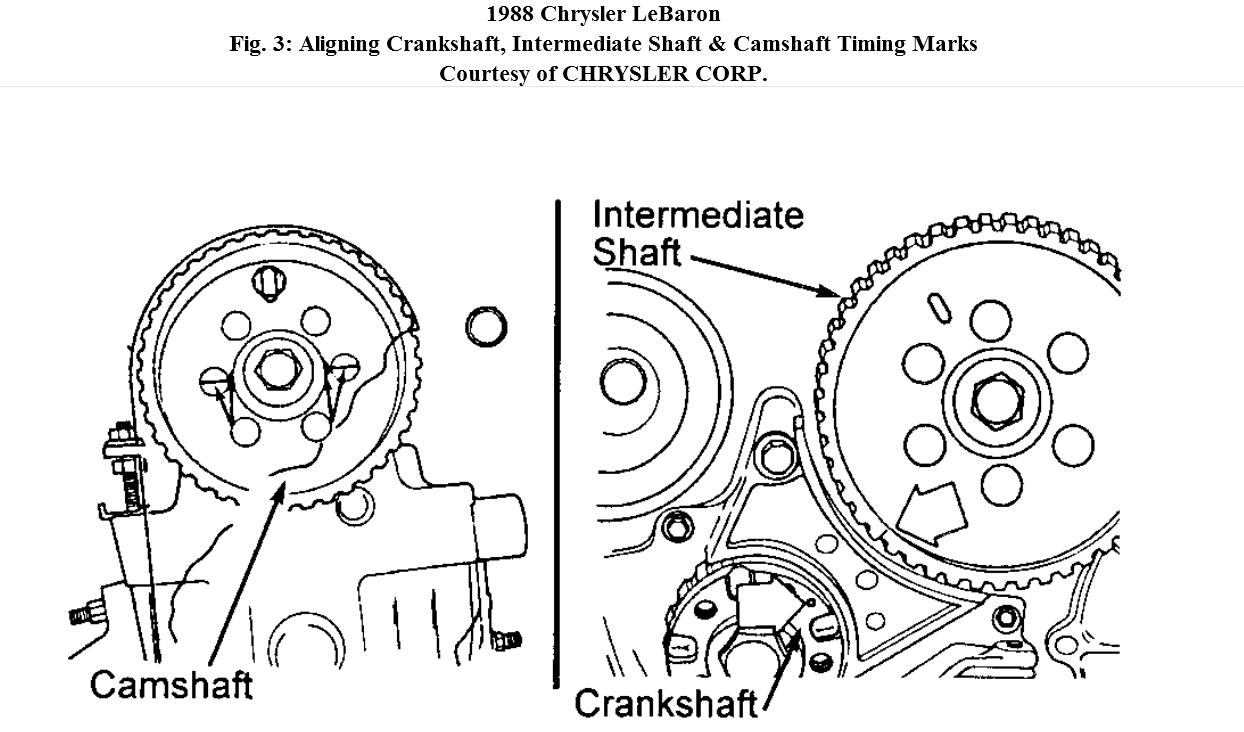
Fig. 1 Crankshaft And Intermediate Sprocket Timing Marks
Rotate the crankshaft and the intermediate shaft until the markings on the sprockets are aligned as shown.

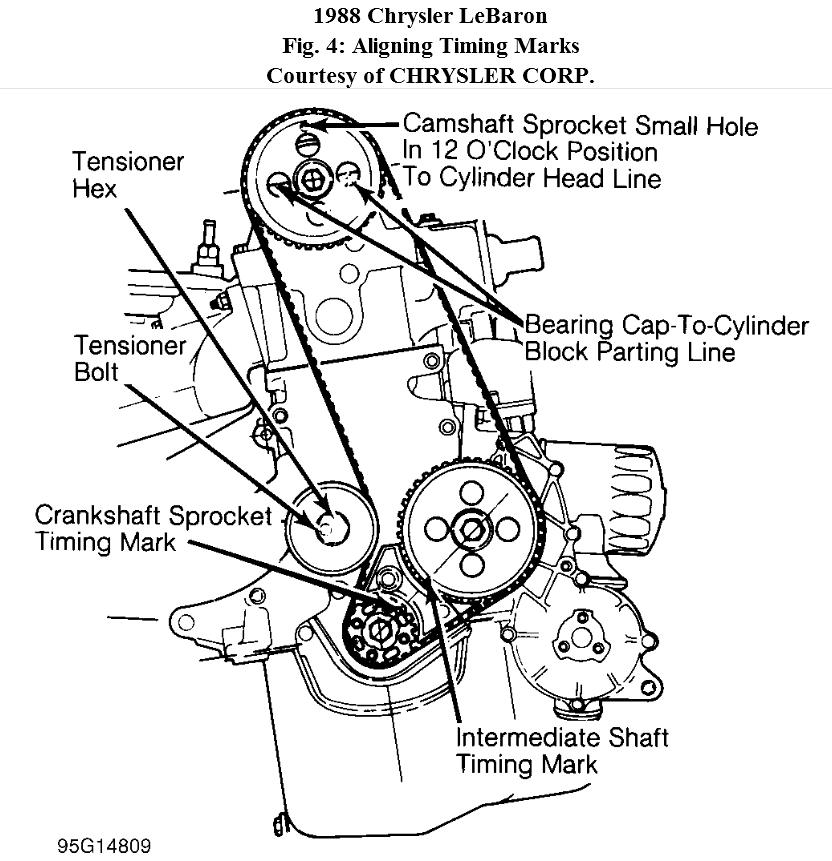
Fig. 2 Camshaft Sprocket
Rotate the camshaft until the arrows on the hub are aligned with the No.1 camshaft cap to cylinder head line. The small hole must be located along the vertical center line.
Be certain that all timing marks are still aligned.

Cam Belt Routing
Install the timing belt. Recheck all alignment marks.

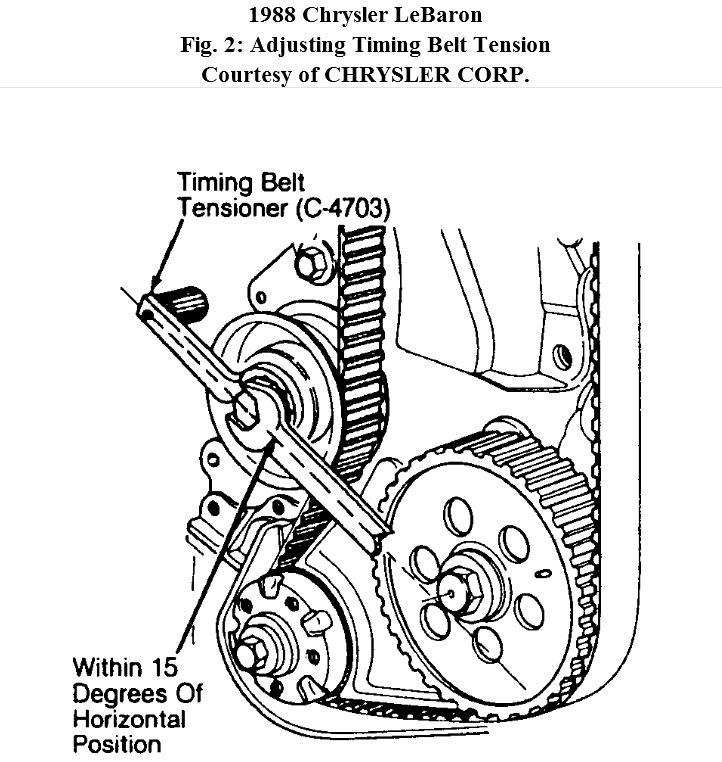
Fig. 21 Adjusting drive belt tension
Set the belt tension, so that the Chrysler belt tension tool's (#C- 4703) axis is within 15°of horizontal.
Rotate the crankshaft two revolutions in the clockwise direction, then position at TDC. Tighten the tensioner locknut.
Reverse steps #1 through #6 to complete installation.

Very labor intensive job

Roy
Was this
answer
helpful?
Yes
No
-1
Tuesday, October 11th, 2011 AT 11:17 AM
Tiny
KHLOW2008
  • MECHANIC
  • 41,815 POSTS
Our database does not have any information for your vehicle and the information below should be similar for your vehicle.

TIMING BELT

Removal

1. Disconnect negative battery cable. Remove all accessory drive belts. If necessary, remove alternator, mounting brackets, and A/C compressor (if equipped). DO NOT disconnect refrigerant lines. Remove A/C belt idler pulley.

2. Raise and support vehicle. Remove right inner splash shield. Remove water pump and crankshaft pulleys. Remove upper and lower timing belt covers. See Fig. 1. Support engine using a jack.

3. Remove right engine mount bolt, and raise engine slightly. Loosen the timing belt tensioner, and remove timing belt. See Fig. 2.

Installation

1. Remove spark plugs. Place cylinder No. 1 on TDC. Align timing marks on crankshaft and intermediate shaft sprockets. See Fig. 3. Rotate camshaft sprocket until 2 marked arrows on sprocket hub align with camshaft bearing cap-to-cylinder head parting line. Small hole in camshaft sprocket must be at 12 o'clock relative to cylinder head line. See Fig. 4.

2. Install timing belt. Ensure timing belt is installed in original direction of rotation. Install Timing Belt Tensioner (C-4703) horizontally on large hex of belt tensioner pulley. Loosen tensioner lock nut (if necessary) to reset belt tensioner
to within a 15-degree axis of horizontal position of tool. See Fig. 2. Tighten lock nut.

CAUTION:
DO NOT rotate crankshaft counterclockwise. DO NOT rotate engine using camshaft or intermediate shaft sprocket bolts.

3. Rotate crankshaft clockwise 2 complete revolutions to TDC. Tighten tensioner retaining bolt to specification while holding belt tensioner wrench in position. Check all timing marks for proper alignment. To complete installation, reverse removal procedure. Adjust drive belts to proper tension.
Was this
answer
helpful?
Yes
No
+2
Tuesday, October 11th, 2011 AT 11:19 AM

Please login or register to post a reply.

Sponsored links