Where is the camshaft position sensor located and how to replace it?

Tiny
KERRI ANNE HOYTE
  • MEMBER
  • 2008 FORD EXPLORER
  • 4.6L
  • V8
  • 4WD
  • AUTOMATIC
  • 125,000 MILES
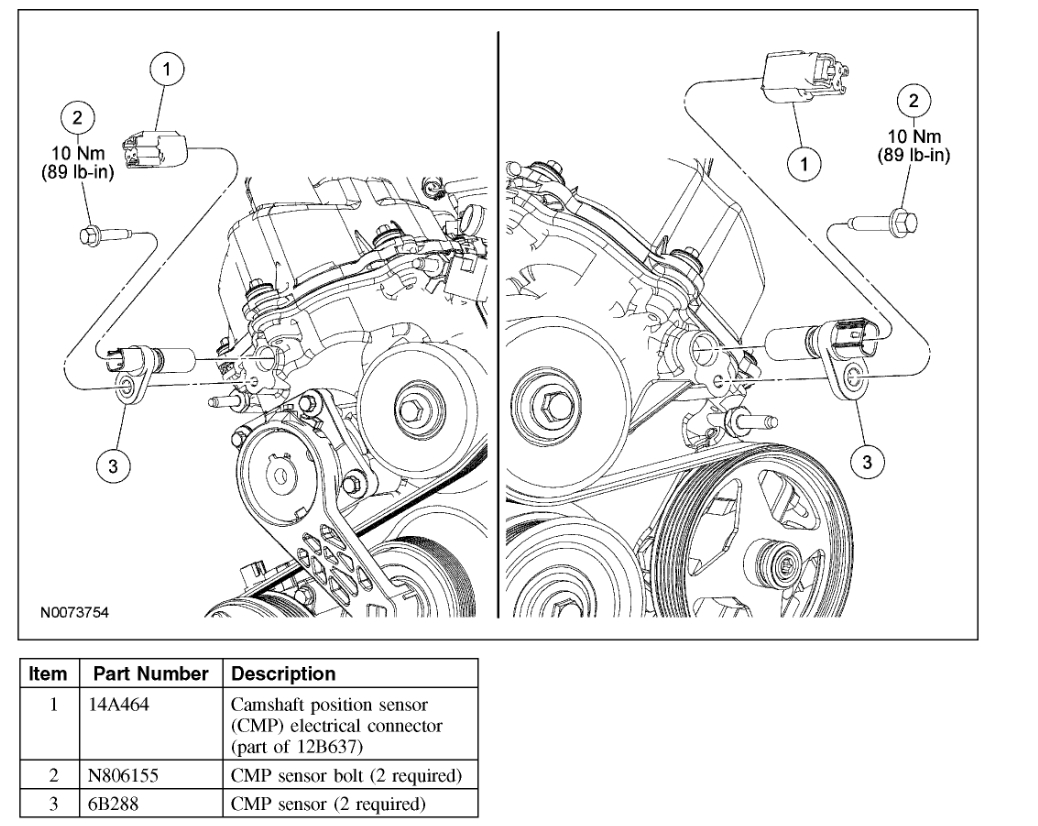
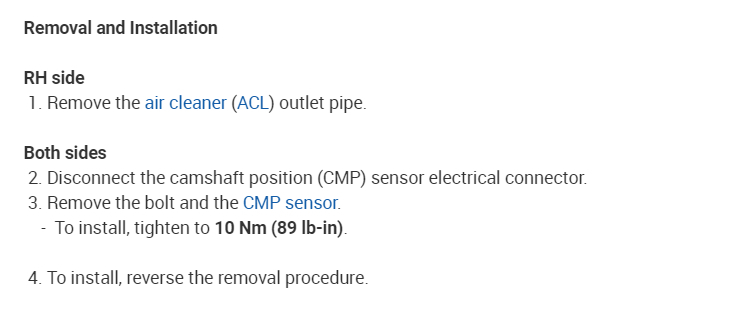
My truck has a check engine light, and the error code has come up with a camshaft position sensor (circuit bank 1). I have recently been using experiencing “jerking” and what feels like a delay from the time I hit the gas to the car actually accelerating. I found the part for about $20.00 and would like to replace it myself. How would I replace the sensor? Where exactly is it located, do you have any diagrams that would help? Thank you so much for your time and help!
Thursday, May 25th, 2023 AT 9:27 AM

1 Reply

Tiny
KEN L
  • MASTER CERTIFIED MECHANIC
  • 42,949 POSTS
It sounds like you're dealing with a Camshaft Position Sensor issue on your 2008 Ford Explorer with a 4.6L engine. This is a relatively common issue, and the sensor itself is typically not too hard to replace. However, please note that working on your vehicle's engine can carry certain risks, especially if you're not familiar with the process. Always take proper safety precautions and consider consulting with a professional mechanic if you're unsure.

The Camshaft Position Sensor is located on the engine, typically near the top and in the vicinity of the camshaft itself. In your vehicle, it's likely near the front of the engine, possibly near the timing cover.

Here is a general step-by-step guide on how to replace it:

Locate the Camshaft Position Sensor: It should be located near the front of the engine, possibly near the timing cover.

Disconnect the Battery: To prevent any electrical issues, it's always a good idea to disconnect the negative terminal of the battery before starting.

Remove the Electrical Connector: The sensor will have an electrical connector plugged into it. Carefully unplug this connector.

Remove the Sensor: The sensor will typically be held in place with a bolt or two. Remove these bolts and carefully pull out the sensor. Note that it might require a bit of wiggling to get it loose.

Install the New Sensor: Insert the new sensor into the hole and secure it with the bolts. Be careful not to over tighten these bolts, as this can damage the sensor.

Reconnect the Electrical Connector: Plug the electrical connector back into the sensor.

Reconnect the Battery: Reconnect the negative terminal on the battery.

After replacing the sensor, you may need to clear the error code using an OBD2 scanner. If the issue persists, or if the sensor was not the root of the problem, the error code might return.

Bank one is on the same side as cylinder #1 here is the location of the sensor so you can replace it. Check out the images (below). Please let us know what happens.
Was this
answer
helpful?
Yes
No
Thursday, May 25th, 2023 AT 4:56 PM

Please login or register to post a reply.

Sponsored links