We have created this guide to show the proper way to remove and install a wheel (rim and tire) without stripping or breaking the wheel studs and lug nuts. Some manufacturers have a wheel lock key which is usually located in the glove box or in a trunk compartment. Flat tire instructions are featured in the section below.
Safety First!
Vehicle safety and proper drivability depend on the proper removal and installation of a wheel, not to mention the potential injury and damage that can occur if the wheel falls off. Incorrect wheel reinstallation may also cause brake rotors and hub flanges to warp which will create vibrations while driving. Before you begin you will need to jack up and raise the vehicle without damaging the undercarriage.
Lets Jump In!
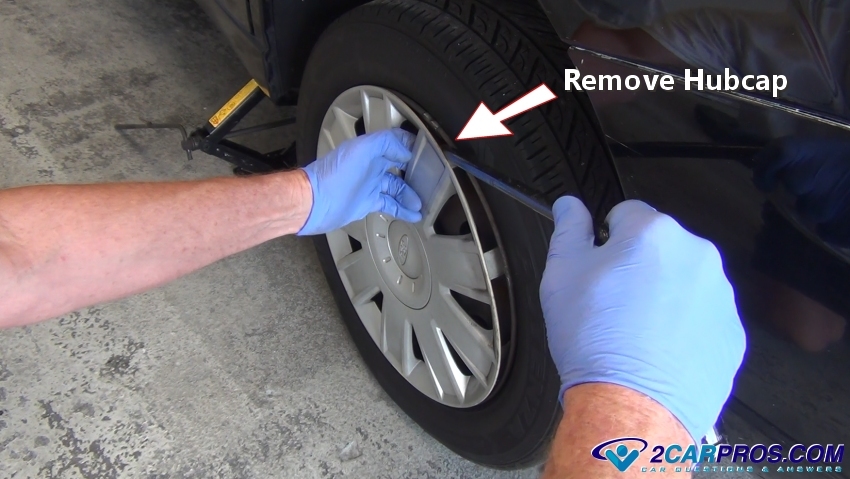
There are typically two types of wheel covers which can hinder the removal of
the lug nuts and wheel. The first is the complete hubcap which needs to be removed
to gain access to the lug nuts. Using the opposite side of the vehicle's lug wrench
or a large flat blade (standard) screwdriver, wedge the tip in-between the cap and
the rim of the tire. Twist the lug wrench or screwdriver back and forth to start
the removal process.
Here is an example of a lug nut cover on an aluminum wheel which has plastic
covers over them which must be removed. These plastic covers can be made to resemble
lug nuts and actually thread onto the metal lug nuts that hold the rim on. Each
of these must be removed before the center cap will come off.

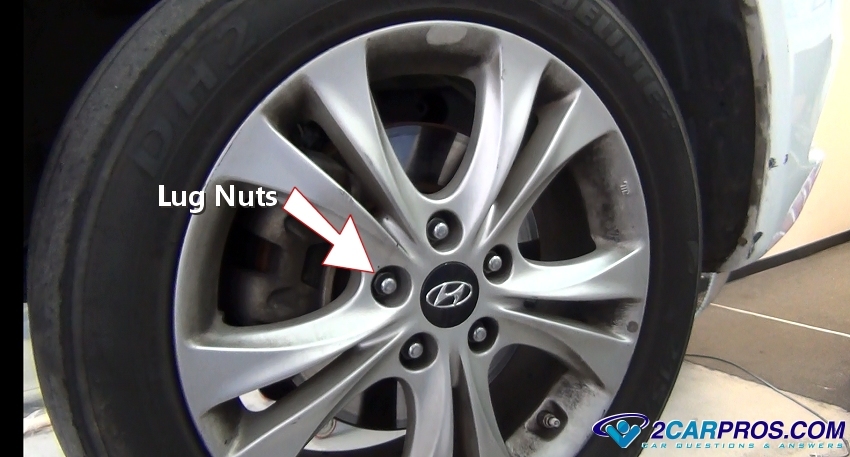
This style of alloy or aluminum wheel has the lug nuts already exposed and is
ready for removal without any additional preparation.
The first step in removing the lug nuts is obtaining a tool capable of doing
so. This could be a lug wrench which is supplied in most cars by the spare tire.
Most mechanics prefer to use a breaker bar which is basically a large socket wrench
that will give you additional leverage over a traditional wrench or socket and ratchet.
This bar is usually not included in a typical tool set and will need to be purchased
separately along with a set of 1/2 drive deep well sockets. Wheel lugs sizes can
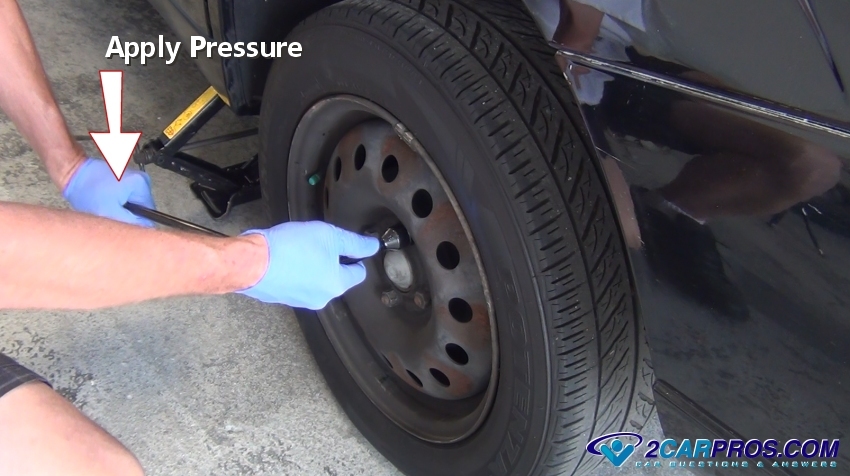
range from 17mm, 18mm, 19mm, 21mm or 3/4 inch or 13/16 inch in most cases. Set the
jack in place and lift the car slightly, this will allow the suspension to travel
downward from the vehicle but not enough to lift the tire off of the ground. While
the tire is touching the ground, apply downward pressure to the lug wrench while
holding the pivot point of the wrench steady. One thing you do not want to do is
pull upward on the lug wrench, this will cause uneven pressure to your lower back
and can cause pain. To remove the lug nuts turn them counterclockwise, these nuts
will be tight so be ready.
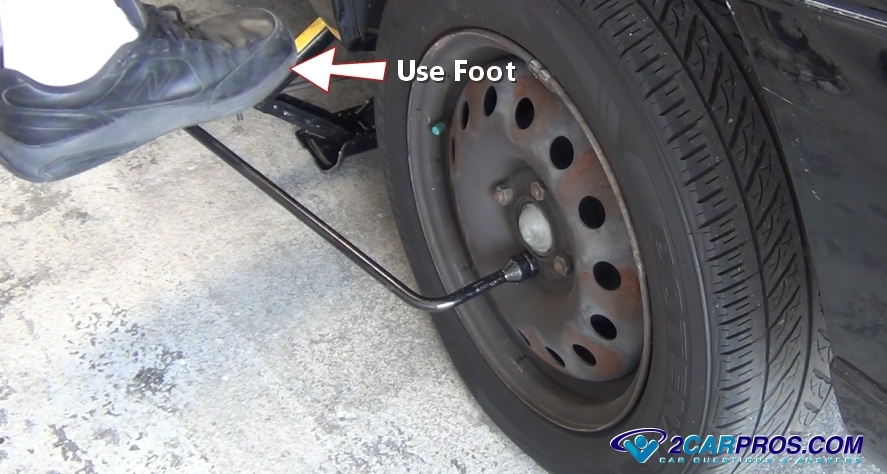
Some lugs can be rusted or over tightened. In this case you may need to use your
full body weight to step on the lug wrench. Make sure the lug wrench or breaker
bar is fully seated to avoid rounding. Be careful doing this because there is much
more pressure being applied. Continue breaking the lugs loose until all are done,
then loosen about one full turn. This will ensure that once the tire is in the air
you will have no problem completely removing the nuts, do not remove the nuts fully
at this time.
Continue lifting the car until the tire is no longer touching the ground, in
this instance we are using a
hydraulic floor jack which
is more stable than a scissor jack that is supplied with most vehicles, stabilizing
by using jack stands for safety.

Watch The Video
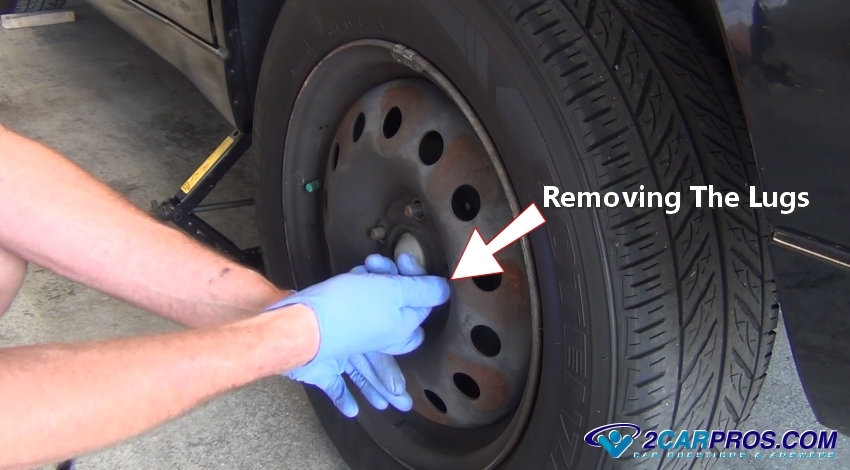
Continue to remove all of the lug nuts either be hand or using the lug wrench
or breaker bar, a regular socket and ratchet can be used at this time. Some European
models such as Mercedes Benz, BMW and Porsche will use lug bolts which when removed
will allow the tire to fall because there is no wheel stud to hold the rim in place,
be ready to grasp the wheel when removing the lugs. If the wheel seems stuck this
is because rust has accumulated between the hub and rim, using your foot, give the
tire a swift kick, this should break the wheel loose from the hub.
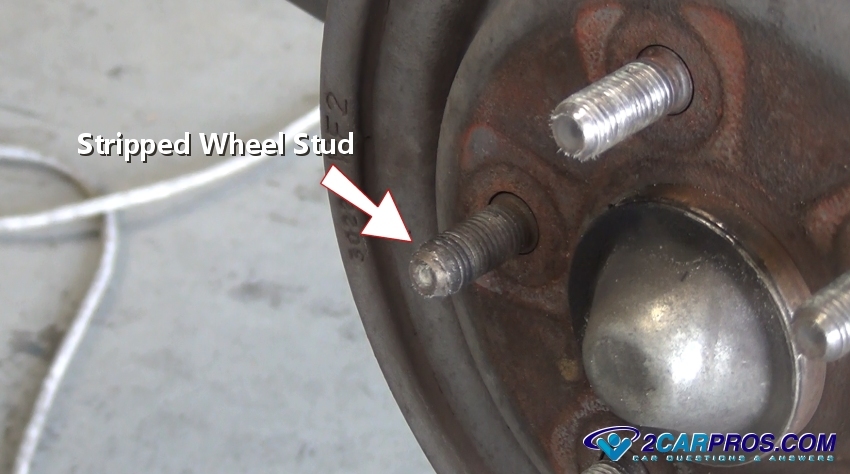
Check the lug studs and replace any
that are damaged. Also, wipe off the mounting surface on both the wheel, rotor or
drum, clean any dirt, rust or grease before the wheel is reinstalled.
Reinstallation: Grasp the tire and gently reinstall it onto the wheel studs so
as to not damage the threads. Some European cars you will need to hold the tire
in place on the wheel hub and then align the rim with the threaded lug bolt holes,
you may need to jockey the rim around a bit to line up the holes.
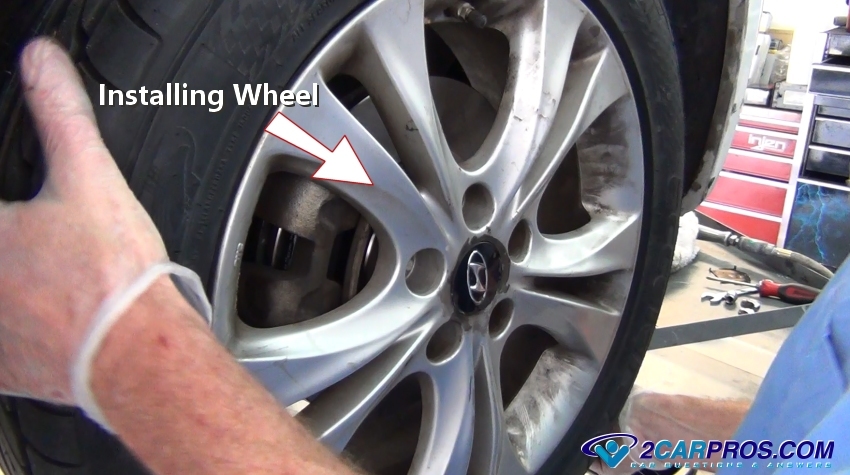
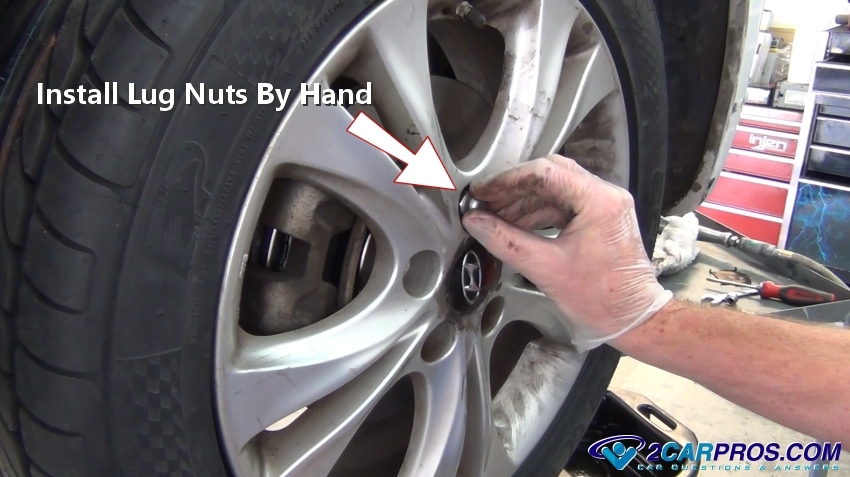
Push the wheel on until it rests flush against the rotor or drum flange, install
the lug nuts onto the studs by turning them clockwise. Do not start the lugs with
a socket or impact gun, this can cause cross threading. Continue installing the
lug nuts until all have been started at least two turns. Do not use grease on the
lug nuts, if rust exists on the wheel studs use a wire brush to remove it before
installation.
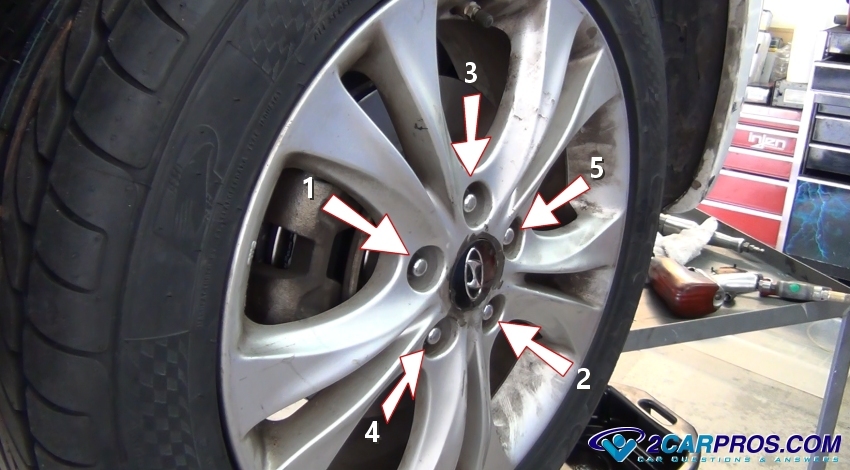
Start the initial tightening by following a star pattern. This will ensure the
wheel will be tightened evenly which will avoid warping. You can use a normal ratchet
and socket for this while holding the tire by hand. In the next step the wheel will
be tightened completely.
Lower the car just enough for the tire to touch the ground which will hold it
from spinning while it's being tightened.
Use a torque wrench and set it to manufacturer's specifications which is usually
70 to 90 foot pounds for passenger cars, and 100 to 120 foot pounds for pickup trucks
and large SUVs. Finish tightening the lugs in a star pattern while listening and
feeling for the torque wrench to click signaling the proper tightness has been achieved.
If a torque wrench is not available, tighten the lugs evenly in a star pattern,
go over the lugs twice to ensure they are all tight. Reinstall the hubcap or lug
nut cover and remove the jack. A hub cap will have a relief for the valve stem,
take note and install it correctly. Be careful not to apply excessive pressure on
the cover to avoid breakage. Once the job is complete listen for any strange noises
while the vehicle is in use. A loose wheel will make a clicking or ticking noise
when rolling at low speeds. Recheck the lug nuts after a day or two of driving to
make sure they are secure. After installation is complete
check the tire air pressure,
this will help the tire perform its best.

Flat Tire Change
There are mainly three types of flat tires which are; very low on air pressure (almost flat) but it is still able to roll, completely out of air, finally the most dangerous, a high speed blow out.
Safety First
High speed blowouts can be hazardous, if you hear and feel a tire blowout controlling the car will become more difficult. If this happens, let off the throttle while keeping the steering wheel steady, gently apply the brakes until you have slowed down. The idea is to get the vehicle to safe and level ground even if you need to drive for a short distance to do so. Drive slowly and use caution, the vehicle will act a little funny, (if you are on the freeway head for the nearest off ramp). In most cases once the tire has been run flat it breaks down the inner layers rendering it useless, don't get hung up on trying to save the tire, no tire is worth injury. Avoid changing a flat tire directly on the side of the road, make sure you are a safe distance from other drivers, Roadside flares are a good idea to warn approaching motorists to slow down. If you cannot get to a safe place, dial 911 and wait for help from the highway patrol or local police. A flat tire emergency roadside kit including a set of gloves is recommended.
Park the car on level ground and set the parking brake, also block the tires (2 blocks of wood). This is to keep the car from rolling when being lifted with the jack. The jack must be on solid ground, if you are on a soft roadside shoulder use a large piece of flat wood to set the jack on before lifting. Do not lift a vehicle on uneven ground, it can cause the jack to buckle and the vehicle to roll off of the jack.
Located the spare tire (mentioned in your vehicles owner’s manual) and check its inflation, some vehicles have a space saver spare which requires no air. In the same vicinity as the spare tire the jack and lug wrench should be available and held down with a mounting screw which is hand tight.
Remove wheel cover of the flat tire (if quipped) using the tire iron break the lug nuts loose, 2 turns (counterclockwise). Make sure the lug wrench is completely on the lug to avoid rounding, push downward with the lug wrench facing left horizontally. A bouncing motion works best, you can also use a foot on the wrench.
The jack should have instructions on how and where to lift the car, also in the vehicle's owner’s manual there will be instructions for your particular vehicle. Do not assume where the jack is placed because you can damage the vehicle lifting it incorrectly. Some vehicles have an arrow on the lower body pinch molding (bottom) that shows exactly where the jack should be placed. Position the jack under the lifting area and start to turn the jack screw clockwise. This will raise the jack into position, continue winding upward until the wheel clears the ground.
Continue removing lugs nuts, (on German cars the lug nut is combined with the wheel stud, so the tire will fall off once the lug studs are removed).
Grasp the tire firmly and gently slide it off the wheel studs and place it under the car for additional safety, do not hit the jack.
Carefully lift the spare tire onto the wheel studs (German cars you will need to thread a stud lug) and hand thread a lug nut to hold the tire in place, install the remainder of the lug nuts and snug.
Lower the jack slightly until the tire just touches the ground which will hold it from rotating while tightening the lug nuts. Push downward with the lug wrench facing right, do not pull upward.
Continue to lower the jack and then remove.
Stow the flat tire, lug wrench and jack and you are all set. The spare tire is a temporary item in most cases, have a new tire installed or the old tire repaired.
Questions?
Our certified technicians are ready to answer tire and wheel questions for free. We hope you saved money and learned from this guide and video, we are creating a full set of car repair guides. Please subscribe to our 2CarPros YouTube channel and check back often for new videos which are uploaded regularly.
Article published 2022-03-08
Safely Change Your Spare Tire

Lower Control Arm Bushing Replacement