Sound coming from front

Tiny
SIRJR
  • MEMBER
  • 2012 CHEVROLET SONIC
  • 1.4L
  • 4 CYL
  • 2WD
  • AUTOMATIC
  • 117,000 MILES
I'm trying to obtain information regarding my daughter's vehicle. She states that she has been noticing a groan/creak (not squeaky) sound coming from the front (end) as she starts to accelerate at a slow rate, sometimes as vehicle coming to a stop as well.
I will be examining the car this weekend and I'm hoping you can give me some directions on how to further trouble shoot this issue. Thank you.
Friday, February 1st, 2019 AT 6:39 AM

22 Replies

Tiny
JACOBANDNICKOLAS
  • MECHANIC
  • 108,269 POSTS
Hi and thanks for using 2CarPros.

I'm not sure where you are located, but often times, cold temperatures will cause creaking sounds from bushings on the front of the vehicle. Often times they can be control arm bushings or sway bar bushings.

If you look at picture 1, it shows the sway bar bushings that I am referring to. If you bounce the front of the vehicle and hear the noise, check them first. Please keep in mind that the cold temperatures can cause the rubber to contract and this sound may go away once it warms back up.

Picture 2 shows the control arm and bushings. Again, these can be the problem.

Inspect them and let me know what you find. I can provide directions for component replacement if needed.

Take care,
Joe
Was this
answer
helpful?
Yes
No
+1
Friday, February 1st, 2019 AT 2:13 PM
Tiny
SIRJR
  • MEMBER
  • 86 POSTS
Thank you for the information. In addition to doing this, how do I determine/troubleshoot the front wheel bearings?
Was this
answer
helpful?
Yes
No
Saturday, February 2nd, 2019 AT 9:41 AM
Tiny
JACOBANDNICKOLAS
  • MECHANIC
  • 108,269 POSTS
Welcome back:

Most often, a wheel bearing will make a howling noise which changes pitch relative to speed. When you hear that noise, in a safe area, turn left and right to see if the sound changes. If it does, it's a bearing. What happens is this. When you turn right, the vehicle's weight increases on the left side. So, if it gets louder when turning right, the left bearing is bad. If the sound gets quieter, the right wheel bearing is bad. It will get quieter because you take weight off it.

Now, if you safely lift the wheels off the ground, place your hands at 6 and 12 o'clock and try to wiggle the wheel. If you find play, that can also be a bearing issue.

I hope that makes sense.

Also, I attached a picture (picture 1) which is the diagnostic flow chart for determining wheel bearing issues. Take a look at that too.

____________________________________________

If you determine a bearing needs replaced, here are the directions. The first set of directions are for the front wheels and the second are the rear. All attached pictures starting with number 2 correlate with these directions.

__________________________________________

Front Wheel Bearing and Hub Replacement

Special Tools

CH-50559 - Wheel Hub/Bearing Remover Kit

For equivalent regional tools, refer to Special Tools See: Suspension > Electrical / Mechanical Repair > Front Suspension.

Removal Procedure

1. Raise and support the vehicle. Refer to Lifting and Jacking the Vehicle See: Vehicle Lifting > Procedures > Lifting and Jacking the Vehicle.

2. Remove the steering knuckle assembly from the vehicle. Refer to Steering Knuckle Replacement See: Front Steering Knuckle > Removal and Replacement > Steering Knuckle Replacement.

Picture 2

3. Position the steering knuckle assembly (1) in a suitable vise.

4. Position the CH-50059-1 wheel hub/bearing removal/installation bridge assembly (1) and the CH-50559-2 wheel hub/bearing removal/installation adapter (2) on the wheel bearing inner hub.

5. Using the CH-50059-1 and the CH-50559-2, remove the wheel hub from the wheel bearing.

Picture 3

6. If the inner race of the bearing is pulled out with the hub, remove the inner race from the using the appropriate tools.

Picture 4

7. Using the appropriate tool, remove the retaining ring (1) from the steering knuckle.

Picture 5

8. Position the CH-50559-1 wheel hub/bearing removal/installation bridge assembly (1) and the CH-50559-3 wheel bearing removal adapter (2) on the steering knuckle.

9. Remove the wheel bearing from the steering knuckle and discard it. Inspect the bore of the of the steering knuckle for pitting, scoring wear, or corrosion. If damage cannot be easily cleaned up with light sanding, replace the steering knuckle.

Installation Procedure

Picture 6

Note:
Ensure that the wheel bearing is evenly seated in the steering knuckle.

1. Using the CH-50559-4 wheel hub/bearing installation adapter (1) and the appropriate extension and press, install the new bearing into the steering knuckle until it is correctly seated.

Picture 7

2. Position the CH-50559-4 (1) wheel hub/bearing installation adapter and the appropriate extension to the inside of the bearing and position the CH-50559-2 wheel hub removal/installation adapter and the appropriate extension on the wheel hub.

3. Press in the hub until it is correctly seated.

Picture 8

4. Using the appropriate tool, install the retaining ring (1).

5. Verify the hub rotates smoothly.

6. Install the steering knuckle assembly in the vehicle. Refer to Steering Knuckle Replacement See: Front Steering Knuckle > Removal and Replacement > Steering Knuckle Replacement.

7. Lower the vehicle.

______________________________________

For rear wheel bearing replacement, see pictures 9 and 10.

______________________________________

Let me know if this helps or if you have other questions.

Take care,
Joe
Was this
answer
helpful?
Yes
No
+1
Saturday, February 2nd, 2019 AT 8:50 PM
Tiny
SIRJR
  • MEMBER
  • 86 POSTS
I appreciate all this information. I will be checking her Sonic this morning to see if I can figure out the issue. Thank you very much.
Was this
answer
helpful?
Yes
No
Sunday, February 3rd, 2019 AT 6:13 AM
Tiny
SIRJR
  • MEMBER
  • 86 POSTS
Would you be able to send me information regarding the steps involve to remove the steering knuckle on her car? I believe I'm going to have to remove a number of items to be able to remove the knuckle. I am going to be bringing the steering knuckle to a shop to have the bearings pressed out and the new ones pressed in. Thank you.
Was this
answer
helpful?
Yes
No
Sunday, February 3rd, 2019 AT 6:22 AM
Tiny
SIRJR
  • MEMBER
  • 86 POSTS
Dear Joe,

After examining the car according to your diagnostic information, your initial reply o me regarding the sway bar and linkage bushings, seems to apply. We live in central Florida and last week the temperatures were 30+ degrees below normal. When she brought the car over this morning, the noise was not present. I performed all the checks you explained regarding the bearings and no noises were caused. There was no play in the wheels when jacked up.
My question now to you is, being what happened last week, should I replace the bushings, even though, now that it has warmed up, the groaning sound is absent? If you recommend me replacing the bushings, would you please send the information regarding removing and replacing the sway bar and linkage bushings. The vertical linkages seem accessible; however, the sway bar bushings seem to be difficult to get to.
Thank you so much for your help thus far.
Steve
Was this
answer
helpful?
Yes
No
Sunday, February 3rd, 2019 AT 4:02 PM
Tiny
JACOBANDNICKOLAS
  • MECHANIC
  • 108,269 POSTS
Hi Steve:

Honestly, I live in PA and it is a common occurrence. The bushings aren't really bad. The cold temperature caused them to contract and if they are a bit dry, they make a creaking noise. If you checked them and the sway bar has little to no movement, I would leave them alone. If, however, you want to replace them, here are the directions.

____________________________________________________________________

Here are the directions for replacing the stabilizer bar itself. This process is extensive, but you should be able to eliminate many of the procedures because you don't have to remove the entire bar. Just remove the mount, then the bushing has a slice on one end so you can twist it off and the new one on without taking the entire bar out. The pics correlate with these directions.

________________

Stabilizer Shaft Replacement

Removal Procedure

1. Remove the intermediate steering shaft lower bolt. Refer to Intermediate Steering Shaft Replacement See: Steering Column > Removal and Replacement > Intermediate Steering Shaft Replacement.

2. Raise and support the vehicle. Refer to Lifting and Jacking the Vehicle See: Vehicle Lifting > Procedures > Lifting and Jacking the Vehicle.

3. Remove the tire and wheel assembly. Refer to Tire and Wheel Removal and Installation See: Wheels and Tires > Removal and Replacement > Tire and Wheel Removal and Installation.

4. Remove the front wheelhouse inner liner front extension. Refer to Front Wheelhouse Liner Inner Front Extension Replacement.

5. Remove the front bumper impact bar lower bracket. Refer to Front Bumper Impact Bar Lower Bracket Replacement.

6. Remove the stabilizer shaft links from the stabilizer shaft. Refer to Stabilizer Shaft Link Replacement See: Stabilizer Link > Removal and Replacement > Stabilizer Shaft Link Replacement.

7. Remove the lower control arm ball joint bolt and nut from the steering knuckle. Refer to Lower Control Arm Replacement See: Control Arm > Removal and Replacement > Lower Control Arm Replacement.

8. Disconnect the steering linkage tie rod end from the steering knuckle. Refer to Steering Linkage Outer Tie Rod Replacement See: Tie Rod > Removal and Replacement > Steering Linkage Outer Tie Rod Replacement.

9. Remove the transmission rear mount to bracket retaining bolt. Refer to Transmission Mount Bracket Replacement - Rear See: Transmission Mount, A/T > Removal and Replacement > Transmission Mount Bracket Replacement - Rear.
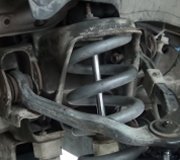
Picture 1

10. Remove the exhaust pipe insulators (1).

Picture 2

11. Release the front suspension frame front bolts about 10 mm.

12. Usingf a suitable support, support the crossmember area of the cradle.

Note:
It is not necessary to remove the front bumper facia in this procedure.

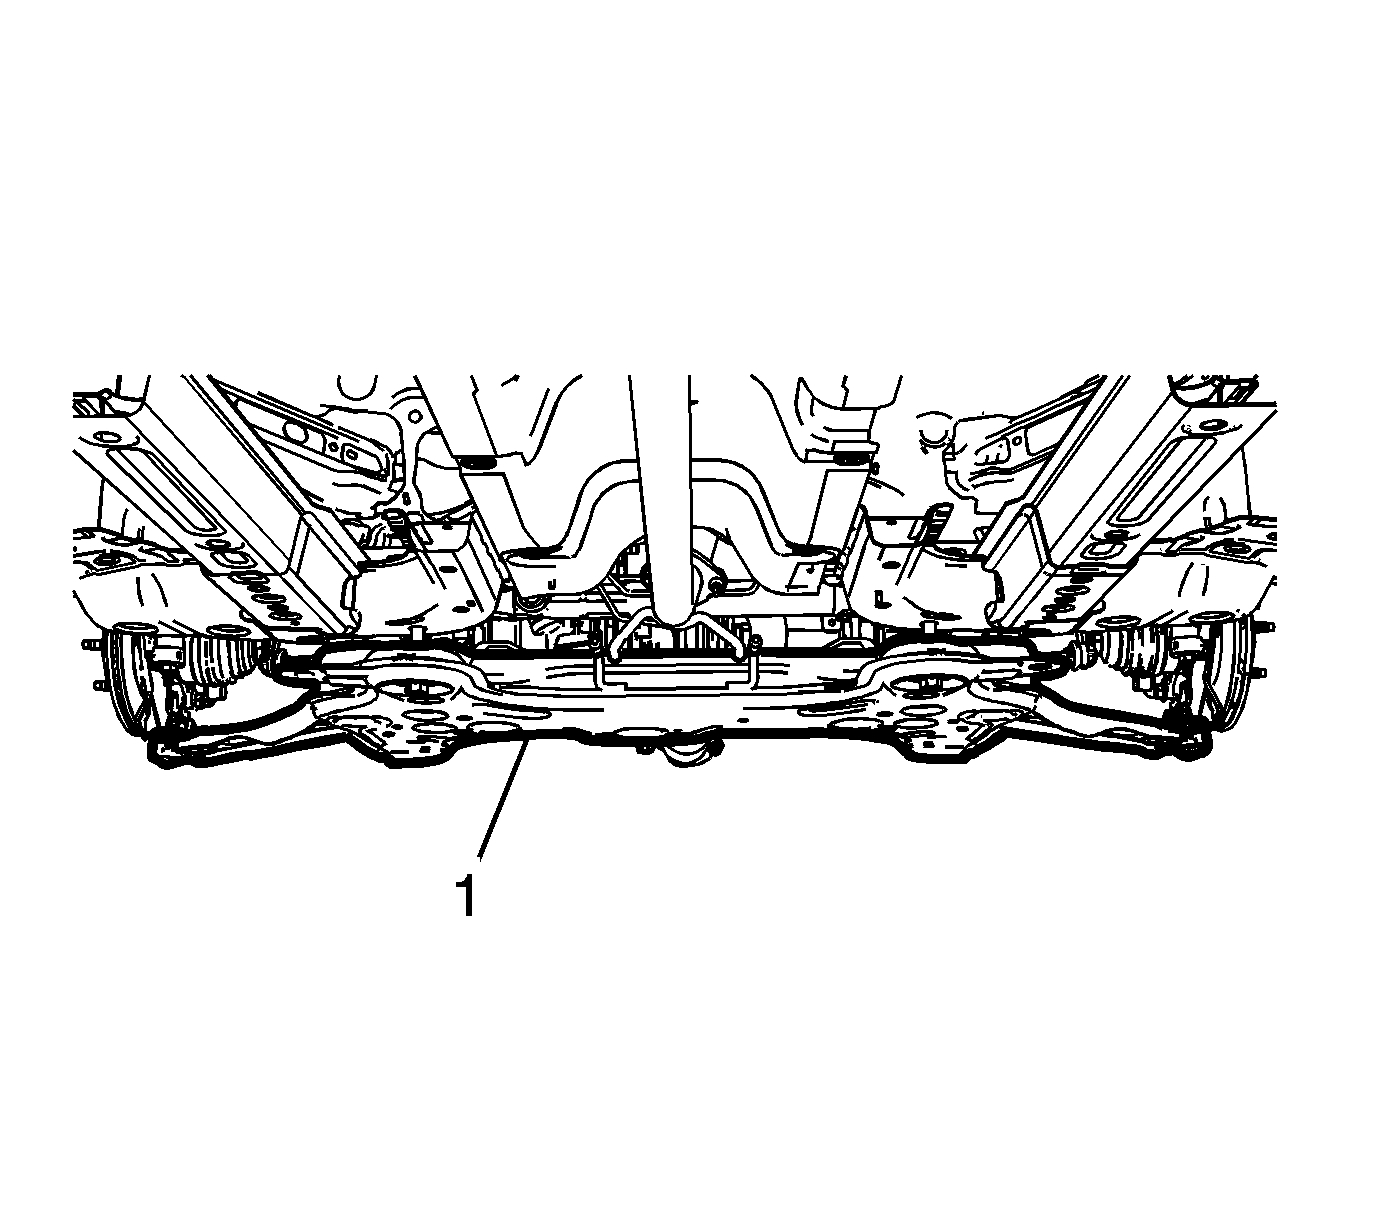
13. Using a suitable support, lower the front suspension frame (1) about 500 mm enough to gain access to the stabilizer shaft insulator bolts and to remove the stabilizer shaft. Refer to Drivetrain and Front Suspension Frame Replacement

Picture 3

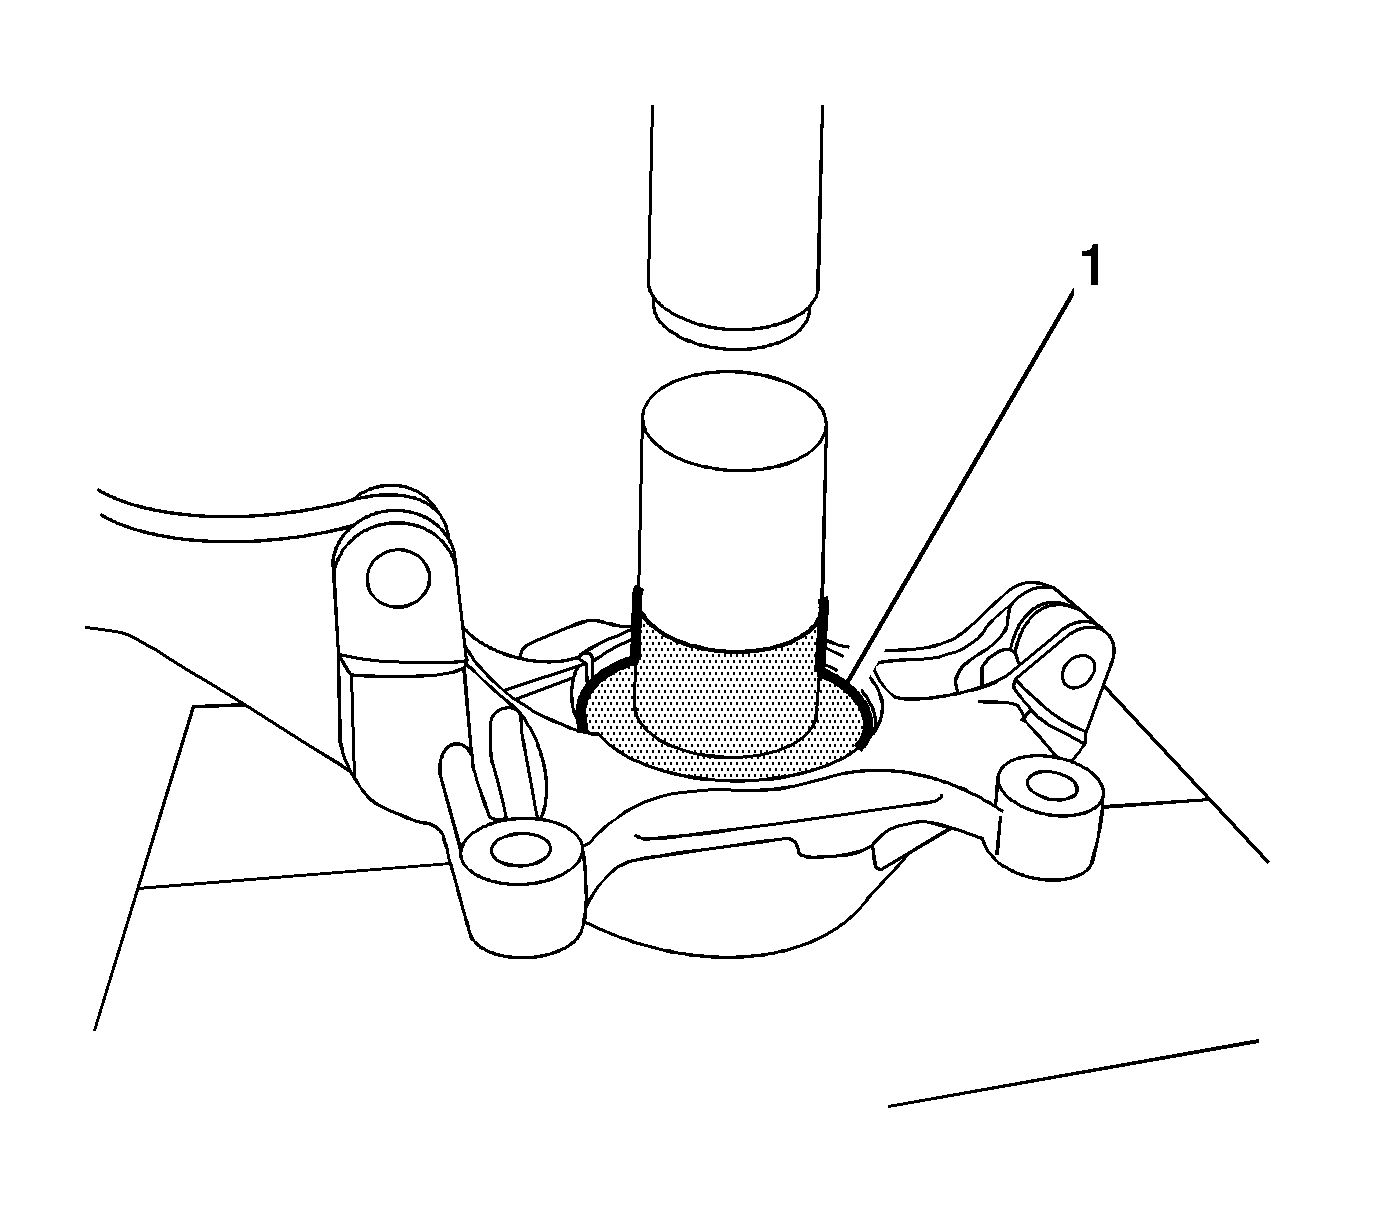
14. Remove the stabilizer shaft insulator bolts (1).

Picture 4

Note:
It maybe necessary to maneuver the front stabilizer shaft in such away as to remove it from the front suspension frame.

15. Remove the front stabilizer shaft (1) from the front suspension frame.

Installation Procedure

Picture 5

1. Position the front stabilizer shaft (1) in the front suspension frame.

Picture 6

Caution:
Refer to Fastener Caution See: Vehicle > Technician Safety Information > Fastener Caution.

2. Install the front stabilizer shaft insulator bolts (1) and tighten to 22 Nm (16 lb ft).

Picture 7

3. Lift the front suspension frame (1) into the proper position and tighten the front suspension frame bolts. Refer to Drivetrain and Front Suspension Frame Replacement.

4. Install the transmission rear mount to bracket retaining bolt. Refer to Transmission Mount Bracket Replacement - Rear See: Transmission Mount, A/T > Removal and Replacement > Transmission Mount Bracket Replacement - Rear

5. Connect the steering linkage tie rod end from the steering knuckle. Refer to Steering Linkage Outer Tie Rod Replacement See: Tie Rod > Removal and Replacement > Steering Linkage Outer Tie Rod Replacement

6. Install the lower control arm ball joint to steering knuckle bolts. Refer to Lower Control Arm Replacement See: Control Arm > Removal and Replacement > Lower Control Arm Replacement.

7. Install the stabilizer shaft link to the stabilizer shaft. Refer to Stabilizer Shaft Link Replacement See: Stabilizer Link > Removal and Replacement > Stabilizer Shaft Link Replacement.

Picture 8

8. Install the exhaust pipe insulators (1).

9. Install the front bumper impact bar lower bracket. Refer to Front Bumper Impact Bar Lower Bracket Replacement.

10. Install the front wheelhouse inner liner front extension. Refer to Front Wheelhouse Liner Inner Front Extension Replacement.

11. Install the tire and wheel assembly. Refer to Tire and Wheel Removal and Installation See: Wheels and Tires > Removal and Replacement > Tire and Wheel Removal and Installation.

12. Remove the support and lower the vehicle.

13. Install the intermediate steering shaft lower bolt. Refer to Intermediate Steering Shaft Replacement See: Steering Column > Removal and Replacement > Intermediate Steering Shaft Replacement.

________________________________________________

For the stabilizer link (vertical) the directions are pictures 9 and 10.

Let me know if this helps or if you have other questions.

Take care,
Joe
Was this
answer
helpful?
Yes
No
+1
Sunday, February 3rd, 2019 AT 6:45 PM
Tiny
SIRJR
  • MEMBER
  • 86 POSTS
Again, thank you very much for this information. Will see if any noise returns and pay attention to the temperature. On visible inspection, the bushing look fine. I appreciate you being part of 2carpros.
Was this
answer
helpful?
Yes
No
Monday, February 4th, 2019 AT 4:40 AM
Tiny
JACOBANDNICKOLAS
  • MECHANIC
  • 108,269 POSTS
You are very welcome. Feel free to come back anytime. And thanks. It's people like you that allow me to enjoy doing this.

Take care and let me know if you need anything.

Joe
Was this
answer
helpful?
Yes
No
+1
Monday, February 4th, 2019 AT 5:50 PM
Tiny
SIRJR
  • MEMBER
  • 86 POSTS
Would there be any benefit/validity to spraying the rubber bushings of the sway bar and linkage with silicone?
Was this
answer
helpful?
Yes
No
Tuesday, February 5th, 2019 AT 4:11 AM
Tiny
JACOBANDNICKOLAS
  • MECHANIC
  • 108,269 POSTS
Honestly, it may help quiet them down when it gets cold. However, don't use the traditional penetrating fluid sprays. If you are going to do it, use a silicone spray.

Please understand, this is only a temporary fix to the noise.

Let me know if you have other questions.

Joe
Was this
answer
helpful?
Yes
No
+1
Tuesday, February 5th, 2019 AT 8:22 PM
Tiny
SIRJR
  • MEMBER
  • 86 POSTS
Dear Joe,
Great. Thank you for the information.
Sincerely,
Steve
Was this
answer
helpful?
Yes
No
Wednesday, February 6th, 2019 AT 3:55 AM
Tiny
JACOBANDNICKOLAS
  • MECHANIC
  • 108,269 POSTS
Hi Steve:

You are very welcome. Let me know if you have any other questions. Also, feel free to come back in the future is you need anything.

Take care,
Joe
Was this
answer
helpful?
Yes
No
+1
Wednesday, February 6th, 2019 AT 8:01 PM
Tiny
SIRJR
  • MEMBER
  • 86 POSTS
Dear Joe,

This week my daughter stated that the sound returned. Today I drove the vehicle. The sound that she stated was a groaning like sound, to me is more like a "clicking" sound. It only is evident when I go over a manhole cover with the wheel (we don't really have any bumps in Florida) or when the car is moving in a straight line and I rapidly turn the steering wheel right/left/right/left. It is a consistent "clicking"/metallic clunking" type sound. It is not the "howling" noise you stated that would indicate a wheel/hub bearing.
Could this sound be indicative of struts/strut bearings? Vehicle has 118,000 miles. Any information will be greatly appreciated. Thank you, Steve
Was this
answer
helpful?
Yes
No
Sunday, June 23rd, 2019 AT 4:40 PM
Tiny
JACOBANDNICKOLAS
  • MECHANIC
  • 108,269 POSTS
Welcome back, Steve. Strut plates will make a clunking noise when hitting bumps, but usually not when turning. That sounds more like a stabilizer link or bar. Have you checked those?

Joe
Was this
answer
helpful?
Yes
No
+1
Sunday, June 23rd, 2019 AT 7:44 PM
Tiny
SIRJR
  • MEMBER
  • 86 POSTS
Would you be able to describe how I check the stabilizer links and/or sway bar rubber mounts?
Was this
answer
helpful?
Yes
No
Monday, June 24th, 2019 AT 3:54 AM
Tiny
SIRJR
  • MEMBER
  • 86 POSTS
And thank you very much for the quick reply.
Was this
answer
helpful?
Yes
No
Monday, June 24th, 2019 AT 2:28 PM
Tiny
JACOBANDNICKOLAS
  • MECHANIC
  • 108,269 POSTS
Welcome back:

Basically you are just checking to see if there is excessive play in them, if the rubber mounts are worn or missing, and often times a link will actually break. However, they too can just have excessive play.

Don't laugh, but I just grab onto them and with aggression, see if I can move anything. If everything is tight, then I suspect it could be strut plate.

Let me know.

Joe
Was this
answer
helpful?
Yes
No
+1
Monday, June 24th, 2019 AT 6:00 PM
Tiny
SIRJR
  • MEMBER
  • 86 POSTS
Replaced the sway bar stabilizer links and clicking sounds gone! The lower connections, the ones that connect into away bar, were very loose. I can't thank you enough for your expertise in helping me resolve this issue with my daughter's Sonic.
Sincerely,
Steve.
Was this
answer
helpful?
Yes
No
Friday, July 5th, 2019 AT 4:40 PM
Tiny
JACOBANDNICKOLAS
  • MECHANIC
  • 108,269 POSTS
Welcome back, Steve:

You are very welcome. I had a feeling it was something like that. If you need help in the future, I hope you come back.

Take care and hope you had a nice 4th.

Joe
Was this
answer
helpful?
Yes
No
+1
Friday, July 5th, 2019 AT 5:17 PM

Please login or register to post a reply.

Sponsored links