Rack and pinion removal

Tiny
JORDAN013
  • MEMBER
  • 1991 HONDA ACCORD
  • 2.2L
  • 4 CYL
  • 2WD
  • AUTOMATIC
  • 227,000 MILES
Hello,

I have disconnected rack and pinion from steering wheel and disconnected from lines and have removed bracket. I’m ready to remove it but the exhaust is in the way. What is best way to remove exhaust and where would I remove the nuts from to drop exhaust and get rack out?
Saturday, April 4th, 2020 AT 9:27 PM

70 Replies

Tiny
JACOBANDNICKOLAS
  • MECHANIC
  • 108,300 POSTS
Hi,

Here are the directions from start to finish. It explains what part of the exhaust needs removed. The attached pictures correlate with the directions.

_______________________________________

1991 Honda Accord L4-2156cc 2.2L SOHC
Removal and Installation
Vehicle Steering and Suspension Steering Steering Gear Service and Repair Removal and Replacement Power Steering Removal and Installation
REMOVAL AND INSTALLATION
1. Drain the power steering fluid. See: Power Steering Fluid > Removal and Replacement
2. Raise the front of car and support on safety stands in the proper locations.
3. Remove the front wheels.

Steering Joint Cover Removal

pic 1

4. Remove the steering joint cover.

Steering Joint Removal

pic 2

5. Remove the steering joint bolts, and move the joint toward the column.

NOTE: Lock the steering shaft with ignition key to keep the steering shaft in position.

7. Remove the cotter pin from the castle nut and remove the nut.
8. Install the 12 mm hex nut on the ball joint. Be sure that the 12 mm hex nut is flush with the ball joint pin end, or the threaded section of the ball joint pin might be damaged by the ball joint remover.

NOTE: Remove the ball joint using the Ball Joint Remover, 28 mm (07MAC-SL00200l or equivalent.

Removing Tie Rod
pic 3

9. Separate the tie-rod ball joint and knuckle using the special tool.

CAUTION: Avoid damaging the ball joint boot.

Gearbox Shield Removal

pic 4

10. Remove the gearbox shield.
11. Using solvent and a brush, wash any oil and dirt off the valve body unit, its lines, and that end of the gearbox, blow them dry with compressed air.

Removing Lines From Valve Body

pic 5

12. Using flare nut wrenches, disconnect the four lines from the control unit.

A: From pump: 14 mm wrench
B: To oil cooler: 12 mm wrench
C: To reservoir: 17 mm wrench
D: To power steering speed sensor: 12 mm wrench

13. Disconnect the 4P connector from the heated oxygen sensor. (EX, SE only)

Exhaust Pipe "A" Bracket Removal

pic 6

14. Remove the exhaust pipe A bracket nuts.
15. Remove the self-locking nuts that connect the exhaust pipe A to the three way catalytic converter, and the exhaust pipe A to the exhaust manifold.

Exhaust Pipe "A" Removal
pic 7

16. Remove the exhaust pipe A.

CAUTION: Replace the exhaust gasket and self-locking nuts when you reinstall the pipe.

Gear Box Mounting Bolts Removal

pic 8

17. Remove the steering gearbox mounting bolts and holder.
18. Remove the left tie-rod end, then slide the tie rod all the way to the right side.

Gear Box Removal
pic 9

19. Slide the gearbox right so that the left tie rod clears the bottom of the rear beam, then remove the gearbox assembly.

CAUTION: Be careful not to bend or damage the four power steering lines when removing the gearbox assembly.

_____________________________________________

1991 Honda Accord L4-2156cc 2.2L SOHC
Installation
Vehicle Steering and Suspension Steering Steering Gear Service and Repair Removal and Replacement Power Steering Installation
INSTALLATION
1. Slide the rack all the way to the right.
2. Pass the right side of the steering gearbox assembly above and through the right side of the rear beam.
3. Raise the left side of the steering gearbox assembly above and through the left side of the rear beam.

Installing Rack Assembly
pic 10

4. Insert the pinion shaft up through the bulkhead.

Installing Steering Rack Clamps
pic 11

5. Install the holder with arrow mark facing forward and tighten the gearbox mounting bolts.

Connecting Pipes And Fittings
pic 12

6. Connect the four lines to the valve body unit, using flare nut wrenches.

A: From pump: 14mm wrench 38 N-m, 3.8 kg-m, 28 lb-ft
B: To oil cooler: 12mm wrench 13 Nm, 1.3 kg-m, 9 lb-ft
C: To reservoir: 17mm wrench 29 Nm, 2.9 kg-m, 21 lb-ft
D: To power steering speed sensor: 12mm wrench 13 Nm 1.3 kg-m, 9 lb-ft

Installing Exhaust "A" Pipe
pic 13

7. Install the exhaust pipe A with a new gasket, then tighten the new self-locking nuts and bolts.

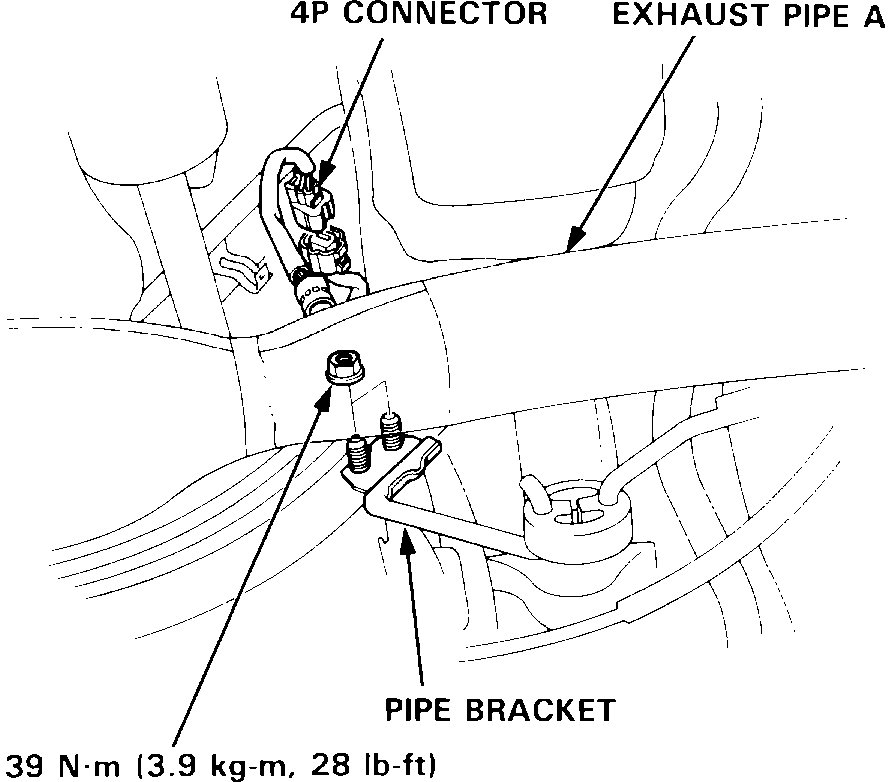
Pipe Bracket And HO2S Connector Installation
pic 14

8. Install the pipe bracket.
9. Connect the 4P connector to the heated oxygen sensor. (EX, SE only)

Connect Tie Rod Ends
pic 15

10. Reconnect the tie-rod ends to the steering knuckles, tighten the castle nut to the specified torque, and install new cotter pins.

CAUTION: Before tightening the steering joint bolts, pull up the steering joint to make sure that the steering joint is fully seated. Torque the castle nut to the lower torque specification, then tighten it only far enough to align the slot with the pin hole. Do not align the nut by loosening.

Checking Cable Reel Centering
pic 16

11. Center the steering rack with its strokes.
12. Make sure that the cable reel of the airbag system is centered as follows:

Turn the steering wheel left approx. 150 degrees, and check that the cable reel is in position with the indicator.
If the cable reel is centered, the yellow gear tooth lines up with the alignment mark on the cover.
Return the steering wheel right approx. 150 degrees to position the steering wheel to the straight ahead position.

Steering Joint Installation
pic 17

13. Slip the lower end of the steering joint onto the pinion shaft (line up the bolt hole with the groove around the shaft) and loosely install the lower bolt.

NOTE:
Connect the steering shaft and pinion with the cable reel and steering rack centered.
Be sure that the lower steering Joint bolt is securely in the groove on the steering gearbox pinion.

14. Adjust the front toe.

NOTE: If the steering wheel and rack are not centered, reposition the serrations at lower end side of the steering joint.

Steering Joint Cover Installation
pic 18

15. Install the steering joint cover with the clamps and clips.
16. Fill the system:

Fill the reservoir with new power steering fluid.
Start the engine and let it run at idle, then turn the steering wheel from lock-to-lock several times to bleed air from the system.
Check the fluid again, and add more if necessary.

Gearbox Shield Installation
pic 19

17. Check the gearbox for leaks, then reinstall the gearbox shield.
18. Reinstall the front wheels.

___________________

Let me know if this helps or if you have other questions.

Take care,
Joe
Was this
answer
helpful?
Yes
No
Saturday, April 4th, 2020 AT 10:20 PM
Tiny
JORDAN013
  • MEMBER
  • 55 POSTS
Thank you very much, I appreciate the help. Do you have any tips to remove the self locking nuts in picture 7? The ones I have on there have been difficult to get out and they are a 14mm.
Was this
answer
helpful?
Yes
No
Saturday, April 4th, 2020 AT 10:34 PM
Tiny
JORDAN013
  • MEMBER
  • 55 POSTS
Also where can I find the gasket and self locking nuts?
Was this
answer
helpful?
Yes
No
Saturday, April 4th, 2020 AT 10:35 PM
Tiny
JACOBANDNICKOLAS
  • MECHANIC
  • 108,300 POSTS
As far as the self locking nuts, they are designed in a way that prevents them from vibrating loose. They will be snug the entire way off, so don't be surprised. As far as gaskets, any parts store should have them. Well, you may have to order them, but they are not uncommon.

Let me know if you need anything.

Take care,
Joe
Was this
answer
helpful?
Yes
No
Saturday, April 4th, 2020 AT 10:48 PM
Tiny
JORDAN013
  • MEMBER
  • 55 POSTS
Thank you. If I were to use a torch and a ratchet and socket combo after heating the nuts, would that be a good method?
Was this
answer
helpful?
Yes
No
Saturday, April 4th, 2020 AT 10:54 PM
Tiny
JACOBANDNICKOLAS
  • MECHANIC
  • 108,300 POSTS
Without seeing how badly they are corroded, it's hard to say. What I would do is simply take a wire brush and clean the nut and as much of the threads you can, spray it with a good penetrating oil, and then see if it will come off. Allow the penetrating oil some time to penetrate. This is something I would normally do the day before I start. That way the penetrating oil has over night to work.

As far as a torch, when you heat, the idea is for it to expand the part being heated so it comes loose. Because of the size of the bolts / nuts, I don't think you will be able to only heat the nuts. Instead, everything will get hot and expand.

Try what I said first. If it doesn't work, then heat one at a time. While it is still hot, tap gently on the bolt. Make sure not to damage the threads. And then see if they come off when hot.

Let me know how it works. Also, the nuts, unless in bad condition, shouldn't need replaced.

Take care,
Joe
Was this
answer
helpful?
Yes
No
Saturday, April 4th, 2020 AT 11:14 PM
Tiny
JORDAN013
  • MEMBER
  • 55 POSTS
Awesome, I will get some penetrating oil tomorrow and hopefully that will do the trick. Thank you for everything and I will keep you updated should any issues arise.
Was this
answer
helpful?
Yes
No
Saturday, April 4th, 2020 AT 11:15 PM
Tiny
JACOBANDNICKOLAS
  • MECHANIC
  • 108,300 POSTS
You are very welcome. Let me know how things turn out for you.

Joe
Was this
answer
helpful?
Yes
No
Sunday, April 5th, 2020 AT 5:30 PM
Tiny
JORDAN013
  • MEMBER
  • 55 POSTS
I got the 3 nuts loosened on the down pipe from exhaust manifold and I used pb blaster, a ratchet with extension and a jack handle for leverage. In picture 7, there is a bracket that has 4 nuts that hold the exhaust, 2 that go to the block and 2 that go to the exhaust from bracket. I was able to get the 2 12 mm that go to bracket off and one of the 14 mm nuts that go to the engine (the left side one) off, but the inner one is still on there pretty dang tight and I can’t get a good grip on it nor do I have enough room to get socket w extension and use jack handle for leverage. Would I be able to separate the exhaust from the lower part of that’s bracket (the 2 12 mm bolts) without having to remove the top 2 14 mm bolts going to the block?
Was this
answer
helpful?
Yes
No
Sunday, April 5th, 2020 AT 9:10 PM
Tiny
JACOBANDNICKOLAS
  • MECHANIC
  • 108,300 POSTS
Hi,

I attached a picture and circled 2 bolts. First, is this the part you are referring to? If it is, as long as you remove the two I circled, the exhaust will come off. The upper bolts simply mount the bracket to the vehicle.

Let me know.
Joe
Was this
answer
helpful?
Yes
No
+1
Monday, April 6th, 2020 AT 8:26 AM
Tiny
JORDAN013
  • MEMBER
  • 55 POSTS
Yes, those are the ones. Great, thank you. For some reason that last one in the block was being a pain but I am glad to know I can remove the exhaust without having to take the last one out from the block. I will provide updates for when I fully remove the exhaust from manifold and brackets, will have to wait to finish because it has been raining but the rack has been completely separated from brackets and disconnected from lines so it should just drop down when exhaust is disconnected. Thank you for all your help. :)
Was this
answer
helpful?
Yes
No
Monday, April 6th, 2020 AT 8:32 AM
Tiny
JACOBANDNICKOLAS
  • MECHANIC
  • 108,300 POSTS
Happy to help. Let me know when you get to it. If you run into problems or have questions, let me know.

Take care and stay dry.

Joe
Was this
answer
helpful?
Yes
No
Monday, April 6th, 2020 AT 8:35 AM
Tiny
JORDAN013
  • MEMBER
  • 55 POSTS
Hello,

I disconnected the exhaust flange from the manifold but was not able to fully drop it down due to it getting stuck on lower portion of car but it still went down and I was able to disconnect the exhaust from the bracket coming from engine block. This car doesn’t have a resonator but has a pipe instead so I wasn’t able to disconnect the rear portion of the exhaust flange that would typically be able to be disconnected. I proceeded to wiggle the rack and try to get it to drop down while being careful with the lines. I kept messing with the rack and was able to move it to the right a good amount but couldn’t quite get it to drop straight down and pull it out from the driver side after getting it to clear the inner tie rod portion. This rack also seems to have been installed at an angle to the area around the shaft where the shaft connects to the steering wheel was at an angle and not centered as it should have been. After 2 hours of trying to get the rack to lower I realized that I did not remove the exhaust hanger from bracket which I believe is what was stopping me from getting rack to lower on side connecting to wheel. Do you know what size the bolts are for hanger bracket ? I sprayed some pb blaster on it for now and will clean it off tomorrow to try and remove it which hopefully will give me the angle needed. If that doesn’t do the trick I believe I will have to cut the exhaust.
Was this
answer
helpful?
Yes
No
Monday, April 6th, 2020 AT 7:30 PM
Tiny
JACOBANDNICKOLAS
  • MECHANIC
  • 108,300 POSTS
Hangers are usually either 1/2" 3/4" or 14 or 15mm.

Let me know if that helps.

Joe
Was this
answer
helpful?
Yes
No
Monday, April 6th, 2020 AT 8:15 PM
Tiny
JORDAN013
  • MEMBER
  • 55 POSTS
Thank you, I will try tomorrow after I get it cleaned and let the penetrating oil soak in.
Was this
answer
helpful?
Yes
No
Monday, April 6th, 2020 AT 8:33 PM
Tiny
JACOBANDNICKOLAS
  • MECHANIC
  • 108,300 POSTS
Happy to help. Let me know how things turn out for you.

Take care,
Joe
Was this
answer
helpful?
Yes
No
Tuesday, April 7th, 2020 AT 9:31 AM
Tiny
JORDAN013
  • MEMBER
  • 55 POSTS
I can’t seem to find a socket and ratchet or wrench to fit on the buts for exhaust hanger bracket, very difficult angle. Any tips?
Was this
answer
helpful?
Yes
No
Tuesday, April 7th, 2020 AT 11:39 AM
Tiny
JORDAN013
  • MEMBER
  • 55 POSTS
Also, what is this part? I’ve seen other videos of rack removal but haven’t seen this one and it was crooked and not centered before I got to the rack.
Was this
answer
helpful?
Yes
No
Tuesday, April 7th, 2020 AT 11:41 AM
Tiny
JACOBANDNICKOLAS
  • MECHANIC
  • 108,300 POSTS
Are these the bolts? See pic 1. They look like they are either a 14mm or 15mm. As far as getting them, the left one doesn't look too bad, but the right will require a box end wrench because there isn't enough room for a ratchet.

As far as the second pic, what is that attached to or mounted to? I can't determine location.

Let me know.
Was this
answer
helpful?
Yes
No
Tuesday, April 7th, 2020 AT 6:11 PM
Tiny
JORDAN013
  • MEMBER
  • 55 POSTS
Yes, those are the bolts, thank you, I will try to get the bottom w box wrench and the top one should be easier but it is a bit tight. The second picture is right below the steering wheel where the shaft would connect to the steering wheel. I see the boot that goes on shaft connecting to the steering wheel, rack is almost out but that area I circled confused me a bit because the shaft from rack runs through there and it is causing me to have to pull the rack out at a weird angle and it is crooked so I am not sure if I need to replace it when the rack is out or simply readjust it?
Was this
answer
helpful?
Yes
No
Tuesday, April 7th, 2020 AT 7:27 PM

Please login or register to post a reply.

Sponsored links