You didn't know what you were in for when you asked how a master cylinder works.
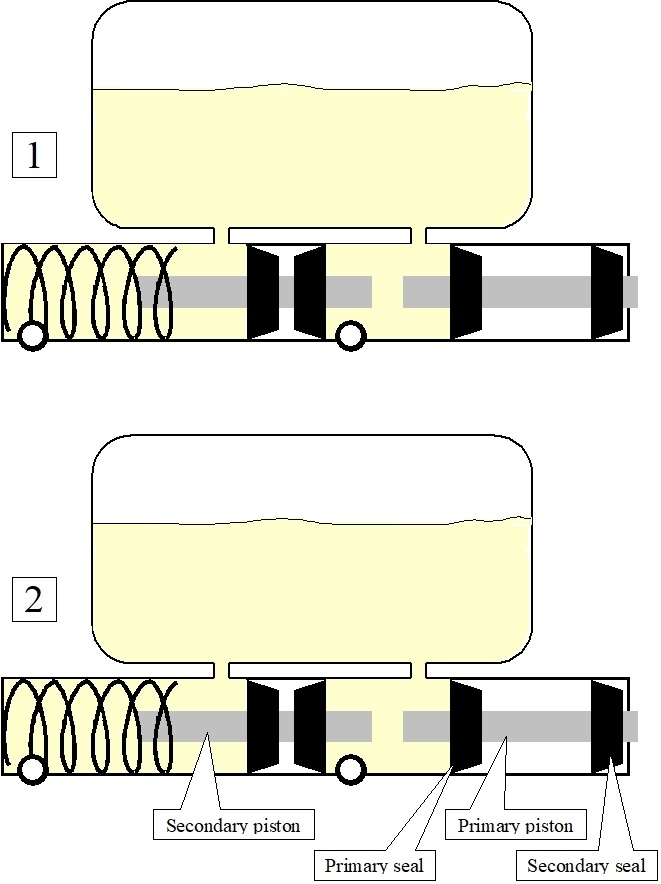
The first drawing shows the dual master cylinder at rest. Dual systems have been required since the late 1960s. If a leak develops in one half of the hydraulic system, You'll still have the other half that works, but with reduced stopping power.
The important parts are listed in the second drawing. The primary piston is the one pushed on by the brake pedal through a push rod and / or power booster assembly. The primary and the secondary pistons each have a primary and a secondary rubber lip seal.
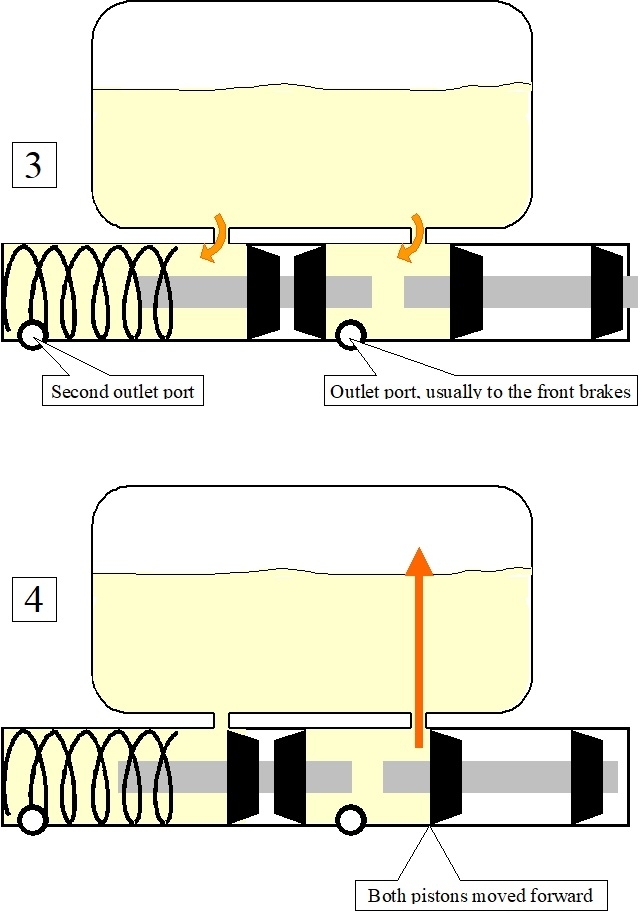
The pistons are still at rest in the third drawing. The orange arrows show where brake fluid runs into the cylinder bore through a pair of "replenishing" ports. They're also called the "return" ports where the brake fluid returning from the wheels flows back up into the reservoir. If a bleeder screw at a wheel is opened, gravity can draw brake fluid down through the replenishing port, through the chamber ahead of the primary piston, then out the port and down to the wheel. Gravity-bleeding is the best way to bleed brakes, but it takes the most time.
The excitement starts in the fourth drawing. The primary piston has moved forward about 1/4" That equates to roughly the first one inch of brake pedal travel. The brake fluid looks for the easiest place to go. That is up through that replenishing port into the reservoir. This produces a potential clue when diagnosing the system. If you watch in the reservoir with the cap removed, you will usually see the spurt of fluid jump up when a helper presses hard and fast on the brake pedal. When you don't see that spurt of fluid, it is possible the primary lip seal is torn. It will leak internally, meaning the fluid can bypass that seal and not become pressurized. There will already be fluid between the primary and secondary seals. The secondary seal prevents fluid from being lost to the power booster or from running out in front of it.
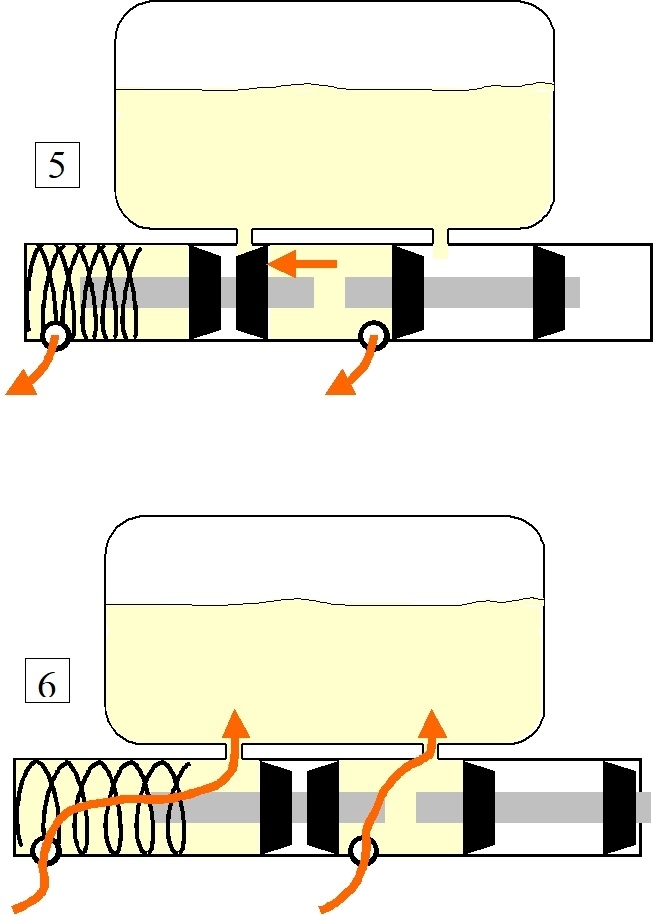
In the fifth drawing, the brake pedal has been pushed a total of roughly two inches. The primary seal on the primary piston has moved just past the replenishing port. At this point the brake fluid is trapped and can't go back up into the reservoir. As the pedal and piston continue to move, pressure builds forcing the fluid to go two places. The first is out the port to one pair of wheels. The second is it pushes the secondary piston forward by pushing on its primary seal. As that piston moves, its secondary seal has also moved past its replenishing port, so that fluid is trapped and now is pressurized and will get pushed down to its two wheels. There is no mechanical connection between the primary piston's secondary seal and the secondary piston's primary seal. Brake fluid is all there is to push on the secondary piston.
Very little volume of brake fluid is needed to apply front brake calipers. When the vehicle has rear drum brakes, there is quite a bit of fluid needed to push the shoes out to the brake drums. A different part of the story has to do with the "metering" or "hold-off" valve in the front brake circuit. That valve is in the combination valve mounted under and near the master cylinder. It delays the application of the front brakes until the rear shoes can catch up and are ready to apply. The rear shoes are being pushed out against their return spring tension.
When the brake pedal is released, the rear shoes returning under spring tension cause that brake fluid to rush back to the master cylinder. That fluid, in part, pushes the pistons back and the brake pedal. As rear shoe linings wear, they adjust automatically so the same volume of fluid is always needed. Front disc brake pads adjust differently. As the linings wear, they get pushed out further and further over months and years. The pistons in the calipers get pushed out to take up the microscopic amount needed to stay in contact with those pads. Brake fluid had pushed those pistons out. With each application and pad wear, slightly less brake fluid goes back up to the master cylinder. Over time the pistons in the master cylinder would not get push back all the way, leaving the brake pedal sitting lower than normal. To address that, the spring in the front of the cylinder also pushes the pistons back. Due to slightly less fluid coming back, a little enters the chambers from the reservoir, through the replenishing ports.
This leads to another clue. As the disc brake pads wear, more and more brake fluid fills in behind the pistons in the brake calipers. No fluid has been lost, but the level in the reservoir will have gone down a lot. Experienced mechanics know if there is no external leak, low fluid in the reservoir means the disc pads are in need of inspection and most likely replacement. This is one fluid that must not be topped off during other routine services like oil changes. When new, thicker brake pads are installed, the pistons in the calipers must be manually retracted to make room for them. Doing that pushes all that brake fluid back up into the reservoir, bringing the level back up to "full". If anyone had added fluid previously, it's going to overflow and make a mess. Worse, brake fluid eats paint, so it must be washed off with water right away.
Defects
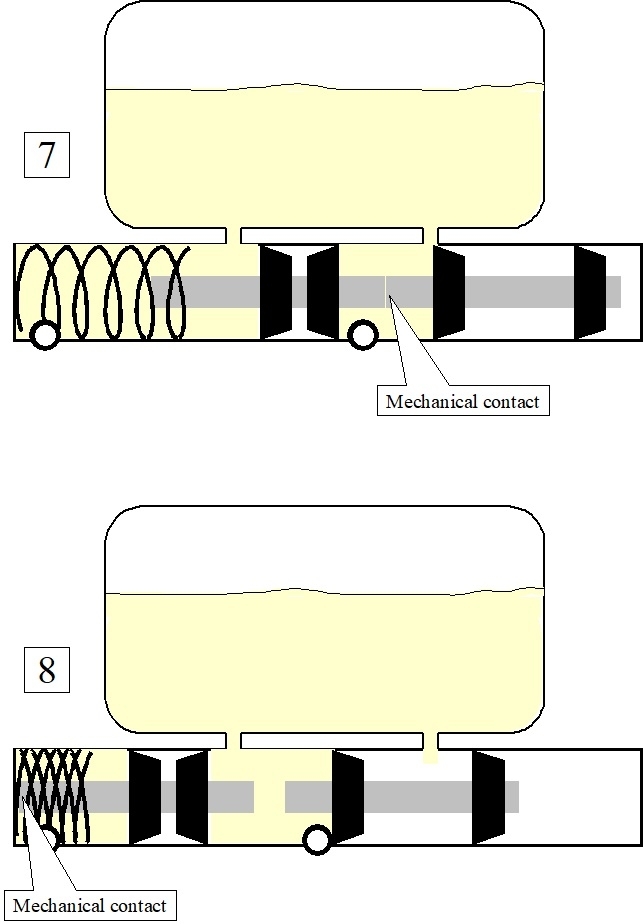
In the seventh drawing, a major leak has developed such as a ruptured flexible hose or a rusted steel line. No pressure can develop with that leak so the brakes for those two wheels don't apply. Brake fluid is lost from that leak, and it can't push the secondary piston forward. The brake pedal will move a lot further than normal, then the primary piston will make a mechanical contact with the secondary piston, and move it to apply that half of the brakes. That mechanical contact is a backup design that allows some stopping power when a leak occurs. This also works when an internal leak develops inside the master cylinder.
If a leak develops in the secondary circuit, there's no pressure built up in the front section, (left side in the eighth drawing). That piston moves so easily, no fluid pressure can build up in the primary chamber either. Here again, the brake pedal will move much further than normal, but as the brake fluid in between pushes the secondary piston as far as possible, it runs into the end of the bore, inside the spring, then can't go any further. Now any further pedal movement will build fluid pressure in the primary circuit.
For a long time one hydraulic circuit operated the front brakes and the other circuit ran the rear brakes. The rear brakes do roughly 30 percent of the stopping, so there was still significant stopping power when the front system fails. With front-wheel-drive cars and their transmissions in the front, more weight is on the front tires, so the front brakes do closer to 80 percent of the stopping. With the loss of the front brakes, stopping distances increased too much with only rear working brakes. To address that, most cars today use a "split-diagonal" hydraulic system. That puts one front brake and the opposite rear brake on the same hydraulic circuit. A loss of either circuit leaves you with 50 percent of normal stopping power.
When someone disables one front brake on an older rear-wheel-drive car, the braking force on the working side is not balanced, or offset by that on the other side. Applying the brakes like that will tear the steering wheel out of your hands, and can be strong enough to break your wrist. The suspension geometry and alignment angles were modified to prevent that on front-wheel-drive cars. Chrysler has that so well perfected, the only way to know there's a problem is by the red "Brake" warning light on the dash. For most other brands, at most you might see a little wiggle in the steering wheel when first applying the brakes, but the vehicle will stop in a straight line.
That brings us to the second valve in the combination valve called the "pressure differential valve". It slides in a small bore, and normally remains centered. Each hydraulic circuit applies fluid pressure to one end of that valve. When a leak or defect occurs in one half of the system, the normal pressure that builds on the working side isn't offset on the other side, so that valve shifts to one side. In doing that, it turns on a switch that turns on that red "Brake" warning light. Very often that warning light also turns on when the brake fluid level is low in the reservoir, and when the parking brake is applied. For vehicles with anti-lock brakes which is an add-on option to this "base" brake system, the yellow "ABS" warning light usually turns on too. That is because the ABS Computer sees the red light, but doesn't know why it's on. If there's a leak in the hydraulic system, the ABS will be unable to perform its function, so the computer turns the system off.
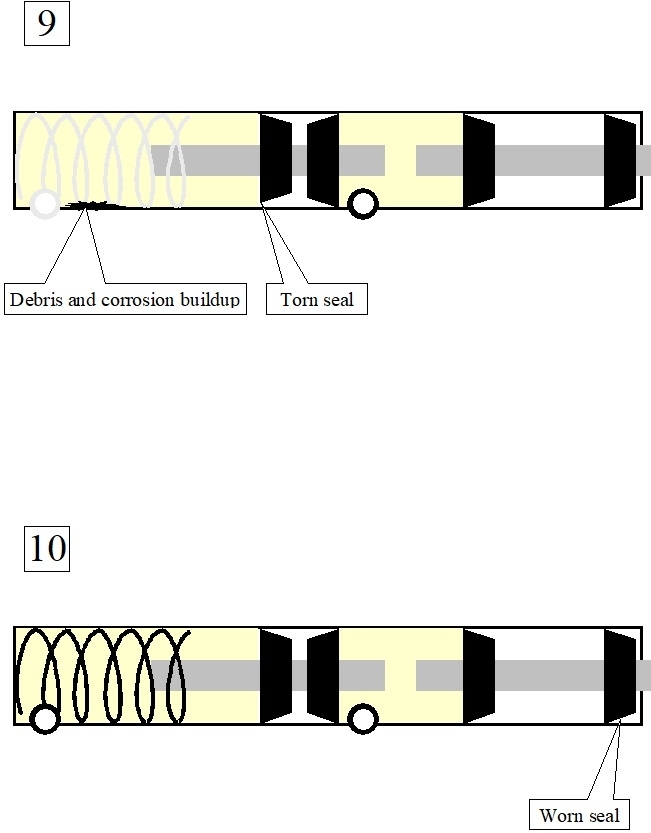
Drawing nine shows a common failure that is easy to prevent. Most brake systems will work fine for many years before a problem develops. In that time, the brake pedal never travels more than halfway to the floor. The pistons and seals in the master cylinder travel back and forth in the upper halves of their bores. Thanks in part to the moisture that sneaks in, crud and corrosion develops in those areas where the seals don't normally run. At some point a leak will develop, then the pistons travel further and a seal gets run over that crud. That can rip the seal resulting in a slowly-sinking brake pedal. That often takes two or three days to show up. This is internal leakage inside the master cylinder. No brake fluid is lost, but none gets pushed down to the two wheels in that half of the system.
Kits with new pistons and seals are available for most applications to repair the master cylinders, but they are not a good value. This should only be done when it's the only option. A professionally-rebuilt master cylinder with a warranty commonly costs less than the kit. Also, since the late 1970s, most master cylinders are made of aluminum. That corrodes very quickly except the bores are treated with an anodized coating. That's an electroplating that seals the metal. Metal tools or hones used to remove the debris will remove some of that coating. Another failure will occur very soon.
This same ripped seal is often caused by improper bleeding techniques. Inexperienced mechanics, and even some service manuals will tell you to bleed the brakes with a helper to push the brake pedal to the floor. That's fine with a new master cylinder that's less than about a year old. That corrosion hasn't had time to develop yet. After reading that, most people follow those instructions with older master cylinders that do have that corrosion, and that's when the problem occurs.
The same thing can happen when just replacing the front brake pads. The pistons in the calipers have to be pressed in to make room for those new, thicker pads. The final step is to pump the brake pedal multiple times to run the pistons back out to adjust them. The first couple of pumps can allow the brake pedal to reach the floor, then there's that ripped seal. To prevent that, never push the brake pedal more than halfway to the floor.
A less-common failure in drawing ten has to do with a leaking secondary seal on the primary piston. Brake fluid ahead of it is never under pressure, but if it sneaks out, it causes an elusive loss of fluid that's hard to identify. With a power brake booster, the fluid could run down in front of it, but it's more likely to run inside, then get sucked into the engine and burned. The level will drop in the reservoir very quickly, as in days or weeks. When there's no power booster, brake fluid can run down the firewall under the hood, or inside onto the carpet.
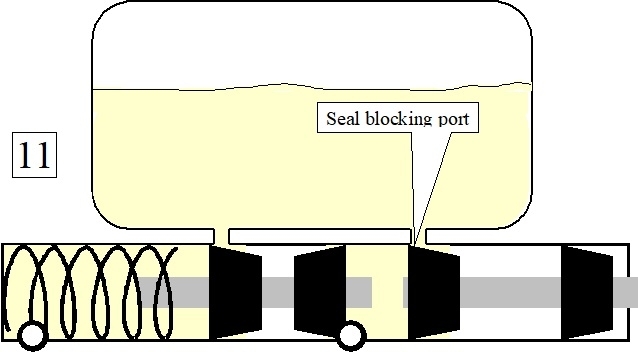
I saved the worst disaster for the last. That's when the brake fluid gets contaminated with a petroleum product. In one case over a dozen vehicles received expensive damage when a pressurizing brake "bleeder ball" was refilled with four gallons of fresh brake fluid using a funnel that was wiped out after being used with engine oil. The light residue in the funnel was enough to cause problems. Brake fluid is a glycol product. Rubber parts compatible with brake fluid are not compatible with petroleum products including engine oil, transmission fluid, penetrating oil, axle grease, and power steering fluid. Those products will make the seals grow and become mushy and slimy.
The first symptom takes about a week to show up. That will be dragging brakes that won't release. That can get bad enough that the vehicle won't move, or the brakes will get really hot. Often the brakes will gradually release after a few hours, but they'll lock up again right away on the next drive cycle.
What happens when the seals expand is they grow past the fluid return ports to the reservoir. That's in the 11th drawing. Brake fluid is trapped ahead of the seals the same as when the brake pedal was pressed that first inch. Pressing the pedal may push a little more fluid down the lines, but then it can't release back into the reservoir. That keeps the brakes applied while driving. They heat up very quickly, then that heat migrates through the calipers and into the brake fluid. The fluid expands, and since it can't expand into the reservoir, it applies those brakes even harder.
This contamination flows throughout the entire hydraulic system, so all the rubber parts must be replaced. That includes the rubber flex hoses, front calipers, rear calipers or wheel cylinders, master cylinder, cap, and combination valve. This can also include the optional anti-lock brake hydraulic controller, and the height-sensing proportioning valve. Due to the wide variation in loading front-to-rear with pickup trucks and minivans, that valve is commonly used to vary the percentage of braking power that goes to the rear brakes. The valve will be near the rear axle and has rubber o-rings in it. If any rubber part is not replaced, the contamination will leach out of it and recontaminate the new brake fluid.
The steel lines must be flushed and dried too before installing the new parts.
Another sure sign of fluid contamination is the rubber bladder seal under the reservoir cap will be blown up and mushy. They normally bulge out after the level in the reservoir goes down, but when contaminated, you won't be able to pop it back into place.
You can get dragging brakes to release by crawling underneath and opening the bleeder screws on the front calipers. That usually isn't necessary on the rear wheel cylinders. Be aware there are other causes of dragging brakes that respond to opening the bleeder screws, so don't assume from this the brake fluid is contaminated.
On cars, the proportioning valve is the third one inside the combination valve assembly. The two lines leaving the master cylinder run into that brass block, then the lines leave and run to the wheels. Combination valves typically aren't used with anti-lock brakes. During braking, the vehicle's weight shifts to the front tires. With less weight on the rear, it becomes too easy for those brakes to lock up. Once a certain braking effort is reached, the proportioning valve limits or stops further fluid pressure buildup to the rear brakes. This part of the combination valve is very carefully calibrated to provide balanced braking, front to rear. Options that cause a difference in weight distribution will require a different combination valve. Most commonly that includes engine size, with or without air conditioning, and / or a heavy duty cooling system.
There's one last valve to be aware of. That is a "residual check valve". It sits in the master cylinder's port when that line feeds drum brakes. Wheel cylinders have a pair of rubber lip seals very similar to those in a master cylinder. The direction the lips face hold brake fluid in, but nothing prevents anything else from going in past them. In particular, when barometric pressure goes up overnight, that can, in effect, put the brake fluid into a slight vacuum. That difference in pressure makes air want to sneak in past the seals. To prevent that, the residual check valve closes to maintain ten pounds of fluid pressure on that part of the system. Ten pounds is much too low to cause the shoes to start to apply. They stay fully retracted under return spring tension. Pressurized brake fluid returning from the drum brakes causes the fluid to flow back up into the reservoir like normal, until that pressure gets down to ten pounds. That's when the valve closes and keeps the fluid at that pressure.
When older cars and trucks had drum brakes on all four wheels, there was a residual check valve in each port in the master cylinder. By the early 1970s just about every vehicle had disc brakes on the front. There must not be a residual check valve used with them. Ten pounds of fluid pressure will keep a caliper applied enough to cause a dragging brake. When a car model was available with rear disc or rear drum brakes, such as my Dynasty, you must be sure to buy the correct replacement master cylinder. Often the manufacturer will design something different to ensure the wrong part doesn't get installed. You'll often find, for example, the port diameters are different and the soft metal nuts on the steel lines won't fit with the wrong master cylinder.
At this point it doesn't make sense to leave anything out. The last thing to be aware of is the diameter of the master cylinder's bore, and the diameters of the caliper pistons and wheel cylinder pistons are all very carefully matched during the design of each specific car model. That is how they achieve a comfortable brake pedal that doesn't require too much travel, and it maintains that front-to-rear balance which makes all four tires stop with equal braking forces. As far back as the 1980s it was common during a professional brake job to rebuild calipers and wheel cylinders along with hanging the new linings on the car. "All in One" kits included the rear shoes, hold-down and return spring hardware, and new seals for the wheel cylinders. Ford kits in particular came with four sizes of wheel cylinder seals. You were to use the one size that matched the old ones being removed. The same shoes could fit a station wagon, a two-door, a four-door model, and one with a larger and heavier engine. A problem could occur when it made more economic sense to replace the entire wheel cylinder. All those different sizes were available and would fit. It was up to the mechanic to buy the correct one. We actually ran into a Pontiac that had an irritating brake pull since the car was new. At its second brake job was when it was discovered two different diameter wheel cylinders had been installed at the factory. We made the owner very happy that day when we put the right part on and solved that pull.
Let me know if I left anything out. There are a lot more parts to the brake system story, especially when it comes to performing a proper brake job.
Images (Click to make bigger)
Thursday, April 13th, 2023 AT 4:16 PM