No compression in one of the cylinders

Tiny
CARSTUD
  • MEMBER
  • 2000 VOLVO S80
  • 2.9L
  • 6 CYL
  • 2WD
  • AUTOMATIC
  • 150,000 MILES
So I went to replace cam seals as my aunt had asked me too. Once I finished replacing seals and belts and tensioner and VVT hub I have found that one cylinder does not have compression. I was really hoping I didn't end up wrecking a valve. Its an inline 6 with no codes coming up. Idles rough and has a minor ting like a lifter. But this car does not have lifters it has tappets.

Could the wrong tappet make no compression?
Or am I in for a treat and have to pull the head for a valve job?

Any help would be greatly appreciated.
Tuesday, November 17th, 2020 AT 4:13 PM

5 Replies

Tiny
KASEKENNY
  • MECHANIC
  • 18,907 POSTS
We need to do a cylinder leakage test to tell us where you are losing the compression. Basically you just set number 1 to TDC on the compression stroke and then put a small amount of compressed air to the cylinder and then find where the air is escaping. Here is a video that will help with this:

https://www.youtube.com/watch?v=WHli-wLy9_o

Once you get the air going to the cylinder, you want to listen to the following areas which will tell us what is leaking.

1. Air intake would mean the intake valve
2. Exhaust pipe would mean an exhaust valve
3. Oil fill cap would mean piston rings
4. Coolant bottle for bubbling would be the head gasket

Let us know what you find and we can go from there. Thanks
Was this
answer
helpful?
Yes
No
+1
Tuesday, November 17th, 2020 AT 5:21 PM
Tiny
CARSTUD
  • MEMBER
  • 3 POSTS
Yes, thank you. I thought of that after I posted this. I forgot about this test cause I don't use it very often. I found air coming out of the intake manifold to conclude bent intake valve's. Thank you very much for your quick response. Helped verify my findings.
Was this
answer
helpful?
Yes
No
Tuesday, November 17th, 2020 AT 9:45 PM
Tiny
ASEMASTER6371
  • MECHANIC
  • 52,797 POSTS
Good morning,

I attached the procedure for removing the cylinder head for you.

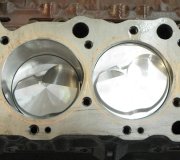
Make sure you check for any piston damage as well. If there is, that piston will have to be replaced.

Roy

Removing the cylinder head

Note! The illustrations in this service information are used for different model years and / or models. Therefore there may be some variation. However, the essential information in the illustrations is always correct.

Removing the camshaft variable valve timing unit / timing belt pulley

imageOpen In New TabZoom/Print

Camshafts with variable valve timing

Install tool 999 5452 CAMSHAFT ADJUSTMENT TOOL See: Vehicle > Electrical / Mechanical Repair > 999 5452 Camshaft Adjustment Tool at the rear of the camshafts.
Remove the plug at the front edge of the variable valve timing unit (Tx 55).
Remove the center screw from the variable valve timing unit (Tx 55).
Carefully pull out the camshaft pulley with the variable valve timing unit.

Camshafts without variable valve timing

Remove the screws.
Pull off the camshaft pulley.
Remove tool 999 5452.
Remove the inner timing cover.

Caution! The camshafts must not be turned when the timing belt has been removed.

Removing the camshaft cover

imageOpen In New TabZoom/Print

Remove the control valve from the variable valve timing unit.
Remove the spark plugs from cylinders 2 and 5.
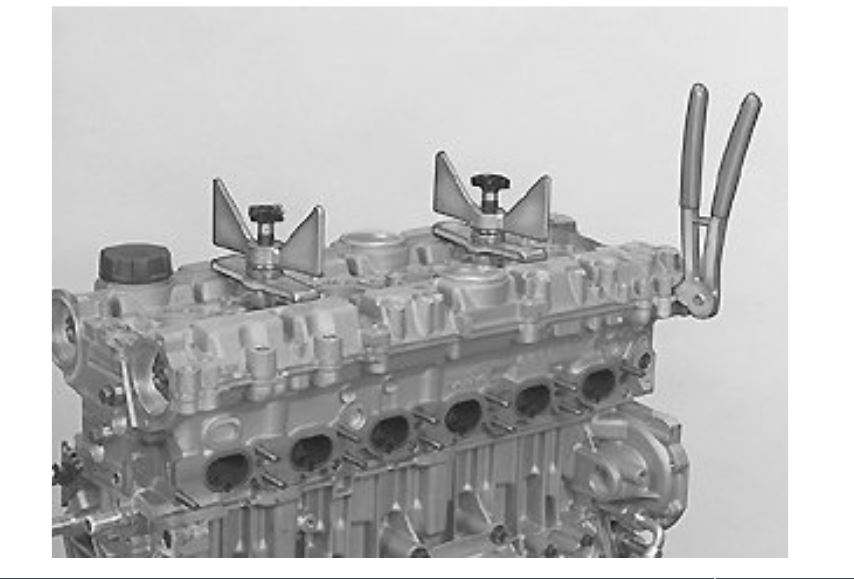
Install 2 tools. Leave a 2-3 mm gap to the camshaft cover. Ensure that the screw in the spark plug well is tightened as far as it will go.
Remove all the screws securing the camshaft cover to the cylinder head.

ImageOpen In New TabZoom/Print

Remove
camshaft cover with pliers 999 5670 Pliers See: Vehicle > Electrical / Mechanical Repair > 999 5670 Pliers at the stop lugs.
Start at cylinder 1 and work alternately backwards
the wing nuts approximately 2 turns.
Repeat the procedure with the pliers.

Remove
tool 999 5454
the camshaft seals at both the front and rear edges
the camshaft cover
the camshafts. Work loose and lift at the same time.

Note! Take care not to damage the thrust washers.

Removing the cylinder head

imageOpen In New TabZoom/Print

Remove the pipe screws for the coolant heated crankcase ventilation at the rear edge of the cylinder head (applies only to B6284T).
Slacken off the screwed joint for the cylinder head. Start at the sides and work alternately towards the center.
Lift out the cylinder head.

Note! Take care not to damage the mating surfaces.
Was this
answer
helpful?
Yes
No
Wednesday, November 18th, 2020 AT 2:16 AM
Tiny
CARSTUD
  • MEMBER
  • 3 POSTS
Thank you. I have the cam locking tool and the liquid sealer and the Volvo maintenance book. Should hopefully go smoothly. Appreciate all your help.
Was this
answer
helpful?
Yes
No
Thursday, November 19th, 2020 AT 10:56 AM
Tiny
ASEMASTER6371
  • MECHANIC
  • 52,797 POSTS
You are welcome.

Let us know if you have any other questions.

Always glad to help.

Roy
Was this
answer
helpful?
Yes
No
Thursday, November 19th, 2020 AT 12:42 PM

Please login or register to post a reply.

Sponsored links