Welcome to 2CarPros.
I just reviewed the wiring schematic for the lighting. Power to both sides (high and low beam) comes from two fuses. However, if high beam works, the fuse isn't the issue. If I had to guess, both bulbs are bad. However, you can check before getting new ones. All it takes is a test light or multi meter. You need to remove the bulb and using a test light or multi meter check to see if there is power to the light socket when the low beams are turned on. If there is, the bulb is bad. If, however, you have HID bulbs, do not use this procedure.
Here are links showing how to use a test light or multi meter. Also, how to check wiring.
https://www.2carpros.com/articles/how-to-use-a-test-light-circuit-tester
https://www.2carpros.com/articles/how-to-use-a-voltmeter
https://www.2carpros.com/articles/how-to-check-wiring
__________________________
Next, here are the directions for replacing the bulbs. I don't know if you have HID or not, so I will provide directions for both. When installing the new ones, make sure your hands don't touch the glass portion of the bulb. The oils from your skin will actually cause the bulb to burn out faster. Additionally, make sure there is no evidence of moisture.
_________________________
Removal
1. Disconnect the negative (-) battery terminal.
2. Remove the front bumper cover.
(Refer to Body - "Front Bumper Cover")
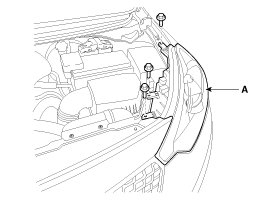
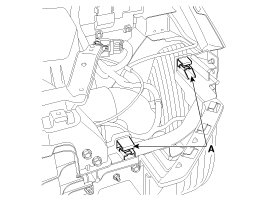
3. Loosening the head lamp mounting bolts (3EA) and disconnect the head lamp connector (B).
Then, remove the head lamp assembly (A).
NOTE:
- Take care not to scratch the head lamp lens or fender.
pics 1 and 2
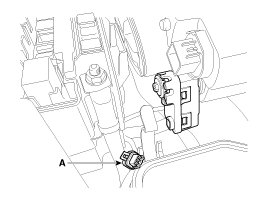
NOTE:
Take care that holding clip (A) is not to be damaged.
pic 3
INFORMATION:
When installing the HID head lamp, disconnect the head lamp leveling actuator connector.
pic 4
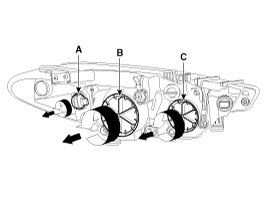
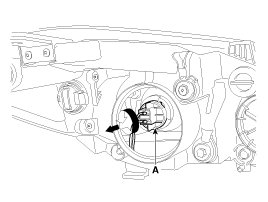
4. Remove the dust caps from the head lamp assembly after turning in the counter clock-wise direction.
pic 5
Head Lamp(low) Bulb
[General Type]
1. Turn the lamp switch off.
2. Disconnect the connector.
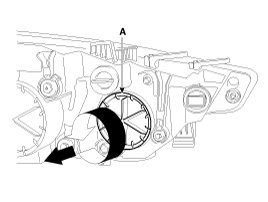
3. Remove the dust cap (A).
pic 6
4. Separate the bulb connector (A) from the head lamp assembly.
pic 7
5. Remove the bulb (A) from the connector.
pic 8
[HID Type]
CAUTION:
Turn the head lamp switch off to avoid high voltage
Be careful not to damage the bulb and use genuine bulbs only
- Do not apply excessive force and fit it correctly.
- Confirm the bulb locking
1. Turn the head lamp switch off.
2. Disconnect the connector.
3. Remove the dust cap (A).
pic 9
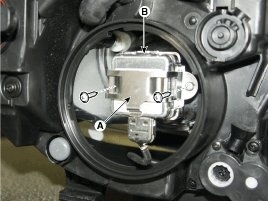
4. Remove the ignitor (A) after loosening the screws.
5. Remove the ignitor and HID bulb (B).
pic 10
Head Lamp(High) Bulb
1. Turn off the lamp power.
2. Disconnect the connector.
3. Remove the dust cap (A).
pic 11
4. Disconnect the connector (A).
pic 12
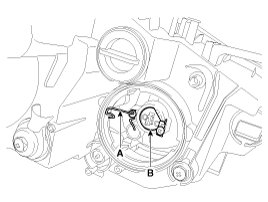
5. Remove the fixing clip (A) and bulb (B).
pic 13
__________________________________
Let me know if I can help.
Take care,
Joe
Images (Click to make bigger)
SPONSORED LINKS
Saturday, April 20th, 2019 AT 8:07 PM