TRANSMISSION
Removal
Notice: All photos are of the 4X4 Sportage. The 4X2 Sportage is similar (unless otherwise noted).
1. Disconnect the cable from the negative battery terminal.
2. Remove the rear portion of the center console:
a. Remove the two screws from the sides of the rear center console.
B. Raise the emergency brake handle.
C. Remove the center console.
3. Unscrew and remove the knob from the shift lever and the transfer lever (4X4 only).
4. Remove the three screws from the front section of the center console. Slide the boots for the shift lever and transfer lever over the levers and remove the console.
5. Remove the dust cover plate by removing five nuts and one bolt.
6. Remove the shift lever:
a. Separate the shift lever bracket from the transmission housing by removing four bolts.
B. Tilt the shift lever bracket back to allow acc to the shift linkage.
C. Remove the clip from one end of the link pin attaching the shift lever to the control rod extension.
D. Remove the pin from the shift lever and separate the lever from the control rod extension.
7. Remove the transfer lever (4X4 only):
a. Remove five bolts.
B. Remove the transfer lever.
C. Remove the clip from the vehicle speed sensor cable.
8. Raise the vehicle and support it with safety stands.
9. Remove the oil level/filler plug and transmission drain plug. Drain the transmission oil into a suitable container.
10. Remove the transfer case drain plug and drain the transfer case oil into a suitable container (4X4 only).
11. Mark both mating flanges at each end of the front and rear driveshafts for alignment reference during reinstallation.
12. Remove the front driveshaft by removing four bolts at the front differential and four bolts at the transfer case (4X4 only).
13. Remove the rear driveshaft:
a. 4X4 - Remove four bolts fat the rear differential flange and four bolts at the transfer case flange.
B. 4X2 - Remove four bolts at the rear differential flange, and two bolts at the center support. Pull driveshaft out of tailshaft housing.
14. Disconnect the back-up light switch connector, the 4WD indicator switch connector (4X4), and the vehicle speed sensor connector. Remove the wiring harness from its clips and move it out of the way.
15. Remove the crankshaft position sensor from the transmission housing:
a. Remove one bolt and pull the sensor straight out from the housing.
B. Move the sensor aside.
Caution: Do not disconnect the clutch line
16. Remove two bolts from the clutch release cylinder and carefully move the assembly aside.
17. Remove the front exhaust pipe bracket:
a. Remove two bolts from the transmission housing.
B. Remove one bolt from the exhaust pipe hanger.
18. Remove five lower front transmission housing bolts.
19. Remove the transfer case side mount (4X4 only):
a. Remove two nuts at the chassis.
B. Remove two bolts at the transfer case.
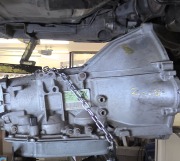
20. Support the transmission assembly, including the transfer case on the 4X4, with a transmission jack.
21. Remove the transmission crossmember:
a. Remove four bolts at each end of the crossmember.
B. Remove two bolts securing the transmission mount to the transmission.
22. Remove the three bolts holding the starter to the front housing.
Notice: One of the bolts has an electrical ground wire attached. Do not disconnect the starter wires or remove the starter from the engine.
23. Secure the transmission assembly, including transfer case on the 4X4, to the transmission jack at the center of the rear cover to ensure proper balancing of the unit when lowering.
24. Remove the remaining clutch housing bolts and then remove the transmission, including the transfer case on the 4X4, from the vehicle.
Installation
1. Secure the transmission, including the transfer case on the 4X4, on the jack so that the rear of the transmission, including the transfer case end on the 4X4, is slightly lower than the front.
2. Raise the transmission and position it at the rear of the engine.
3. Route the wire harness along the right side of the transmission then route the vehicle speed sensor wire over the top of the transmission just to the rear of the control rod extension.
4. While raising and leveling the transmission, push it forward to engage the engine dowel pins.
5. Secure the transmission to the engine with one 14mm bolt at the right side of the transmission.
6. Reinstall the exhaust bracket onto the left side of the transmission with one 14mm bolt.
7. Reinstall the six 14mm transmission to engine mounting bolts.
Tightening torque: 80 ft. Lbs. (108 Nm).
8. Reinstall the five 10mm transmission to engine mounting bolts.
Tightening torque: 29 ft. Lbs. (39 Nm).
9. Reinstall the 6mm transmission to engine mounting bolt.
Tightening torque: 5 ft. Lbs. (7 Nm).
10. Bolt the exhaust pipe to the exhaust pipe bracket using one bolt.
Tightening torque: 20 ft. Lbs. (27 Nm).
11. Reinstall the three starter motor bolts and the ground wire.
Tightening torque: 29 ft. Lbs. (39 Nm).
Notice: The starter may require adjustment after installation. If required, loosen the starter bolts and rotate the starter slightly to provide proper clearance.
12. Reinstall the transmission crossmember mount to the rear of the transmission using two bolts.
Tightening torque: 80 ft. Lbs. (108 Nm).
Notice: Use the transmission jack to help position and align the crossmember to the chassis.
13. Reinstall the transmission crossmember to the chassis using eight bolts.
Tightening torque: 32 ft. Lbs. (44 Nm).
14. Remove the transmission jack.
15. Reinstall the crankshaft position sensor using one bolt.
Tightening torque: 5 ft. Lbs. (7 Nm).
16. Connect the 4WD indicator light switch connector (4X4 only).
17. Connect the back-up light switch connector.
18. Connect the vehicle speed sensor connector.
19. Route the wiring harness through the clips at the back-up light switch location and at the transfer case to the transmission joint.
20. Reinstall the clutch release cylinder using two bolts.
Tightening torque: 29 ft. Lbs. (39 Nm).
Notice: Refer the alignment marks on the mating flanges at each end of the driveshaft for correct orientation of the shaft to the differential/transfer case.
Caution: Misalignment of the flanges can cause damage to the transfer case, engine, or driveshafts.
21. Install the rear driveshaft:
a. 4X4- Reattach the driveshaft to the rear differential flange with four bolts, and to the transfer case flange with four bolts.
B. 4X2- Insert forward end of driveshaft into the extension housing and attach center support to chassis with two bolts. Connect shaft to rear differential flange with four bolts.
Tightening torque: 27 ft. Lbs. (36 Nm).
22. Reinstall the front driveshaft using four bolts at the transfer case and four bolts at the front differential (4X4 only).
23. Add approximately 1.3 quarts. (1.25L) of API GL 4 or GL-5, 75W-90 transmission oil into the oil filler hole of the transmission. The oil level should be even with the bottom of the filler hole.
24. Install a new washer onto the transmission oil filler plug and reinstall into the case.
Tightening torque: 22 ft. Lbs. (30 Nm).
25. Reinstall the transfer case side mount (4X4 only):
a. Reinstall the transfer case side mount to the transfer case using two bolts.
Tightening torque: 38 ft. Lbs. (52 Nm).
B. Reinstall the transfer case side mount to the chassis using two nuts.
Tightening torque: 38 ft. Lbs. (52 Nm).
26. Lower the vehicle.
27. Reinstall the shift lever assembly:
a. Reinstall the ball end of the shift lever into the fork of the control rod extension.
B. Reinstall the link pin into the control rod extension fork and reinstall the clip onto the link pin.
C. Reinstall the shift lever bracket onto the transmission housing using four bolts.
Tightening torque: 18 ft. Lbs. (24 Nm).
28. Install the transfer lever assembly (4X4 only):
a. Route the vehicle speed sensor cable through the harness clip and install the clip onto the forward bolt.
B. Reinstall the transfer lever assembly using five bolts.
Tightening torque: 18 ft. Lbs. (24 Nm).
29. Drop the dust cover plate over the handle of the shift lever (and transfer lever on the 4X4).
30. Secure the dust cover plate using five nuts and one bolt.
Tightening torque: 15 ft. Lbs. (20 Nm).
31. Reinstall the front console using the three screws.
32. Reinstall the knob onto the shift lever (and onto the transfer lever on the 4X4).
33. Reinstall the rear console using the two screws.
34. Reconnect the cable to the negative battery terminal.
SPONSORED LINKS
Saturday, March 21st, 2009 AT 10:52 AM