Hi,
Replacing front brake pads and rotors really isn't that difficult. When you do it yourself, make sure to get lifetime replacement parts so you never have to pay again.
You can expect front brakes to last approximately 25,000, but that will vary based on terrain and driving habits.
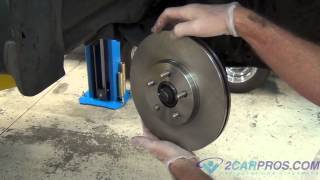
First, here is a link that shows in general how it's done with a video of the job being done on a similar car the process is the same. You can use this as a guide and video.
https://youtu.be/SD9-MLW6Yts
and
https://www.2carpros.com/articles/how-to-replace-front-brake-pads-and-rotors-fwd
Here are the directions specific to your vehicle. The attached pics correlate with the directions.
____________________________________________
2011 Chrysler 300 V6-3.6L
Front
Vehicle Brakes and Traction Control Disc Brake System Brake Pad Service and Repair Removal and Replacement Brake Pads - Installation Front
FRONT
INSTALLATION
NOTE: Perform steps 1 through 7 on each side of the vehicle.
1. Completely retract caliper piston(s) back into bore(s) of caliper. To do so:
a. Remove fluid reservoir cap.
b. Use hand pressure or a C-clamp may be used to retract piston, first placing a wood block over piston(s) before installing C-clamp to avoid damaging piston(s).
c. Install fluid reservoir cap.
pic 1
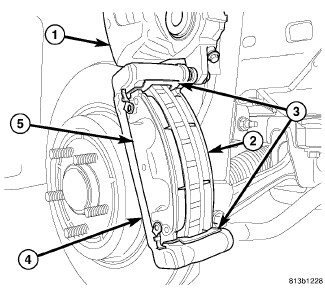
2. If removed, attach anti-rattle clips (3) to upper and lower abutments of adapter (4).
3. If equipped, remove the film from the brake pad double sticky isolator.
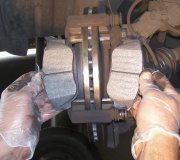
4. Install NEW inboard (2) and outboard (5) brake pads on caliper adapter (4). NEW Inboard and outboard pads are interchangeable.
5. Push caliper guide pins into caliper adapter to clear caliper mounting bosses when installing.
6. Rotate caliper downward, aligning upper mounting boss with lower guide pin.
pic 2
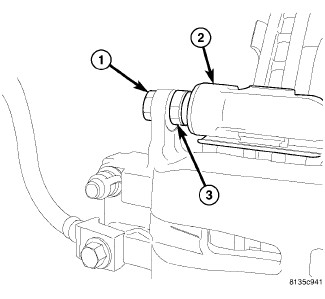
7. Install Upper caliper guide pin bolt (1). While holding guide pin (3) stationary tighten bolt to 60 Nm (44 ft. lbs.).
pic 3
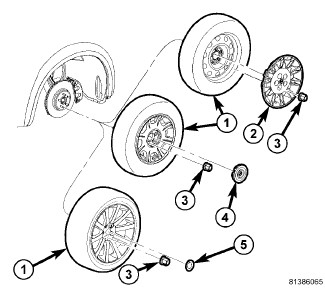
8. Install tire and wheel assembly (1) See: Wheels and Tires > Removal and Replacement > Tires And Wheels - Installation.
9. Lower vehicle.
10. Pump brake pedal several times to set pads to caliper and brake rotor.
pic 4
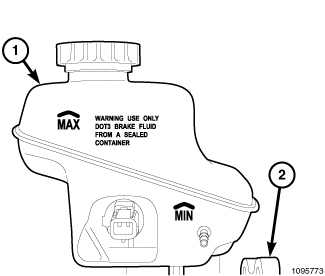
11. Check and adjust brake fluid level in reservoir (1).
CAUTION: When NEW brake pads have been installed, keep in mind that braking effectiveness might be somewhat reduced during the first brake applications following installation.
CAUTION: A burnish procedure must be performed anytime NEW brake pads or rotors are installed on a vehicle equipped with the Police Package. This procedure is particularly important in situations where high speed pursuit is a possibility. It is recommended that the procedure be performed by the Police agency operating the vehicle so it can be performed in a safe controlled environment. This information is covered in the Police Package Owners Manual Supplement which was supplied when the vehicle was originally delivered.
12. Road test vehicle making several stops to wear off any foreign material on brakes and to seat brake shoes. If the vehicle is equipped with the Police Package, a burnish procedure must be followed (Refer to preceding Caution).
________________________
Rotor Replacement
Removal
2011 Chrysler 300 V6-3.6L
Front
Vehicle Brakes and Traction Control Disc Brake System Brake Rotor/Disc Service and Repair Removal and Replacement Brake Rotor - Removal Front
FRONT
FRONT
NOTE: Before proceeding, See: Brakes and Traction Control > Technician Safety Information > Warning See: Brakes and Traction Control > Vehicle Damage Warnings > Base Brakes .
1. Raise and support vehicle. See: Maintenance > Components
pic 5
2. Remove wheel mounting nuts(3), then tire and wheel assembly (1).
NOTE: In some cases, it may be necessary to retract caliper piston in its bore a small amount in order to provide sufficient clearance between shoes and rotor to easily remove caliper from knuckle. This can usually be accomplished before mounting bolts are removed, by grasping rear of caliper and pulling outward working with guide pins, thus retracting piston. Never push on piston directly as it may get damaged.
pic 6
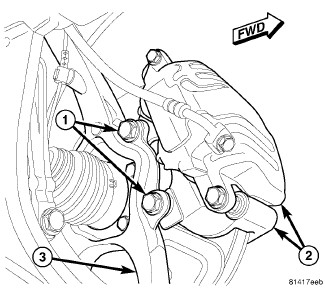
3. AWD - Remove two bolts (1) securing disc brake caliper and adapter (2) to knuckle (3).
4. AWD - Remove disc brake caliper and adapter (2) from knuckle (3) as an assembly. Hang assembly out of way using wire or a bungee cord. Use care not to overextend brake hose when doing this.
pic 7
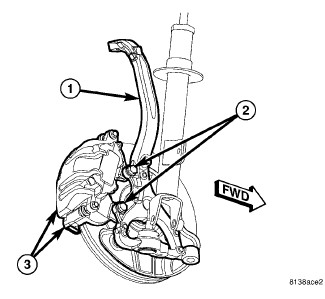
5. RWD - Remove two bolts (2) securing disc brake caliper and adapter (3) to knuckle (1).
6. RWD - Remove disc brake caliper and adapter (3) from knuckle (1) as an assembly. Hang assembly out of way using wire or a bungee cord. Use care not to overextend brake hose when doing this.
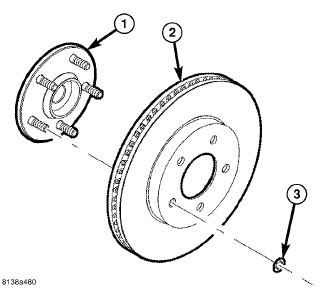
pic 8
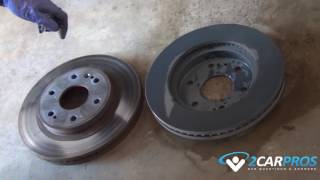
7. Remove any clips (3) retaining brake rotor (2) to wheel studs.
8. Slide brake rotor (2) off hub and bearing (1).
___________
Install
2011 Chrysler 300 V6-3.6L
Front
Vehicle Brakes and Traction Control Disc Brake System Brake Rotor/Disc Service and Repair Removal and Replacement Brake Rotor - Installation Front
FRONT
FRONT
pic 9
NOTE: Inspect brake pads before installation See: Brake Pad > Procedures > Front .
1. Clean hub face (1) to remove any dirt or corrosion where rotor mounts.
2. Install brake rotor (2) over studs on hub and bearing.
pic 10
NOTE: New caliper mounting bolts should be used because they come with a lock patch of thread locker on them. If reusing caliper mounting bolts, ensure the bolts and threads are clean of any leftover adhesive and apply Mopar(R) Stud N' Bearing Mount Adhesive or equivalent.
3. AWD - Install disc brake caliper and adapter assembly (2) over brake rotor.
4. AWD - Install NEW mounting bolts (1) securing caliper adapter (2) to knuckle (3). Tighten bolts to 95 Nm (70 ft. lbs.).
pic 11
5. RWD - Install disc brake caliper and adapter assembly (3) over brake rotor.
6. RWD - Install mounting bolts (2) securing caliper adapter (3) to knuckle (1). Tighten bolts to 95 Nm (70 ft. lbs.).
7. Install tire and wheel assembly (1) See: Wheels and Tires > Removal and Replacement > Tires And Wheels - Installation.
8. Lower vehicle.
9. Pump brake pedal several times to ensure vehicle has a firm brake pedal before moving vehicle.
10. Check and adjust brake fluid level in reservoir (1) as necessary.
CAUTION: If NEW brake rotors or pads have been installed, keep in mind that braking effectiveness might be somewhat reduced during the first brake applications following installation.
CAUTION: A burnish procedure must be performed anytime NEW brake pads or rotors are installed on a vehicle equipped with the Police Package. This procedure is particularly important in situations where high speed pursuit is a possibility. It is recommended that the procedure be performed by the Police agency operating the vehicle so it can be performed in a safe controlled environment. This information is covered in the Police Package Owners Manual Supplement which was supplied when the vehicle was originally delivered.
11. Road test vehicle making several stops to wear off any foreign material on brakes and to seat brake shoes. If the vehicle is equipped with the Police Package, a burnish procedure must be followed (Refer to preceding Caution).
_______________________________
I hope this helps Let me know if you have other questions.
Take care and God Bless,
Joe
Images (Click to make bigger)
SPONSORED LINKS
Monday, June 28th, 2021 AT 7:58 PM