1990 GMC Sierra Pictorial diagram of Heater Core Removal

Tiny
CMSGTSMITH
  • MEMBER
  • 1990 GMC SIERRA
  • 6 CYL
  • 2WD
  • MANUAL
  • 77,000 MILES
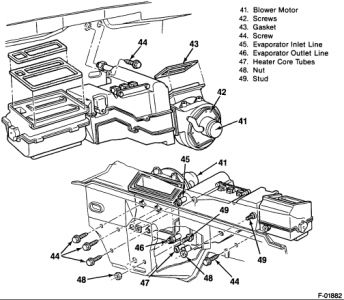
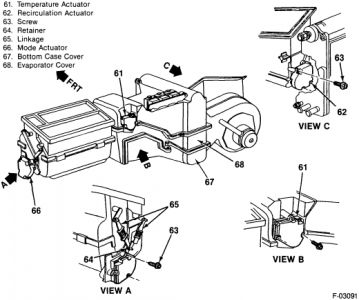
I need to replace the heater core. I cannot find sufficent information for removal and replacement of the core and the plastic box it is contained in. Where are the screws located in the engine compartment? I have already removed the windshield washer reservoir and heater hoses and the glove compartment box. Does a picture of the removal procedure exist? Here are 3 pictures of the truck.Thanks for any information you may be able to help me with.


http://www.2carpros.com/forum/automotive_pictures/464432_DSCF0459_1.jpg


http://www.2carpros.com/forum/automotive_pictures/464432_DSCF0461_1.jpg


http://www.2carpros.com/forum/automotive_pictures/464432_DSCF0457_1.jpg

Friday, January 15th, 2010 AT 12:53 PM

7 Replies

Tiny
RASMATAZ
  • MECHANIC
  • 75,992 POSTS
Hi cmsgtsmith,Welcome to 2carpros and TY for the donation.

HEATER CORE/EVAPORATOR REPLACEMENT


https://www.2carpros.com/forum/automotive_pictures/12900_gmcheater1_1.jpg


https://www.2carpros.com/forum/automotive_pictures/12900_gmcheater2_1.jpg


REMOVE OR DISCONNECT

1.Battery ground cable.
2.Coolant from the radiator.
3.Refrigerant from the system.
4.Coolant overflow tank.
5.Heater hoses from the coil tubes.
6.Refrigerant inlet and discharge lines from the evaporator.
7.Electrical connection to the temperature actuator.
8.Heater case bottom plate.
*Remove the seven screws that hold the bottom cover.
9.Heater core.
*Remove the screws and brackets that hold the core to the case.
10.Evaporator core cover.
*Remove the four screws that hold the cover to the evaporator case.
11.Evaporator core.
*Pull the core out and down from the evaporator case.


https://www.2carpros.com/forum/automotive_pictures/12900_gmcheater3_1.jpg


https://www.2carpros.com/forum/automotive_pictures/12900_gmcheater4_1.jpg


INSTALL OR CONNECT

1.Evaporator core.
2.Evaporator core cover.
*Install the four screws
3.Heater core.
*Install the three screws and bracket.
4.Heater assembly bottom plate.
*Install the seven screws.
5.Electrical connection to the temperature activator.
6.Refrigerant inlet and discharge lines to the evaporator. TIGHTEN
*Inlet line connection to 41 Nm (30 ft lbs) .
*Discharge line connection to 24 Nm (18 ft lbs) .
7.Heater hoses to the heater core.
8.Coolant overflow tank.
9.Charge system with refrigerant.
*Leak test.
10.Coolant to the radiator.
11.Battery ground cable.
Was this
answer
helpful?
Yes
No
+5
Friday, January 15th, 2010 AT 4:51 PM
Tiny
CMSGTSMITH
  • MEMBER
  • 10 POSTS
I was under the impression that the heater core was separate from the evaperator core. Does the air conditioning freon have to be evacuated and the Accumulator removed to replace the heater core? The seventh screw on the lower part of the case is a different size than the 6 other 9/32 screws and cannot seem to be accessed without pulling the complete unit. Is this correct? Also, the Haynes Manual states that there are 2 screws in the engine compartment that has to be removed. Is this true and if so, where are they located? The heater core I purchased only has the two inlet/outlet lines. Appreciate your response. Chief Smith
Was this
answer
helpful?
Yes
No
+1
Friday, January 15th, 2010 AT 7:37 PM
Tiny
CMSGTSMITH
  • MEMBER
  • 10 POSTS
Also, when I tried to download the answer I was informed that the information could not be downloaded. How am I suppose to take the desk top to the car and connect to the internet to repair the car. I could not read some of the information in the diagrams and could not zoom them. My eyes are not as good as they once were.
Was this
answer
helpful?
Yes
No
+1
Friday, January 15th, 2010 AT 8:08 PM
Tiny
RASMATAZ
  • MECHANIC
  • 75,992 POSTS
What Sierra is this -is it C1500/C2500/C3500, need to verify this I could have given you the wrong info-
Was this
answer
helpful?
Yes
No
+3
Friday, January 15th, 2010 AT 8:52 PM
Tiny
CMSGTSMITH
  • MEMBER
  • 10 POSTS
The model is GMC 1500 and the smaller plastic symbols near the upper part of the door on the cab says SLE with Sierra underneath the SLE. I assume that this is the trim level. I was also looking for some of your personal expertise you have gained in removing and replaceing this core. What problems you had or short cuts that is not listed in the diagram and how to work around them.
Was this
answer
helpful?
Yes
No
+1
Sunday, January 17th, 2010 AT 2:46 PM
Tiny
RASMATAZ
  • MECHANIC
  • 75,992 POSTS
I regret to inform you CMS Smith I have little technical experience on this GMC 1500 what I've submitted was for GMC C1500 w/AC 6cyl 2X4 -the rest were all 4X4 -I've been cross-referencing I don't think I can satisfy your needs thru the internet. At this time I would like for you to request an immediate full refund and once again TY for using 2carpros and protecting our freedom like I did in Vietnam 70-73
Was this
answer
helpful?
Yes
No
+2
Sunday, January 17th, 2010 AT 3:18 PM
Tiny
CMSGTSMITH
  • MEMBER
  • 10 POSTS
Razmataz, I'm not interested in a refund. I was in Nam at Phan Rang and also in Udorn, Thailand, 1972-1973. For your information I got tired of not being able to find information concerning this problem. No one seem to know what they were talking about and the Haynes book was practically useless. I took a look at it today and removed five 9/32 screws in the heater/A/C box bottom and removed it (I also removed the two heater hoses from under the hood previously). Then I removed one screw in the small bracket holding the heater and simply pulled it out. The new one went in very easy. Take care and I wish you the best in your endeavers. P.S. You picked a perfect name for this business. Chief
Was this
answer
helpful?
Yes
No
+7
Monday, January 18th, 2010 AT 6:00 PM

Please login or register to post a reply.

Sponsored links