Fuel leak

Tiny
TVNEWS
  • MEMBER
  • 1993 MERCURY MARQUIS
  • 150 MILES
I have my second fuel line leak in 2 weeks. Shop mechanic repaired the first leak. He tells me if I’m handy I can repair this leak. And he tells me the return line needs to be replaced. I found this new leak is above a frame part where the lines turn from frame rail run to head towards back of engine. I can’t see the lines at that point but I have a lot of gas dripping from the frame and the car is a bit hard to start now. I plan to replace the supply line between the fuel filter and the engine. Right now the car has steal line up to about 8-10 inch from fuel rail quick disconnect. That 8-10 inch is some type of plastic line. Looks like it is somehow pressed over the quick disconnect and over the steal line. I assume this is factory. I have a few questions. What size nylon line should I order ( 5/16 I d? With caliper the o d is 3/8). Can I cut that plastic hose off the quick disconnect and push it into 5/16 nylon and put a hose clamp onto it?

On the other end. At the fuel filter right now I have the old steal line going into a short piece of rubber hose. And it is held by two hose clamps. Then the short hose goes to the fuel filter and is held by hose clamp. Can I push the 5/16 nylon inside the hose like the steal line is now and reuse the hose clamp?

If I can’t use the old quick connect can I get a quick connect that I can put onto nylon line? Also, if can’t put nylon hose into rubber hose at fuel filter how do I connect nylon hose to fuel filter?

If you have part numbers or exact info on the nylon hose I need and connectors that would be great.

Thanks
Dean
Saturday, August 10th, 2019 AT 8:26 PM

3 Replies

Tiny
JACOBANDNICKOLAS
  • MECHANIC
  • 108,244 POSTS
Welcome to 2CarPros.

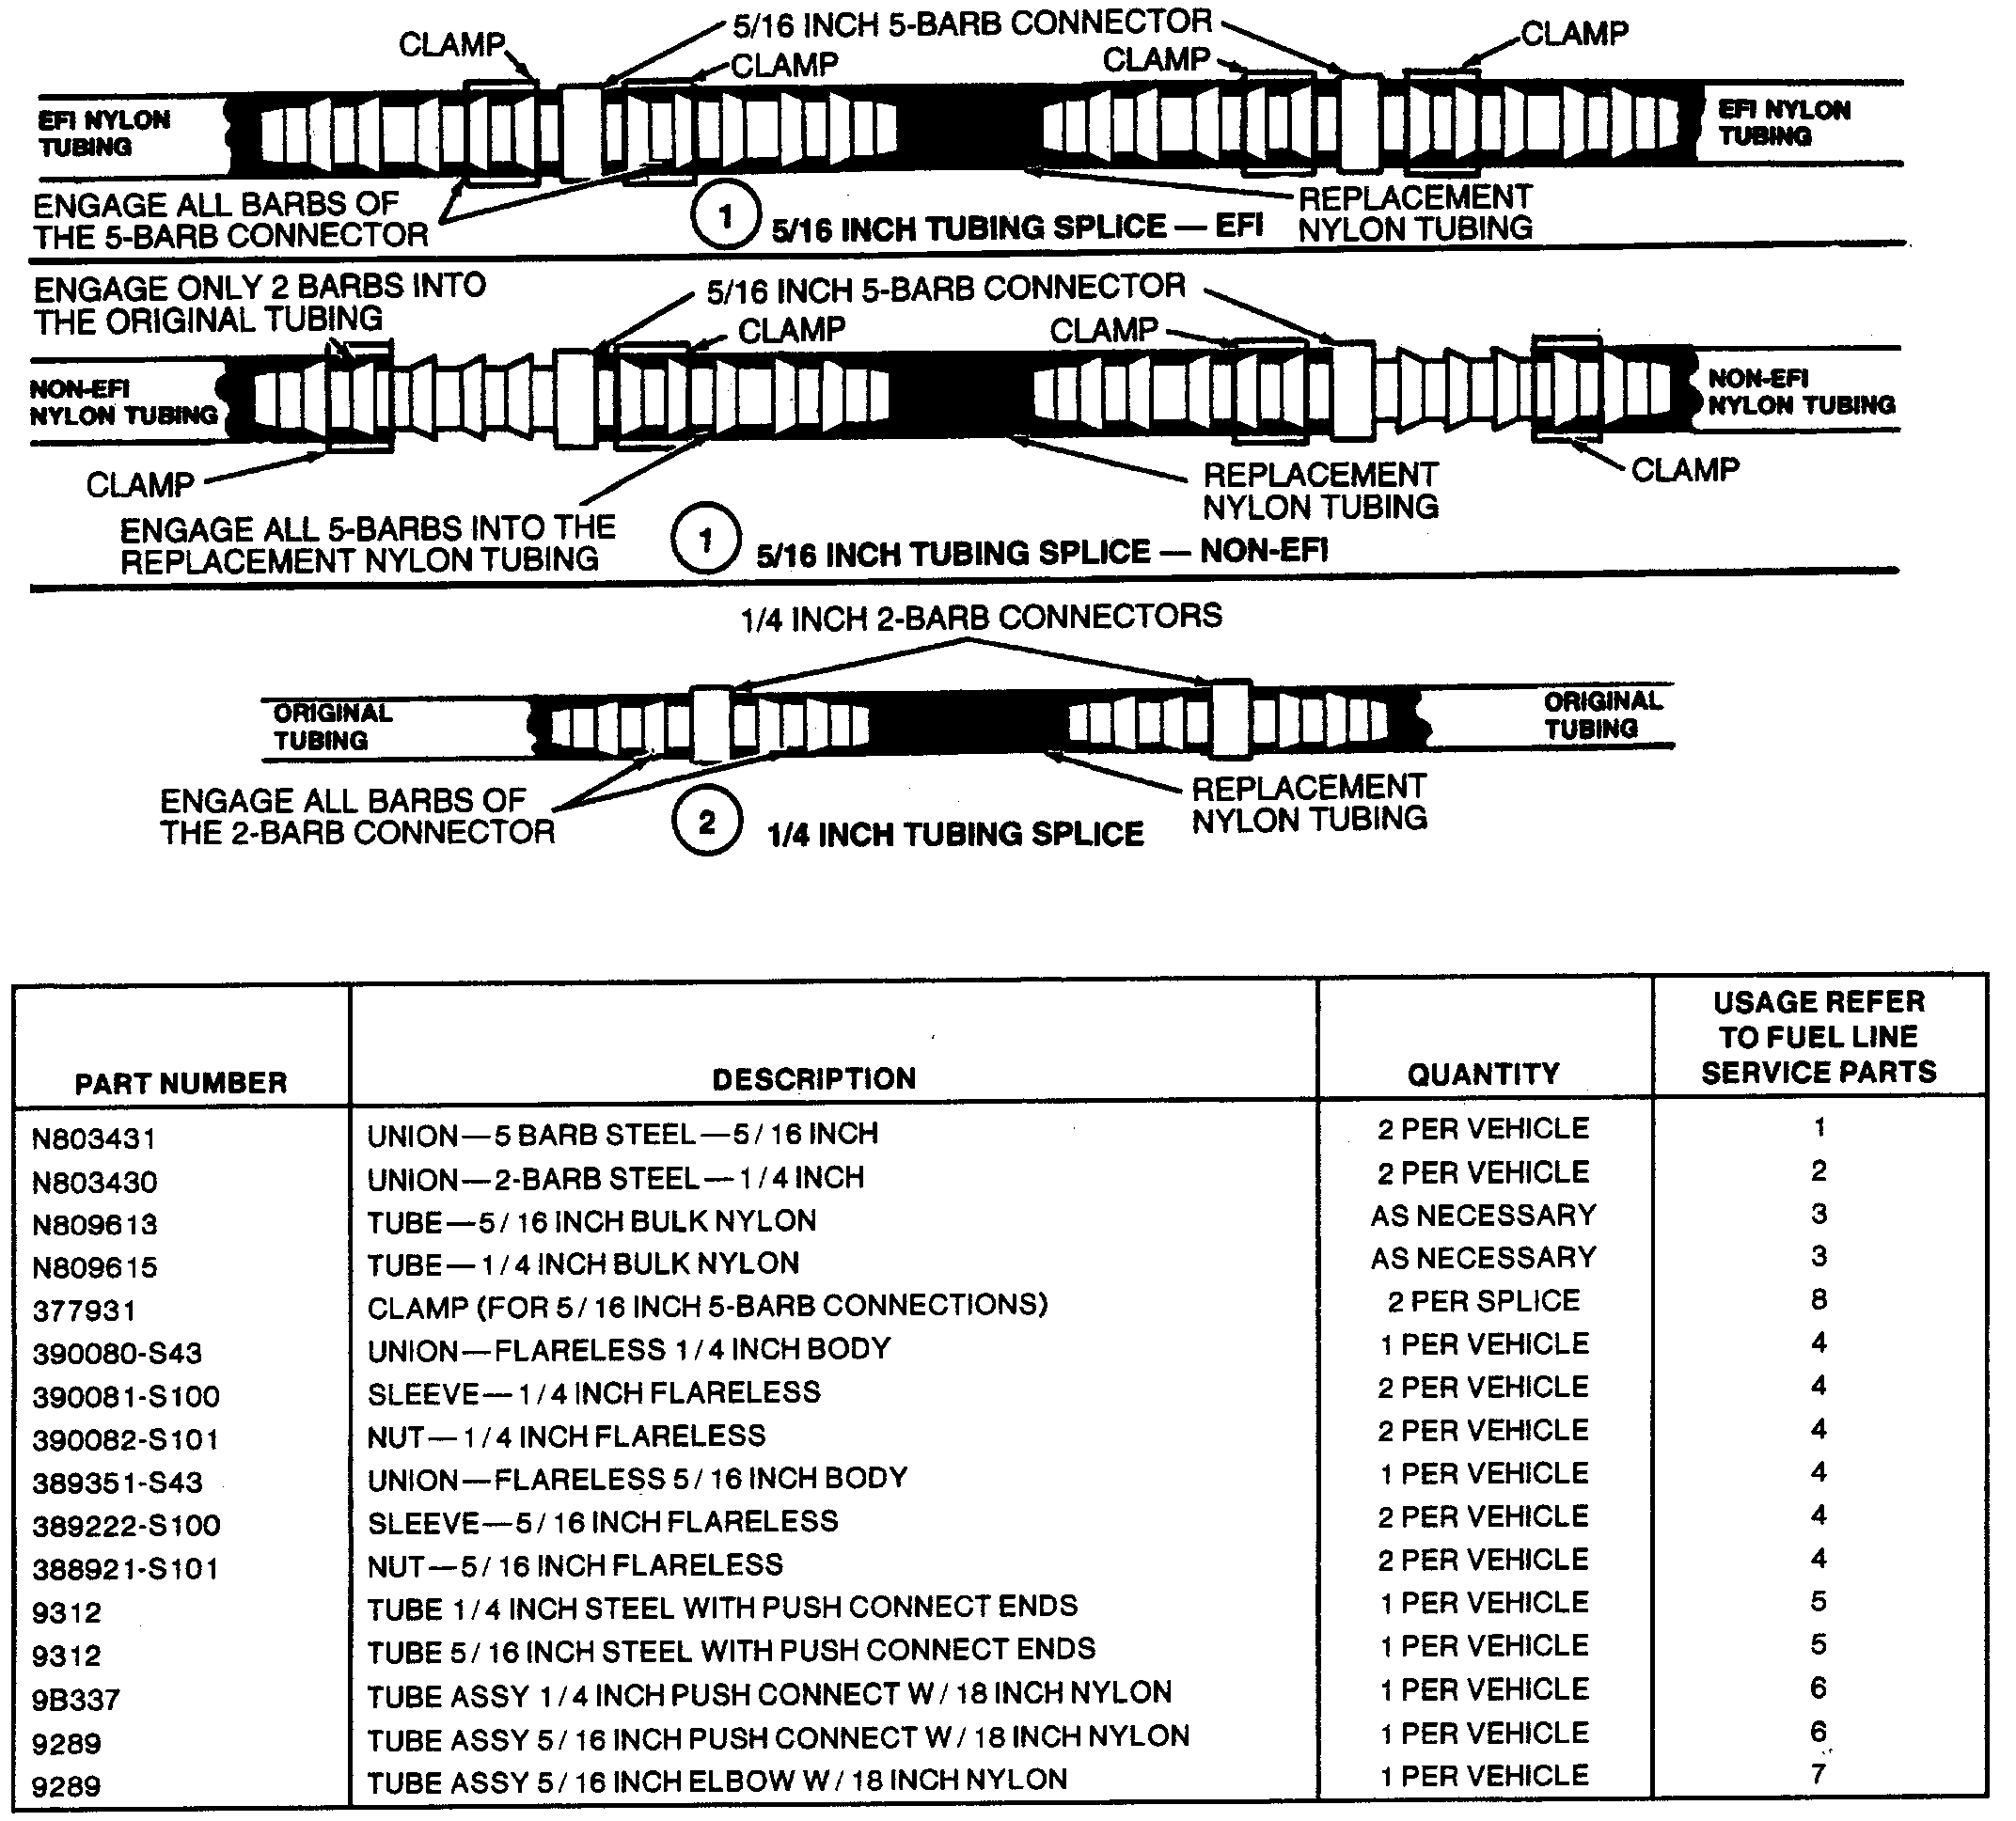
Here are the directions for repairing the nylon fuel line. The attached picture correlates with the directions and show how the connections are made.

_________________________

1. Relieve fuel system pressure. If necessary, drain fuel tank.

2. Cut out damaged section of tubing and retain as a guide.

3. Cut a section of service tubing (type 11 or 12 nylon available in 1/4 and 5/16-inch sizes) to the same length as the damaged section of tubing.

NOTE: To make hand-insertion of the barbed connectors into the nylon easier, the tube end must be soaked in a cup of boiling water for one minute immediately before pushing the barbs into the nylon.

CAUTION: Do not use any heating method except hot water to repair nylon tubing. Temperatures above 100°C (212°F) cause the nylon to soften and will not seal on the barbed connectors. Replacing nylon line in the engine compartment requires heat protective Hypalon hose.

4. Select the proper (1/4 or 5/16-inch) barbed connectors for completing the splice. Two connectors are required for each splice.

5. Install the barbed connectors into each end of the replacement tubing using boiling water.

6. Install clips onto any tubes which might be difficult to access once the final splices are completed.

7. Install four keystone clamps loosely onto the original nylon tubing before beginning Step 8.

8. Complete the splice of the replacement nylon to the original nylon tubing at both ends. Refer to the illustration.

9. Tighten the clamps in the locations shown in the illustration.

10. Install any remaining clips which were removed for service and check that the tubes are secured in the original clips.

11. Fill fuel tank, start engine and check for leaks.

_____________________________

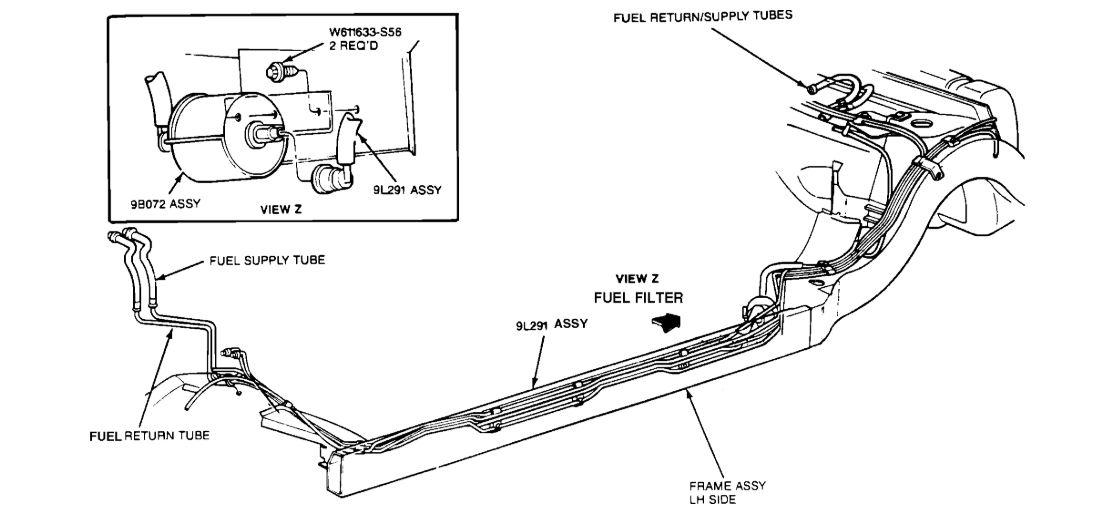
As far as the fuel filter, you can remove those connections and reuse them. There is an O-ring in there, so make sure it isn't damaged.

Here are the directions for the fuel filter. Pic 2 shows the filter, and all lines on the frame.

REMOVAL

1. With engine OFF, relieve the fuel system pressure, refer to Service and Repair / Fuel Pressure Relief Procedure.

2. Raise the vehicle on a hoist.

3. Remove the push connect fittings from both ends of the filter.

4. Remove the fuel filter and retainer from the metal bracket by removing the two retaining bolts.

5. Remove the filter from the retainer. Note the direction of the flow arrow.

6. Remove the rubber insulator rings from the filter.

INSTALLATION

1. Install the rubber insulator rings on the new filter. If the filter moves freely in the retainer, replace the insulator rings.

2. Place the filter in the retainer with the arrow pointing out of the open end of the retainer.

3. Install the fuel filter retainer on the metal bracket and tighten the bolts to 3-5 Nm (27-44 lb in).

4. Install the push connect fittings onto the filter ends.

5. Cycle ignition switch from OFF to RUN position several times, without starting engine. Check for fuel leaks.

6. Lower vehicle.

+++++++++++++++++++++++++++++

Let me know if this helps.

Take care,
Joe
Was this
answer
helpful?
Yes
No
Saturday, August 10th, 2019 AT 8:50 PM
Tiny
TVNEWS
  • MEMBER
  • 2 POSTS
Thank You Joe!

This is a great start.

My first question is, since the supply and return lines both go over a frame member and the gas is pouring down from above that frame I’m not sure which line is leaking.

I did a test and maybe you can tell me if it is valid?

Looking at the engine I see the two lines connected to what I think is fuel rail. I disconnected the line going to the connection favoring the radiator end of the fuel rail. I turned key on and no gas came out of that line. I assume that is return line. Am I right?

Next I disconnected line going to connector on fuel rail favoring the firewall end. Now turned key on and I got gas shooting out but no gas leak under car.

Now I put finger over the open end of this line and the fuel pump turned off in under a second. But in the second I did get a few drops of gas from the frame.

I am assuming that this is the supply line. And I’m assuming the gas takes path of least resistance. With line disconnected and no finger on the ends I assume no leak because the open end is least resistance. But me putting my finger on end and stopping fuel then made the hole in line the least resistance and I got a couple drops on ground before the pump shut down in under a second.

From all of this I am assuming the last line is the supply line and that is line leaking.

Does my test make sense? And am I correct to assume this second line is the supply line? And is this supply line the one leaking?

I’m sure my question is very basic mechanic 101 and sound stupid to you. I’m sorry for my lack of knowledge.

Thanks again,
Dean
Was this
answer
helpful?
Yes
No
Sunday, August 11th, 2019 AT 12:58 AM
Tiny
JACOBANDNICKOLAS
  • MECHANIC
  • 108,244 POSTS
Welcome back, Dean.

Your question isn't stupid at all. And what you did makes total sense. Now, by doing the test, we know which line is which and we know the supply does seem to be the one leaking. With that, I would replace it and get everything back together. We will then know if the return line is good because it will be getting fuel through it.

I have to be honest. If you depend a lot on this vehicle, you may want to just replace both. If one has rusted through, the other won't be far behind. Plus, you will already be working in the same area and have things apart and more accessible. It's just a thought. However, a little preventative work now may save you a big headache in the future.

Let me know how things go for you or if you need anything. And remember, there is no such thing as a stupid question.

Take care,
Joe
Was this
answer
helpful?
Yes
No
Sunday, August 11th, 2019 AT 7:18 PM

Please login or register to post a reply.

Sponsored links