1998 Ford Expedition Shift indicator in wrong spot

1998 FORD EXPEDITION
144,000 MILES • V8 • 4WD • AUTOMATIC
Avatar
CRAIGINPA
  • MEMBER
  • 23 POSTS
The shift indicator has shifted right one spot. When the car is actually in "Drive", the indicator shows "2". This is kind of dangerous, as "N" on the indicator is actually Reverse. Plus, I cannot shift into "1", as the indicator hits the far right side of the dial and does not go far enough to actually engage "1".
Jul 28, 2009 at 6:57 PM
Advertisement
Avatar
CRAIGINPA
  • MEMBER
  • 23 POSTS
In case someone comes across this and wants to know how to fix it...

Remove the trim from above the steering wheel. It's held in by clips. Just pull it off.

Remove the lower trim from below the steering wheel. This requires taking off the two 7mm bolts holding the hood release, the two 7mm bolts holding the e-brake release, the two 8mm bolts on the metal backing plate (located at the very bottom, with a 7mm bolt between them that does NOT have to come out), the 4 additional 7mm bolts that are arranged around the edges, and, if fitted, the relay for the air suspension has to be unsnapped from the metal backing plate (it's down by those 8mm bolts).

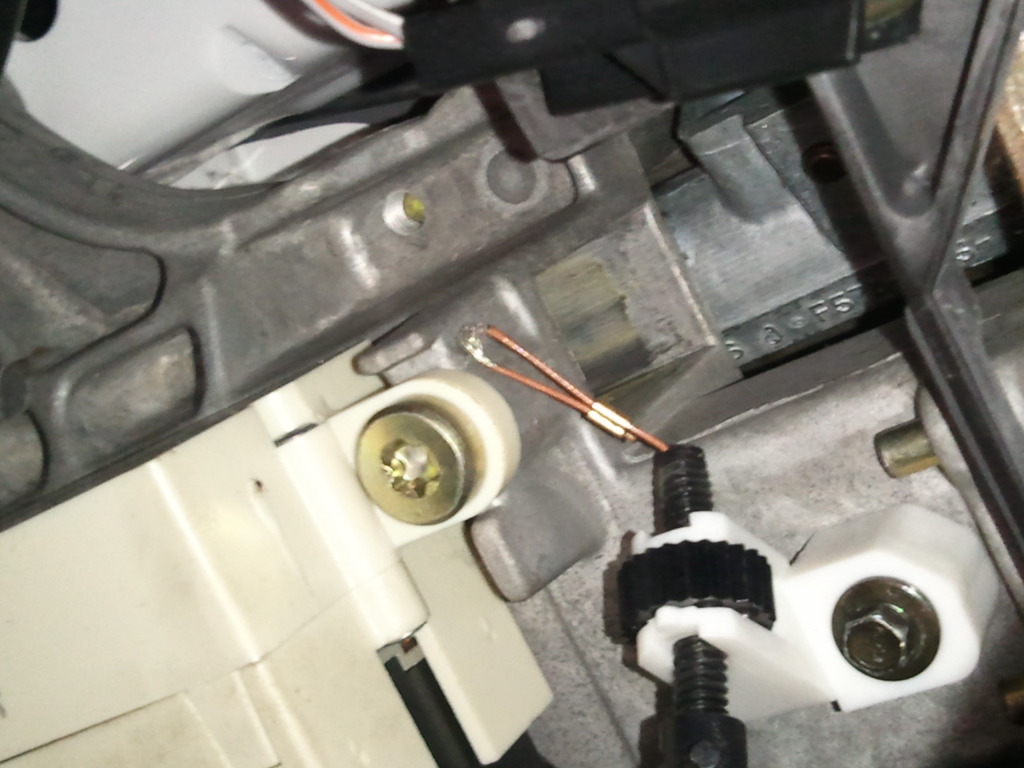
Next to the steering column on the right side is a hooked piece of metal (the prawl) with a thin reddish brown wire attached to it with a loop. When you switch the car on (but don't start the car), hold the brake, and shift the gear selector, you'll see this move up and down. Up is Park. Down is 1.

Following that wire downward, you'll come across a white fitting with a black nut captured in the center of it.

Assuming the white part is intact (both sides around the nut not broken or loose), you merely have to turn the but and observe the indicator going to the correct spot.

If the white part is broken, you have two choices:
1. Buy the replacement part (new, ~$30, used from a u-pull it off virtually any Ford vehicle with column shift, about $1). and refit it: move gearshift to "2", unhook the loop. Remove the white broken piece. Install the new piece, threading the original cable through it, taking care to get the black nut inside the 2 parts of the white piece. Hook the loop back on the prawl. Move the gearshift back to park and then to N. Center the indicator by moving the black nut. Move back to park, then all the way to 2, 3, D, N, R, and back to Park to see that everything detents close to the right spot.

- or -

2. move gearshift to "2", unhook the loop. Pull off the broken white top part. Unscrew the black nut all the way. Extract the cable end from the white part. Put on a second matching nut from your parts drawer, or about 3/8" of washers (you may have to take this apart again if 3/8" is too little or too much). Put the cable back in place. Screw on the black nut to finger tight. Hook the loop back on the prawl. Move the gearshift back to park and then to N. Center the indicator by moving the black nut and your adjusting nut (or re-shim with more or fewer washers). Move back to park, then all the way to 2, 3, D, N, R, and back to Park to see that everything detents close to the right spot.

*TEST* the repair by starting the car and moving it in Reverse and Drive before buttoning everyting up.

Installation of the lower column is the reverse of taking it off. Install the upper column last.

See, wasn't that easy?
Aug 6, 2009 at 7:13 PM
Avatar
TAVYCAL
  • MEMBER
  • 5 POSTS
I had to repair the(copper wire?) cable. I hooked one end onto the spring mechanism inside the indicator. If I pull on the wire it moves the indicator freely. How do I run it back down to connect to the adjuster? Routing? My adjuster thumb wheel looks OK.
Apr 30, 2010 at 6:28 PM
Avatar
MARCELLETTA9
  • MEMBER
  • 3 POSTS
The looped part of the wire on mine is split, is there a way to replace this wire or fix it?
Jul 20, 2011 at 1:31 AM
Avatar
CJ MEDEVAC
  • CAR REPAIR CONTRIBUTOR
  • 11,004 POSTS
A "Field Expedient" Repair would be to use "Super Great Heavy Duty" Fly Fishing line.

A fishing shop could put you onto the right stuff, or your neighbor who always has his boat hook to his truck!

Tie the line just below the crimp

Then form a loop, following the broken loop

Come back down, and once again, tie on below the crimp

Insure your loop is the same length as the original before it broke

LEAVE THE OLD LOOP INTACT---YOUR NEW ONE MAY BREAK LATER--YOU WILL NEED SOMETHING TO GO BY NEXT TIME AROUND!

As you probably already know, the adjustment **** will "Calibrate" your indicator back in, should you be slightly off

Let me know how it works out!

The Medic
Jul 20, 2011 at 2:35 AM
Avatar
CJ MEDEVAC
  • CAR REPAIR CONTRIBUTOR
  • 11,004 POSTS
**** was the "censor" removing my "Could Be" BAD WORD.....I see no point in calling something---something other than what it is, I said the adjustment "K.NOB"!

The Medic
Jul 20, 2011 at 2:50 AM
Avatar
PROTECH1980
  • MEMBER
  • 901 POSTS
Nice work CJ, I still havent figured that out with the sensorship softare and such,... by the way, like the fly line fix, have a good night.
Jul 20, 2011 at 2:55 AM
Avatar
MARCELLETTA9
  • MEMBER
  • 3 POSTS
Thanks so much!!!! we were actually JUST out there trying that but someone wasnt listening to me when I said it needed to be the exact same size as the original loop.(maybe bc hes the "man") Will try that tomorrow in the daylight :D
Jul 20, 2011 at 3:16 AM
Avatar
CJ MEDEVAC
  • CAR REPAIR CONTRIBUTOR
  • 11,004 POSTS
WELL ACTUALLY, I SHOULDA SAID "TOTAL LENGTH" OF THE ORIGINAL LOOP!

WOMEN, YOU CAN'T LIVE WITH 'EM.......AND YOU CAN'T LIVE WITH 'EM!!!

THE MEDIC
Jul 20, 2011 at 3:24 AM
Avatar
CADIEMAN
  • CAR REPAIR CONTRIBUTOR
  • 3,544 POSTS
you will need to replace this prindle cable.
Jul 20, 2011 at 3:32 AM
Avatar
MARCELLETTA9
  • MEMBER
  • 3 POSTS
Would you be able to explain to me how to get the prindle cable off?
Jul 21, 2011 at 6:41 AM
Avatar
CADIEMAN
  • CAR REPAIR CONTRIBUTOR
  • 3,544 POSTS
youll have to remove the speedo head.disacemable and replace it.youll need to pick 1 up at the dealer though.
Jul 21, 2011 at 4:39 PM
Avatar
CJ MEDEVAC
  • CAR REPAIR CONTRIBUTOR
  • 11,004 POSTS
WHAT!!! MY METHOD WAS A FLOP?!

MAMA AND PAPS '86 T-BIRD HAS A PLASTIC COLLAR AROUND THE SHIFTER...IT HAS NO ADJ K.NOB, ROTATING THE COLLAR IS THE ADJUSTMENT.............IT BROKE!

PAP GOTTA NEW ASSEMBLY, FROM THE DEALER (COST UNKNOWN, NOT A FREEBIE BY NO MEANS!---MEGA HEARTACHE INSTALLING THAT PUPPY!-----LATER IT BROKE TOO!

CJ MEDEVAC'S HOSE CLAMP WAS INSTALLED AROUND BROKEN COLLAR IN '95 (I KNOW THIS, BECAUSE HE WANTED TO DRIVE TO THE DR. THE NEXT DAY, DIAGNOSED WITH CANCER WHEN HE GOT THERE)----20 MINUTES TO INSTALL TOPS!------HOSE CLAMP DEALER ONLY MADE ONE SALE (LESS THAN $1.50)........WHAT----A----DEAL!!!!

MAMA STILL DRIVING HER....1ST NEW CAR THEY EVER BOUGHT.

THE MEDIC
Jul 21, 2011 at 4:56 PM
Repair Safety Notice: This information is for general instructional purposes only. Vehicle repair can be dangerous. Verify all information, follow manufacturer service procedures, use proper tools and safety equipment, and consult a qualified repair shop when needed.