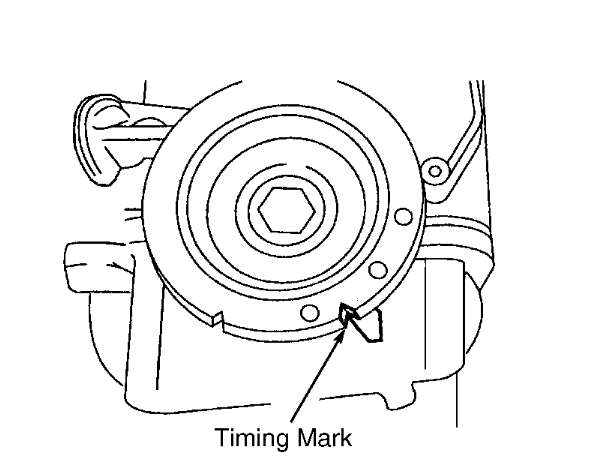
So there is a tool or bar that plugs into the rear of the camshafts and then you set the crankshaft at TDC, please check the images below to see what I mean.
CAUTION: The maximum amount by which the engine management system will adjust the camshaft timing (VCT control unit) is limited to two degrees.
As a result of this an extremely high degree of accuracy is required for any work which affects the valve timing.
Note: The locations of engine mountings and engine support insulators are described looking from the transaxle to the engine.
Note: Operation steps which only apply to certain model variants and therefore do not apply to all vehicles are clearly marked.
Require special tools and knowledge
Removal
1.Disconnect negative battery cable. Raise and support vehicle. Remove right front wheel. Remove engine undercover, if equipped. Remove engine splash shield from right wheelwell.
2.Loosen, but do not remove, water pump pulley bolts. If accessory drive belt is to be reused, mark belt with arrow to indicate direction of rotation. Turn accessory drive belt tensioner clockwise, and remove accessory drive belt.
3.Remove water pump pulley. Remove serpentine belt idler pulley. Using access hole in bottom of transaxle case to stop rotation of engine, remove crankshaft pulley/vibration damper.
CAUTION:Removal of lower timing belt cover is necessary to avoid damage to timing belt.
4.Remove lower timing belt cover. Working from under vehicle, loosen center bolt of left-hand and right-hand engine support insulators 2 turns. DO NOT remove center bolts.
5.Lower vehicle. Remove coolant reservoir tank with hoses attached, and set aside. Disconnect cruise control cable (if equipped) from coolant reservoir.
CAUTION:Use a block of wood between oil pan and floor jack, or oil pan may be damaged.
6.Position floor jack under engine. Raise engine slightly to release pressure from mounting insulator on front of engine. Marking installed position for installation reference, remove engine front support insulator from timing belt end of engine.
7.Remove power steering pressure hose bracket from engine lifting eye, and position aside. Remove the timing belt upper cover bolts, but leave the timing belt cover in its installed position. Remove the timing belt center cover/front engine mounting bracket . Remove the timing belt upper and center covers.
CAUTION:DO NOT pull the spark plug cable when removing the spark plug connectors. If necessary, remove the ignition cables from the ignition coil to avoid kinking the cables. Turn the spark plug connectors
slightly before removing to loosen the seal.
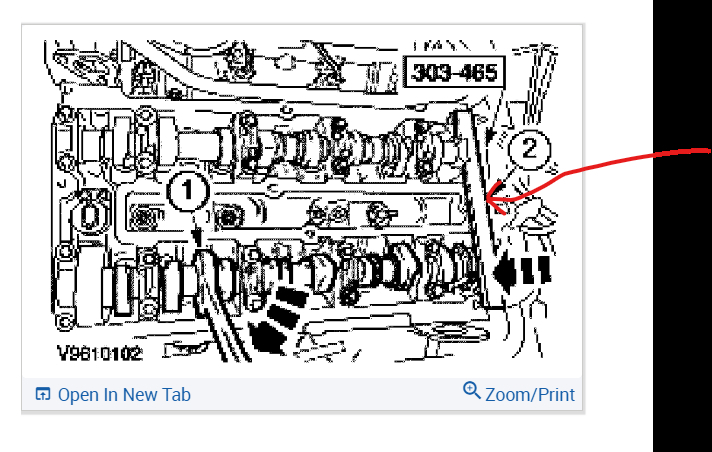
8.Disconnect throttle cable and cruise control cable from engine appearance cover. Disconnect solenoid valve electrical connector (1), and remove the engine appearance cover (2). Pull off the spark plug connectors in line with the spark plugs. Remove the PCV hose. Loosen 10 valve cover bolts from the outside to the inside, working diagonally.. Remove the valve cover.
9.Remove the spark plugs. Turn the engine to TDC on cylinder No. 1. To remove the tension on timing belt, unscrew the timing belt tensioner bolt (1) 4 turns. Position the tensioner so the locating tab (2) is at approximately the 4 o'clock position. Line up the hex key slot (3) in the tensioner adjusting washer with the pointer that is located behind the pulley.
CAUTION:To achieve proper tension when installing timing belt, camshaft sprocket bolts must be loose enough to allow sprockets to turn freely on the camshafts.
10.Remove blanking plug (1) from center of exhaust camshaft pulley. Loosen, but do not remove, exhaust camshaft sprocket bolt (2). Loosen, but do not remove, intake camshaft sprocket bolt (3). Remove timing belt.
Images (Click to enlarge)
Mar 31, 2009 at 9:40 PM