Posted By: diag tech 1 Flag Post For Monitor Review
Shop: WILLIAMS BROTHERS AUTO SERVICE
Date: 8/8/2008 3:42:20 PM
Im going to share this because it took quite a wile to find the answer. If you have the exaust cam out of the head for any reason and it looses oil pressure in the cam gear head DO NOT crank it after new belt install. You have to line your cams and crank then install belt and after tensoiner is tightened thenremove cam holding tool and crank pin, then torq your cam gears to spec by holding cams with 1 inch wrench. Then to build up oil pressure turn motor over by hand (it wont bend valves but cranking with starter will). Turn over by hand until no more squish sound and you see oil on cams, then align crank balancer mark to oil pan mark and recheck your cam alignment. It took about 15 to 20 turns before all the slack in the exhaust cam gear was taken up by oil pressure.
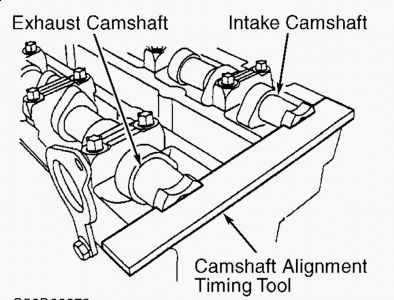
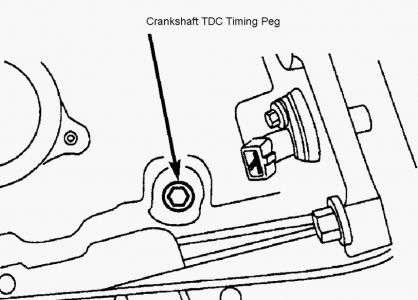
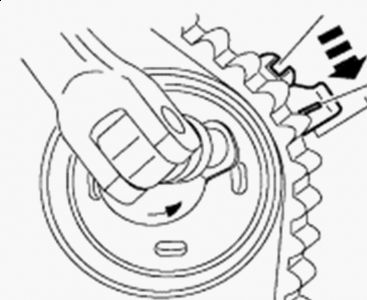
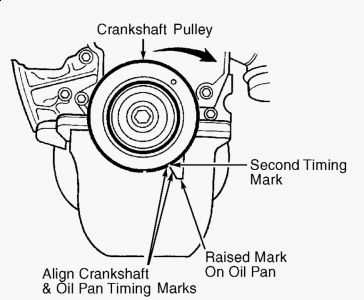
1. Ensure crankshaft pulley timing marks are aligned. See Fig. 2 . Use Camshaft Alignment Timing Tool (T94P-6256-CH) to align camshafts. Install tool in slots on camshafts at rear of engine. See Fig. 3 . Ensure camshafts are aligned. Install intake timing sprocket and loosely install bolt. Rotate oil control bushing one complete turn and check for binding. Position bushing with single hole in 12 o'clock position. 2. Install NEW exhaust sprocket "O" ring. Install exhaust sprocket. Ensure tab on sprocket engages hole in oil control bushing. Loosely install sprocket bolt. Loosely install timing belt tensioner. Starting from crankshaft timing belt pulley and working counterclockwise, position timing belt in place while keeping it under tension. See Fig. 4 . Engage timing belt tensioner tab into upper timing cover backplate. Position hex key slot in tensioner adjusting washer to 4 o'clock position. Tighten attaching bolt enough to seat tensioner firmly against rear timing cover, but still allow tensioner adjusting washer to be rotated using a 6 mm hex key. Using hex key, rotate adjusting washer counterclockwise until notch in pointer is centered over index line on locating tab (pointer will move clockwise during adjustment). See Fig. 5 . While holding adjusting washer in position, tighten bolt to 17-20 ft. lbs. (22-28 N.m). 3. Tighten intake camshaft sprocket bolt to 50 ft. lbs. (68 N.m). Tighten exhaust camshaft sprocket bolt to 36 ft. lbs. (50 N.m). Remove camshaft alignment tool and timing peg. Retighten exhaust camshaft sprocket bolt to 85-92 ft. lbs. (115-125 N.m). Install Variable Cam Timing (VCT) oil plug. 4. Position crankshaft just prior to TDC. Install TDC timing peg. See Fig. 1 . Rotate crankshaft clockwise against peg. Install camshaft special alignment tool. If necessary, loosen timing pulleys and correct camshaft alignment. 5. When alignment is correct, complete installation by reversing removal procedure. When installing valve cover, clean gasket mating surfaces before installing NEW gasket. Install and tighten valve cover bolts in a diagonal pattern starting from the inside working outward. See Fig. 6 . Tighten all nuts and bolts to specification. See TORQUE SPECIFICATIONS . CAUTION: The VCT sprocket has a rectangular tab on the backside of the sprocket which must align with the hole on the front face of the thrust bushing. Failure to align may result in poor engine performance. NOTE: Lug of belt tensioner should not be hooked in sheet metal cover during timing belt installation. NOTE: Camshaft must be held stationary with an open end wrench. DO NOT use alignment tool to hold camshaft in position, as damage to camshaft may occur.
Dec 4, 2009 at 3:42 AM