HI,
If it is related to the timing chain, the engine doesn't need to come out. It is tight, but can be done in vehicle.
The vehicle has two chains. One is for the cams and the other is lower.
Here are the directions for both. You can take a look through them and see what is involved.
I will start with the camshafts chain. The attached pics correlate with the directions.
_____________________________
2009 Volkswagen Passat Sedan (3C2) L4-2.0L Turbo (CCTA)
Camshaft Timing Chain, Removing and Installing
Vehicle Engine, Cooling and Exhaust Engine Timing Components Timing Chain Service and Repair Removal and Replacement Camshaft Timing Chain, Removing and Installing
CAMSHAFT TIMING CHAIN, REMOVING AND INSTALLING
Camshaft Timing Chain, Removing and Installing
pic 1
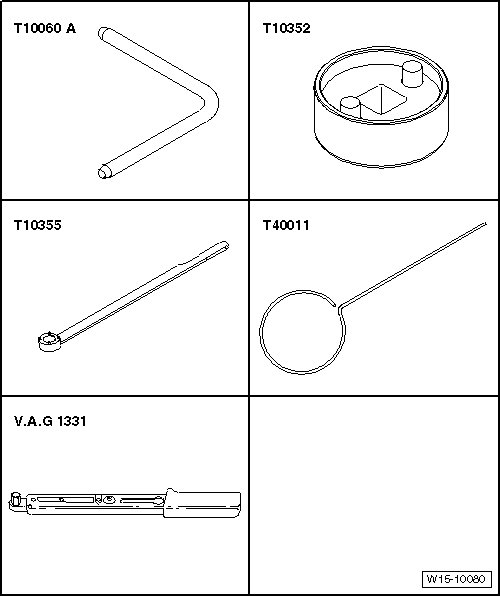
Special tools, testers and auxiliary items required
Drift (T10060 A)
Counter-holder tool (T10355)
Assembly Tool 10352 (T10352)
Securing pin (T40011)
Torque Wrench (V.A.G 1331)
Removing
- Remove timing chain upper cover => [ Upper Timing Chain Cover, Removing and Installing ] See: Timing Cover > Removal and Replacement > Upper Timing Chain Cover, Removing and Installing.
CAUTION!
The control valve has a left thread.
- Remove the control valve using Assembly Tool 10352 (T10352) in the - direction of arrow -.
Pic 2
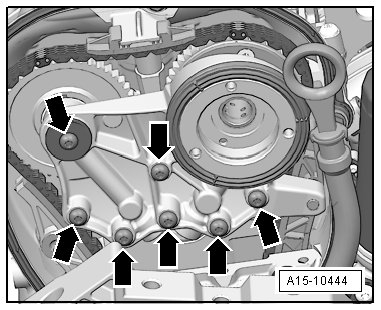
- Remove the bolts - arrows - and remove the bearing bracket.
Pic 3
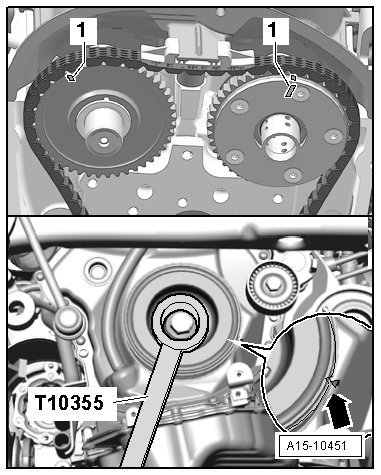
- Rotate the vibration damper using the Counter Hold Tool (T10355) into the "OT" position - arrow -.
Pic 4
The notch on the vibration damper must line up with the arrow marking on the timing chain lower cover.
The markings - 1 - on the camshafts must point upward.
- Remove the lower timing chain cover => [ Chain Drive ] See: Engine > Removal and Replacement > Chain Drive.
- Press the oil pump chain tensioner in the - direction of the arrow - and secure it with a locking pin (T40011).
Pic 5
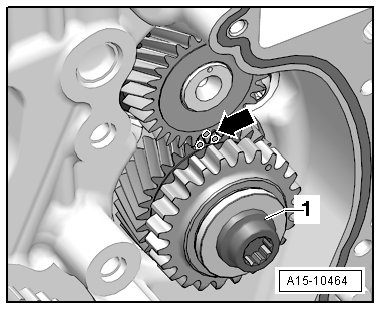
- Remove the oil pump chain tensioner - 1 -.
- Remove the oil pump chain tensioner.
- Using a screwdriver, lift the chain tensioner locking wedge in the - direction of arrow 1 -, press the timing chain tensioning rail in the - direction of arrow 2 - and secure it with Locking Pin (T40011).
Pic 6
- Remove the timing chain tensioning rail - 2 -.
Pic 7
The intake camshaft switches in the engine direction of rotation
- Remove the timing chain.
Installing
Tightening specifications => [ Camshaft Timing Chain, Assembly Overview ] See: Timing Chain > Removal and Replacement > Camshaft Timing Chain, Assembly Overview.
The following must be performed in one sequence; 2 technicians are necessary.
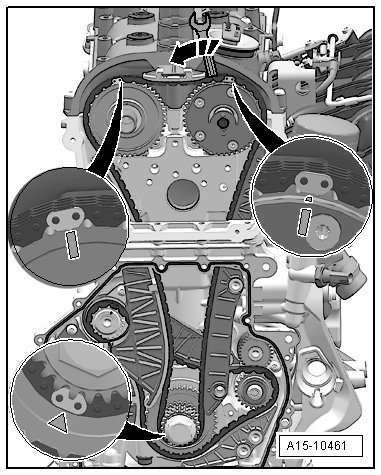
The painted links of the timing chain must be positioned on the markings on the chain sprockets.
Hold the wrench until the tensioning rail is installed.
- Mount the timing chain on the exhaust camshaft.
Pic 8
- Mount the timing chain on the crankshaft.
- Turn the intake camshaft using the wrench in the - direction of the arrow - and mount the timing chain.
- Install the timing chain tensioning rail and tighten the bolt - 2 -.
Pic 9
- Mount the bearing bracket and hand tighten the bolts - arrows -.
Pic 10
- Remove the locking pin (T40011).
- Tighten the bearing bracket bolts - arrows -=> [ Camshaft Timing Chain, Assembly Overview ] See: Timing Chain > Removal and Replacement > Camshaft Timing Chain, Assembly Overview.
The rest of the assembly is basically a reverse of the disassembling sequence.
_______________________________
Here are directions for the lower (balance shaft) chain.
2009 Volkswagen Passat Sedan (3C2) L4-2.0L Turbo (CCTA)
Balance Shaft Timing Chain, Removing and Installing
Vehicle Engine, Cooling and Exhaust Engine Cylinder Block Assembly Balance Shaft Chain Service and Repair Removal and Replacement Balance Shaft Timing Chain, Removing and Installing
BALANCE SHAFT TIMING CHAIN, REMOVING AND INSTALLING
Balance Shaft Timing Chain, Removing and Installing
Removing
- Remove timing chain upper cover => [ Upper Timing Chain Cover, Removing and Installing ] See: Timing Cover > Removal and Replacement > Upper Timing Chain Cover, Removing and Installing.
- Remove the lower timing chain cover => [ Chain Drive ] See: Engine > Removal and Replacement > Chain Drive.
- Remove the camshaft timing chain => [ Camshaft Timing Chain, Removing and Installing ] See: Timing Chain > Removal and Replacement > Camshaft Timing Chain, Removing and Installing.
- Remove the guide rail for the camshaft timing chain - 1 -.
Pic 11
- Remove chain tensioner for camshaft timing chain - 3 -.
- Remove the balance shaft chain tensioner - 1 -.
Pic 12
- Remove the tensioning rail - 2 -.
- Remove the guide rail - 3 -.
- Remove the guide rail - 4 -.
- Remove the timing chain.
Installing
Tightening specifications => [ Balance Shaft Timing Chain, Assembly Overview ] See: Balance Shaft Chain > Removal and Replacement > Balance Shaft Timing Chain, Assembly Overview.
- Turn the intermediate shaft sprocket/balance shaft to the marking - arrow -.
Pic 13
Due to the ratio, the marking align only every 7th turn.
- Mount the timing chain; the painted links of the timing chain must be positioned on the markings on the chain sprockets.
Pic 14
- Install the timing chain tensioning rail and tighten the bolt - 2 -.
Pic 15
- Install the timing chain guide rail and tighten the bolts - 4 -.
- Install the timing chain guide rail and tighten the bolts - 3 -.
- Insert the timing chain tensioner - 1 - with locking compound.
- Check this adjustment one more time.
Pic 16
- Check the markings on the intermediate shaft sprocket/balance shaft - arrow -
pic 17
The marking on the intermediate shaft sprocket/balance shaft is shown with the chain removed.
The rest of the assembly is basically a reverse of the disassembling sequence.
___________________________
Let me know your thoughts. If you have other questions, feel free to ask.
Take care,
Joe
Images (Click to make bigger)
Tuesday, February 11th, 2020 AT 6:39 PM