Hi,
It sounds like a problem with what is called the mode door actuator. The mode actuator is what controls airflow direction. It sounds like it isn't changing from defrost.
Take a look through this link:
https://www.2carpros.com/articles/air-vents-stay-in-the-defrost-position
What I would suggest is to remove the mode actuator and see if there is a problem with it or where it mounts. Here are directions specific to your vehicle for testing and replacing one. The attached pics correlate with the directions.
_____________________________________
2014 Kia Cadenza V6-3.3L
Repair Procedures
Vehicle Heating and Air Conditioning Air Door Actuator / Motor Service and Repair Removal and Replacement Mode Control Actuator Repair Procedures
REPAIR PROCEDURES
Inspection
1. Ignition "OFF"
2. Disconnect the connector of mode control actuator.
3. Verify that the mode control actuator operates to the defrost mode when connecting 12V to the terminal 3and grounding terminal 7.
4. Verify that the mode control actuator operates to the vent mode when connecting in the reverse.
pic 1
pic 2
5. Check the voltage between terminals 4 and 5.
Specification
pic 3
It will feedback current position of actuator to controls.
6. If the measured voltage is not specification, substitute with a known-good mode control actuator and check for proper operation.
7. If the problem is corrected, replace the mode control actuator.
Replacement
1. Disconnect the negative (-) battery terminal.
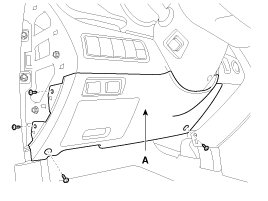
2. Remove the crash pad left side cover (A).
pic 4
3. Remove the console side cover [LH].
4. Remove the crash pad lower cover (A) by loosening the mounting screws.
pic 5
5. Disconnect the diagnosis connector (A) and then remove the crash pad lower cover.
pic 6
6. Remove the left shower duct (A).
pic 7
7. Remove the BCM(A) by loosening the mounting bolt and nut.
pic 8
8. Disconnect the mode control actuator connector (A).
9. Loosen the mounting screw and then remove the mode control actuator (B).
pic 9
10. Installation is the reverse order of removal.
____________________________________________
I hope this helps. Let me know if you have other questions.
Take care and God Bless,
Joe
Images (Click to make bigger)
SPONSORED LINKS
Thursday, February 4th, 2021 AT 4:38 PM